

By default, every Linux OS has an efficient memory management system used to clear the buffer cache periodically. You can manually free up the memory cache with the following simple command:
Als root anmelden
su root
dann den Befehl ausführen:
sk@sk:~$ sudo sh -c "sync; echo 3 > /proc/sys/vm/drop_caches"
However, if you want to force the Linux OS to do clearing memory cache on a particular interval, just add the command to cron job. Here, I show you how.
Open up your terminal and enter the following command to create a file called cacheclear.sh. Say for example, I create cacheclear.sh file in my /home directory:
sk@sk:~$ sudo vi /home/cacheclear.sh
Add the following lines to cacheclear.sh file:
#!/bin/sh sudo sh -c "sync; echo 3 > /proc/sys/vm/drop_caches"
Save and exit the file. Now add this file to your crontab:
sk@sk:~$ sudo crontab -e
This command opens the current user cron file. If you want to set it to some other user, use the following command instead:
sk@sk:~$ sudo crontab -e -u username
Add the following line at the end:
0 * * * * /home/cacheclear.sh
Save and exit the file. Once you’re done, cron job will run this command every hour and will clear the system memory caches.
TMPREAPER räumt das /tmp auf
Auf Distributionen wie RedHat und SuSE kommt ein Prozess „tmpwatch“ über Cron eingeplant bei der Defaultinstallation bereits mit. Der Prozess hat eine Konfiguration im /etc/cron.daily Verzeichnis und wird täglich aufgerufen. Dabei prüft er auf Dateien im /tmp Verzeichnis deren Zugriffszeit älter als 7 Tage ist und löscht die Treffer. Er räumt also kontinuierlich das /tmp Verzeichnis auf.
Bei meinem Ubuntu Server ist mir jetzt nach einiger Zeit aufgefallen das ich diverse sess_* Files (Session Files von PHP) in meinem /tmp Verzeichnis halt. Irgendwas mit 97000 Stück. Blöd, hab ich nicht drauf geachtet.
Im Ubuntu Repository habe ich ein Programm tmpreaper gefunden welches den gleichen Zweck erfüllt wie das mir bekannte tmpwatch. Es bringt eine Konfigurationsdatei /etc/tmpreaper.conf mit welche auch recht übersichtlich gestaltet ist. Außerdem trägt es sich auch ins /etc/cron.daily Verzeichnis ein und wird dadurch täglich durch cron gestartet.
Installieren könnt ihr tmpreaper über:
sudo apt-get install tmpreaper
Anschließend solltet ihr noch die Konfigurationsdatei /etc/tmpreaper.conf bearbeiten und folgende Zeile auskommentieren ansonsten läuft tmpreaper nicht automatisch los, siehe HowTo Files:
SHOWWARNING=true
Die restlichen Optionen sind auch recht gut beschrieben. Ihr müsst aber nichts weiter editieren um euer /tmp nun sauber zu halten.
Ramdisk
Auf Desktop oder Notebook kann man /tmp als tmpfs-Ramdisk einzbinden. Das ist (meist) die bessere Entscheidung. Dazu muss der unten stehende Eintrag In die etc/fstab gemacht werden:
tmpfs /tmp tmpfs nodev,nosuid,mode=1777 0 0
oder besser den Speicherplatz der RAM-Disk auf 512 MB begrenzen:
tmpfs /tmp tmpfs defaults,noatime,nosuid,nodev,noexec,mode=1777,size=512M 0 0
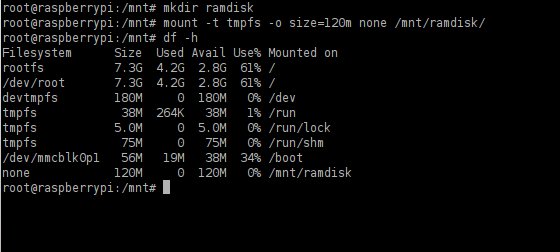
Manuell kannst Du das so testen. Erst einmal erstellst Du zum Beispiel ein Verzeichnis /mnt/ramdisk. Der Mount-Befehl sieht dann zum Beispiel so aus:
mount -t tmpfs -o size=120m none /mnt/ramdisk
Mithilfe von df -h kannst Du dann überprüfen, ob das geklappt hat.
Natürlich lässt sich das auch über die Datei /etc/fstab realisieren.
tmpfs /mnt/ramdisk tmpfs nodev,nosuid,noexec,nodiratime,size=120M 0 0
Dann wird die Ramdisk bei jedem Neustart erschaffen.

Natürlich sind die Inhalte einer Ramdisk verloren, sobald Du den Rechner neu startest oder der Strom ausfällt und so weiter. Bei Cache-Dateien ist mir das allerdings herzlich egal. Dafür schone ich SD-Karte, SDD, Flash-Speicher …