
You made backups with a third-party application called SuperDuper!. Now maybe the time has come to transfer your backup onto another hard drive. Maybe the unthinkable happened and your primary hard drive failed. Or maybe you just replaced your primary hard drive with a new, larger drive. Whatever the case, you need restore from your SuperDuper! backup.
Here’s how to restore from a SuperDuper! backup:
- Connect the backup drive to the computer, if it is not already connected. (If your primary hard drive has failed, you can boot from your SuperDuper! backup drive by using it as the startup disk. For instructions, see How to Change Your Mac’s Startup Disk.)Note: You cannot restore the backup to the current startup disk.
- Open the SuperDuper! application. The window shown below appears.
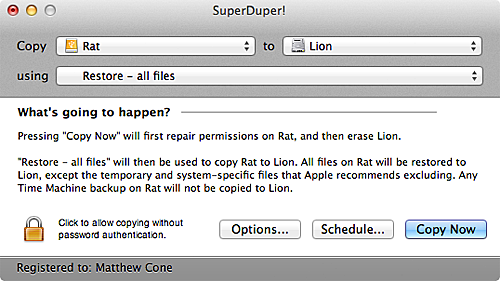
- Select the backup disk from the Copy menu.
- From the To menu, select the hard disk you want to restore the backup to.
- From the Using menu, select Restore – all files.
- Click Copy Now. SuperDuper! starts restoring your backup to the selected hard drive. Depending on the size of your hard drive, this can take a couple of hours. You can continue using your computer while SuperDuper! is restoring the hard drive.
How to Change Your Mac’s Startup Disk
When your Mac turns on, it loads the operating system on the designated startup disk, a hard disk or partition containing the Mac OS X operating system. Normally, the startup disk is set as the hard disk inside of your computer, but you can use an external hard drive, USB thumb drive, or DVD as your startup disk.
Changing the Startup Disk with System Preferences
Here’s how to change your Mac’s startup disk:
- Connect the drive you want to use as a startup disk to your computer.
- From the Apple menu, select System Preferences.
- Select Startup Disk. The window shown below appears.
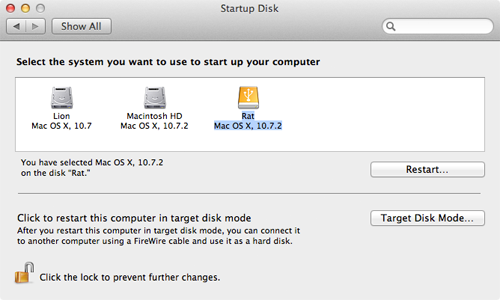
- Select the hard disk or partition you want to use as the startup disk.
- Click Restart to restart your computer and boot from the selected startup disk.
To change your startup disk back to the primary disk, repeat the instructions and select the primary disk as the startup disk.
Changing the Startup Disk at Boot
There’s also a way to select a startup disk immediately after you turn on your Mac. Here’s how:
- Connect the drive you want to use as a startup disk to your computer.
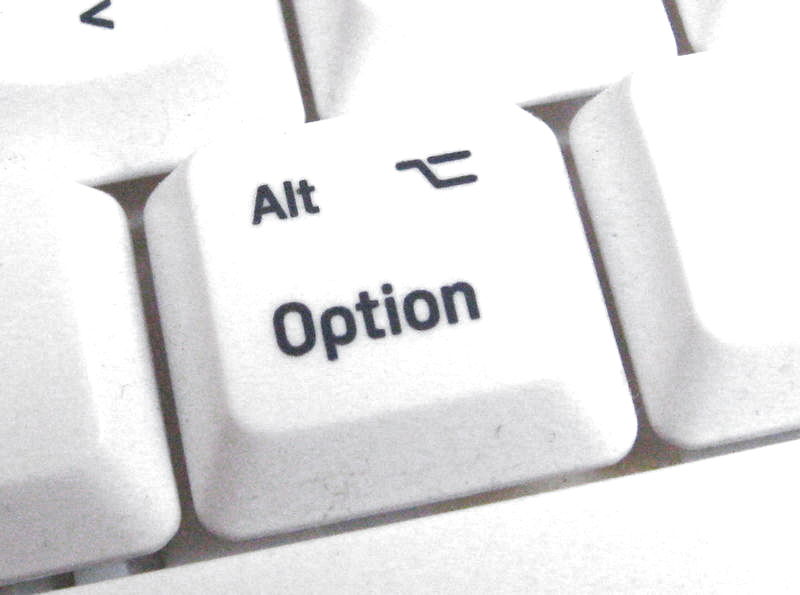
- Press the power button to turn on the computer.
- Immediately press and hold down the Option key.
A screen displaying all of the available startup disks appears.
- Select the disk you want to use as a startup disk.
- Click the arrow directly below the drive. Your Mac boots from the startup disk you selected.
This is an easy way to select a startup disk before your computer turns on. It works well when troubleshooting potential problems with your Mac, especially if you can’t boot from the primary hard drive to access System Preferences.