Tips and Tweaks for Chromebook
Chromebook is a little different to Windows and OS X, and at first glance it may appear to be a little limited as a platform. But scratch beneath the surface and you’ll find that it is as customizable and as versatile as just about anything else you may have used.
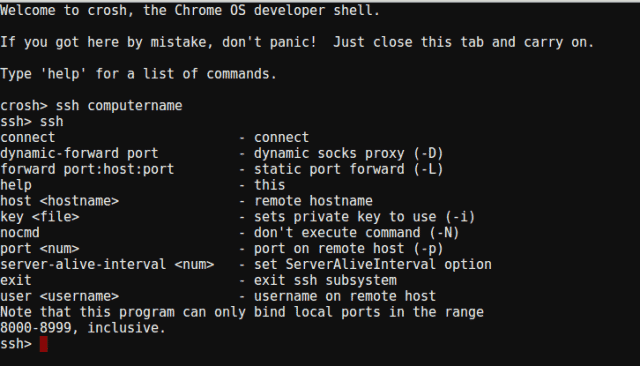
Access Terminal
Chrome OS includes a terminal tool that is great for advanced users. To access Crosh (Chrome Shell), press Ctrl + Alt + T. Once you’re there, there are various commands available to you such as ‘ping’. Server administrators can also take advantage of Secure Shell by typing ssh at the terminal.
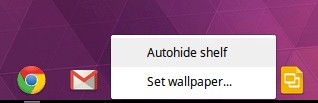
Gain More Screen Space
You can make the most the screen space you have available to you by opting to hide the app shelf. This is a simple tweak, but it’s one that’s easily forgotten yet incredibly useful. Tap with two fingers on the shelf and select the Autohide shelf option. To access your shortcuts, just move your mouse to the bottom of the screen and the shelf will slide back into view ready to use.
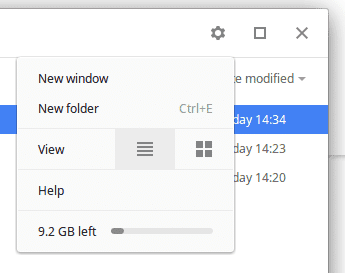
Monitor Available Storage
Chromebook is all about storing data in the cloud, but downloads will usually be stored locally and you’ll need to keep an eye on the amount of space you have left.
The easiest way to do this is to click the gear icon in the Files app but you can view a slightly more detailed breakdown by typing chrome://quota-internals/ into Chrome’s address bar.
Discover Keyboard Shortcuts
There are lots of very useful keyboard shortcuts that you can use to speed up all sorts of everyday operations. But there is one keyboard shortcut that everyone should know: press Ctrl + Alt + ? and you’ll see an on-screen keyboard that can be used to discover all of the available shortcuts. Just press a key, such as Ctrl or Shift, and as you press keys you’ll be shown what tasks they perform.
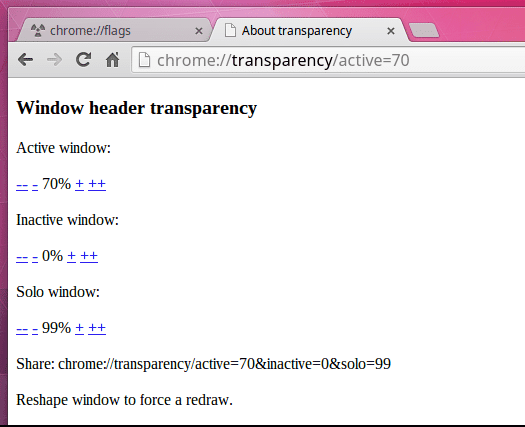
Adjust Windows Transparency
There may not be a huge number of options when it comes to changing the look and feel of your Chromebook, but if you fire up Chrome and pay a visit to chrome://transparency. Hre you can use the controls to adjust the transparency of window titlebars — it’s a small things, but it makes a difference.
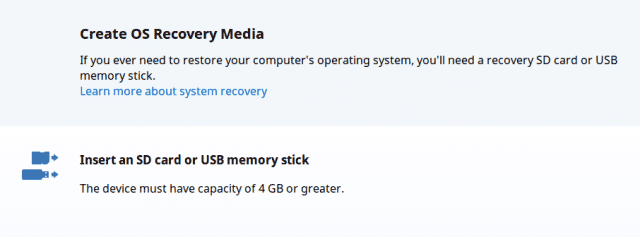
Create a Recovery Disk
If you’re lucky you may find that your Chromebook comes with recovery media, but this is probably not the case. But panic not! You can create your own with little more than a USB drive.
Grab yourself a drive of at least 4GB in size — create a backup of anything you have stored on it as it will be lost — and pay a visit to chrome://imageburner in Chrome. You will then be guided through the process of creating a recovery drive which you can use whenever the need arises.
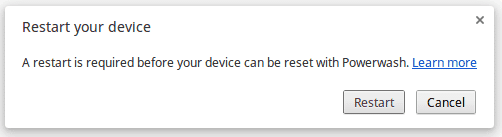
Perform a Powerwash
An alternative to recovery your computer is to perform a factory reset — also known as a powerwash. This can be useful if you want to change the device owner; by default, the first account that is created becomes the device owner and this cannot be changed. To wipe out settings and start again, launch Chrome, click the menu to the upper right and select Settings.
Scroll down to the bottom and click the Show advanced settings link before clicking the Powerwash button. Click Restart and everything will be wiped out ready for you to start all over again.
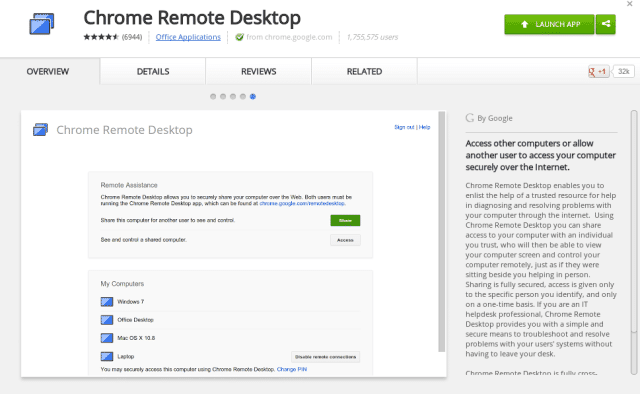
Remotely Access Another Computer
While your Chromebook is a great tool, there are going to be times when you wish you could take advantage of some of the apps you have installed on your Mac or PC. There’s no need to switch machines — all you need to do it installed Chrome Remote Desktop.
Click the Extensions link to the left of the Settings page in Chrome and click Get more extension before performing a search. Once installed, you can use the extension to remotely log into your other computer and use it as if you were sitting in front of it.
Remote over Web-App: https://remotedesktop.google.com/access
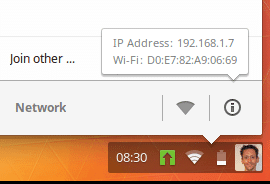
Check your IP Address
If you need to quickly check your IP address, you may wonder how to go about finding it — it’s certainly not immediately obvious. Click your profile picture in the lower right hand corner of the screen and then click the name of the network you are currently connected to. To the bottom of this popup menu, click the ‘i’ button and a tooltip will appear displaying your IP and Mac addresses.
Screenshots in Chrome OS mit Tastatur
Wenn du ein klassisches Chromebook, Convertible oder Chrome OS Tablet mit Tastatur hast, kannst du Screenshots auch per Tastenkürzel erstellen. Dafür drückst du einfach die folgende Tastenkombination: Strg + F5.
Mit dem Shortcut Strg + Umschalttaste + F5 kannst du außerdem nur einen bestimmten Bereich des Bildschirms ausschneiden.
Use The Chrome App Launcher as a Calculator

Not being the best with numbers I often resort to double-checking my sums using a calculator. In Chrome you can subtract the hassle of opening an app, launching a website or reaching for your phone by using the Chrome App Launcher to perform simple sums instead.
Just like Google (the search engine) basic sums can be calculated quickly, and it supports semi-advanced features like brackets, tan, cos and sine.
Use Chrome App Launcher as a Unit Convertor
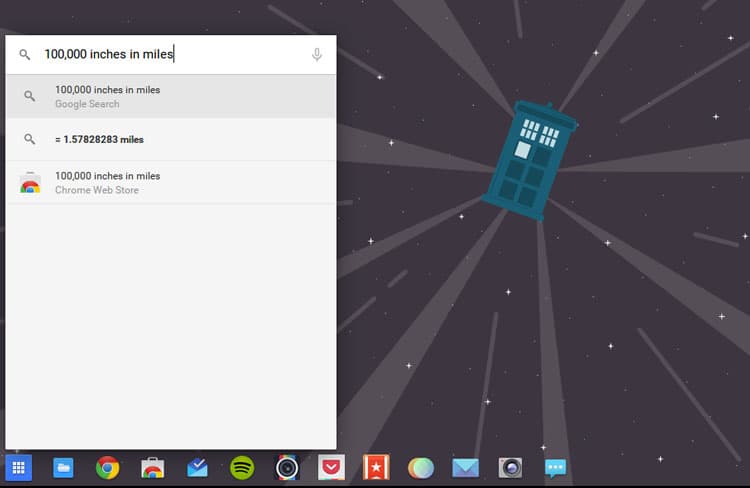
Are the sums you’re making of the measurable variety? If so, you can perform on-the-fly conversions in the launcher too.
Just express your query as“{num} {original unit} in {needed unit}” and the result will appear .
Supported/example conversations include grams to kilograms, millilitres to tablespoon, miles to km, meters, cm, mm, inches… and so on.
Use Chrome App Launcher to Open Apps By Voice
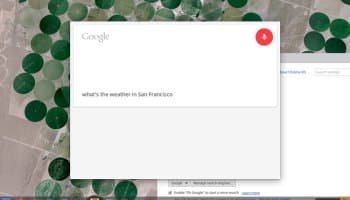
You can do more than check the weather
Google’s Launcher also has built-in voice search capabilities (which can even be set to “always listening” in the latest developer builds).
Aside from barking random search terms at your device you can also launch apps installed on your Chromebook by saying their name:
So, for example, saying “Ok, Google – Wunderlist” will launch Wunderlist (assuming it is installed).
For what it’s worth you don’t even need to say the entire word. For example “cal” would launch any shortcut, website or app result that matches.
Ok Google — that’s neat!
Close Tabs Quickly and Open Links in Background
If you have a mouse with a clickable middle button, or a Chromebook with a gesture-enabled touchpad, you can speed up two common activities: opening links in background tabs and closing tabs that are already open.
If you open links using Right-Click > Open Link in Background Tab, you should stop. It’s far faster to just “click” on the link in question with a three finger tap on your trackpad or by clicking the scroll-wheel on your mouse.
Same goes for closing tabs. Just hover over the tab you wish to close and tap with three fingers or click with your mouses’ third button and… vamoose!
Access ‘Delete’
Chrome keyboards don’t come with a traditional delete key. To delete files or text ‘the wrong way’ without using your mouse just position your mouse at the right point in your document/click the file you wish to ditch and hit:

Paste Text Without Formatting
Pasting text from a word document, web page into an email often carries over text formatting, e.g., different fonts, text sizes, etc. To paste text without formatting press:

Skip/Select Words in a Document
Don’t wear your back-arrow key out trying to move to a specific part of a document letter by letter. Instead use the following modifier to jump back/forwards by word.

To select/highlight words as you jump tap:

Hard Reboot
While you may never need to, on the forcibly reboot It’s not the ideal way to reboot but can be vital if you’re in a boot loop or sat facing a frozen screen.
Just be aware that any unsaved work, data, etc will be lost when using this method.

Note: this is a not a power wash or a factory reset.
What is the command for Ctrl-Alt-Del / STRG-ALT-ENTF – Affengriff on a Chromebook?
Search + Esc will open up Chrome’s task manager. Also, you can always just right click on a the border of a window, or under “More Tools” in the chrome menu, and hit “Task manager” (if you forget the shortcut).
Access More Google Drive Options
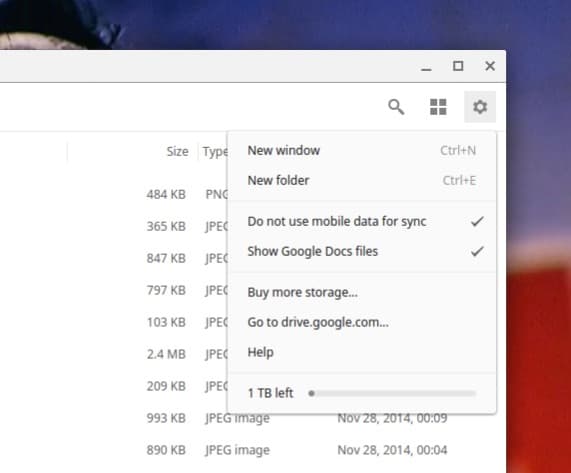
Developer and beta channel builds of Chrome OS now show an extended set of Drive options in the File Manager menu.
Stable you don’t have to wait; press Alt then Click the cog icon in the File Manager to choose whether mobile data is used for syncing, and whether Google Docs files show up.
Voice dictation
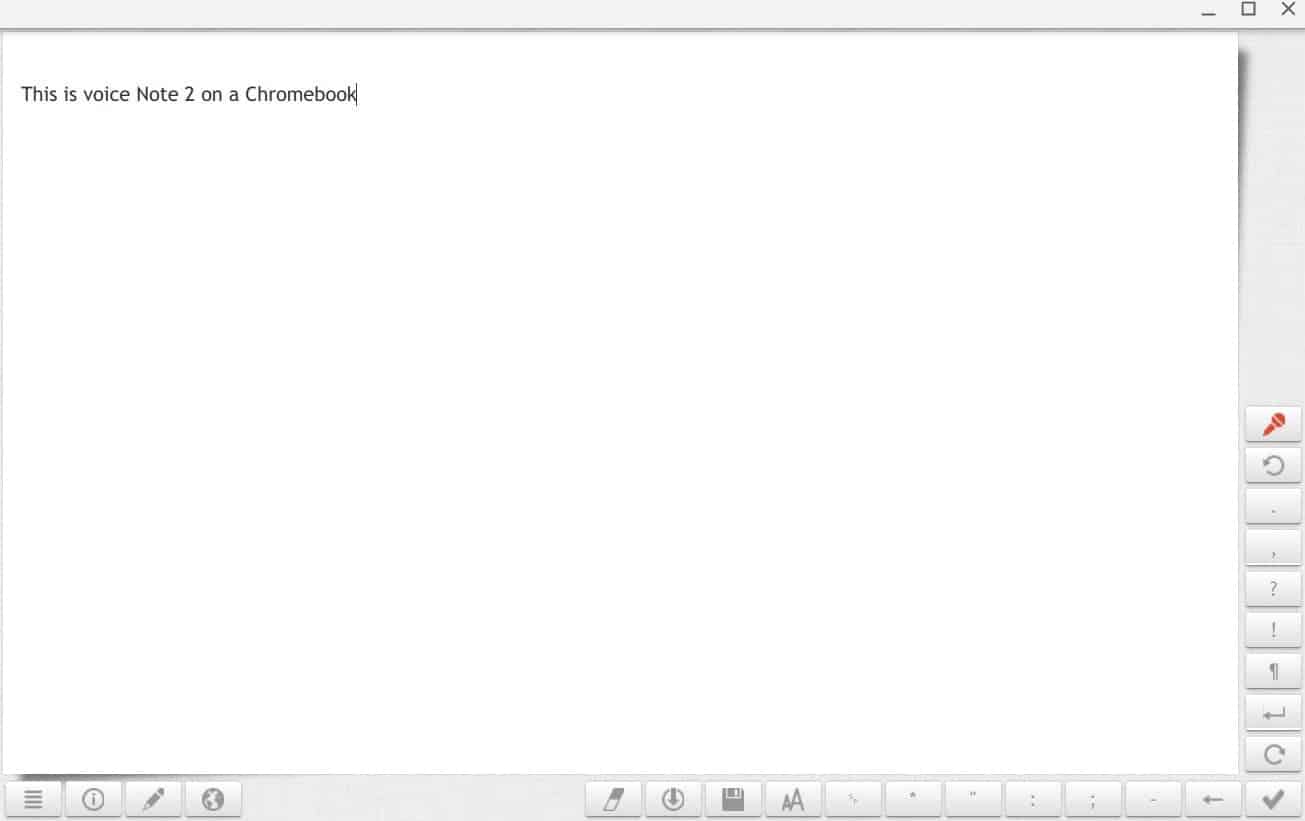
For those suffering from repetitive strain injuries or who would rather not type all the time, using a voice dictation app for document creation can help. There are several options for using voice dictation with Chromebooks, but two that I tried and liked were Google’s built-in dictation for Google Docs and the free Chromebook app VoiceNote II.
To use the feature on Google Docs, open a word processing document, and go to Tools > Voice typing in the menu. A small window with a microphone will open to the left of the document area. Click that and start dictating your document. The only problem with Google’s solution is that it was a little on the slow side in my tests.
When you need to dictate offline, VoiceNote II is a good choice. This Chrome app takes dictation very well. It’s not the best at doing edits such as properly interpreting what you mean by saying “delete” or “backspace,” but for the most part it works.
Chrome Remote Desktop
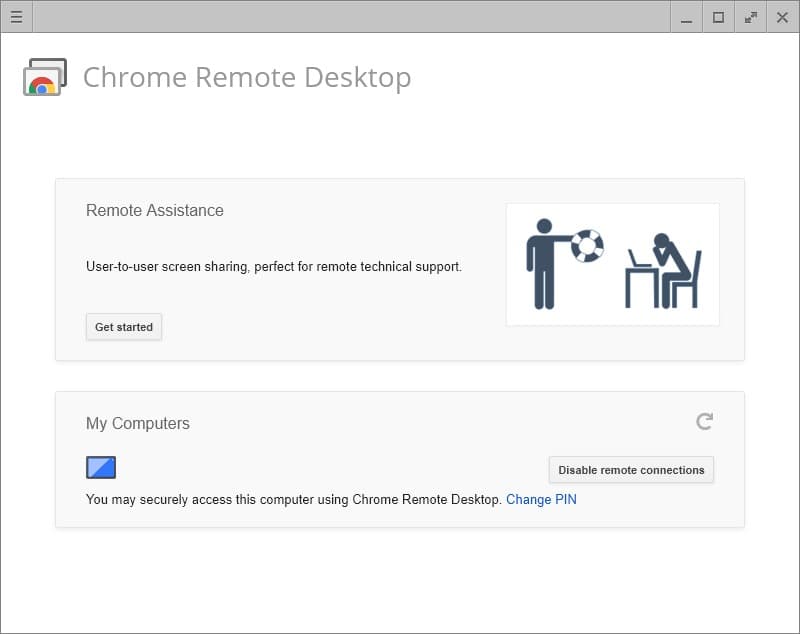
We’ve covered this before, but it’s hard to beat Google’s Chrome Remote Desktop for getting free access to your primary PC when you’re on a Chromebook. You can use this feature if you’re on the other side of the house or the other side of the country. The only thing to keep in mind is that you’ll need to make sure your Windows PC isn’t set to go idle. Otherwise, you won’t be able to access your machine using this method.
Once you’ve installed the Chrome Remote Desktop Chrome app on both PCs, it’s just a matter of opening Remote Desktop on your Windows machine. Then press Get started under My computers, and follow the instructions.
As part of the initial setup process you’ll need to install Chrome’s Remote Desktop Host controller and set a PIN. Once that’s done, open Chrome Remote Desktop on your Chromebook, click Get started under My computers, select the name of the Windows computer you just set up, enter the PIN, and you’re in.
Split your screen by snapping windows
Snap Windows to the Left and Right
If you have a Chromebook that supports a 1920 x 1080 resolution or higher, you probably don’t want to maximize your apps. For better productivity, you can make better use of your screen estate by keeping two windows open side by side.
An easy way to do this is drag windows to the left or right edge and Chrome OS will automatically snap them to the side and fill up half the screen. Or you can select a window and press Alt + [ for left snap or Alt + ] for right snap.
Save files straight to Google Drive
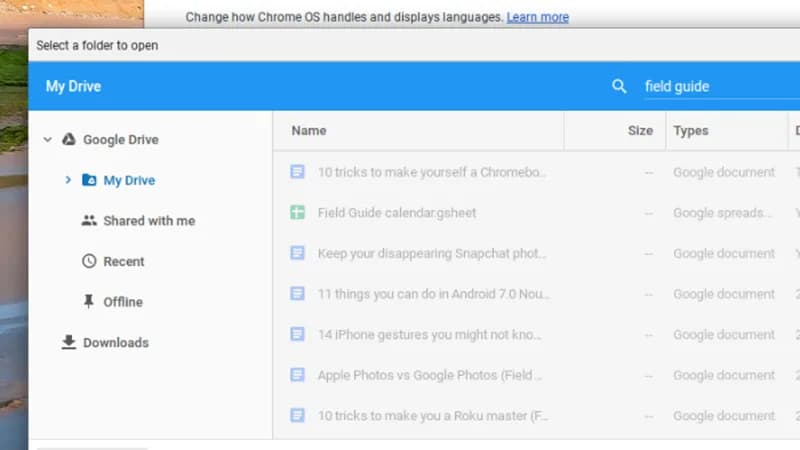
Chromebooks have limited local storage, but you’re encouraged not to use it, and Google Drive appears as an option whenever you download something from the web. To have Chrome OS save files straight to Google Drive with no prompt, open up the Settings dialog then click Show advanced settings.
Under Downloads, click Change, then specify your Google Drive (or any folder inside it), and click on Open. Back on the Settings screen, untick the box marked Ask where to save each file before downloading. The change is saved automatically and new downloads will go straight to your cloud storage.
Use Google Drive offline

Chromebooks have slowly been getting better at working without an internet connection, and Google’s office suite has been leading the way. You can create, edit, and view documents, spreadsheets, and presentations without any internet connectivity, but there’s a setting you need to enable first.
From the front My Drive view in Google Drive, click on the gear icon and choose Settings, then tick the box next to Offline labelled Sync Google Docs, Sheets, Slides & Drawings files to this computer so that you can edit offline. Any changes are automatically synced back when an internet connection is detected.
Mirror the display on a Chromecast
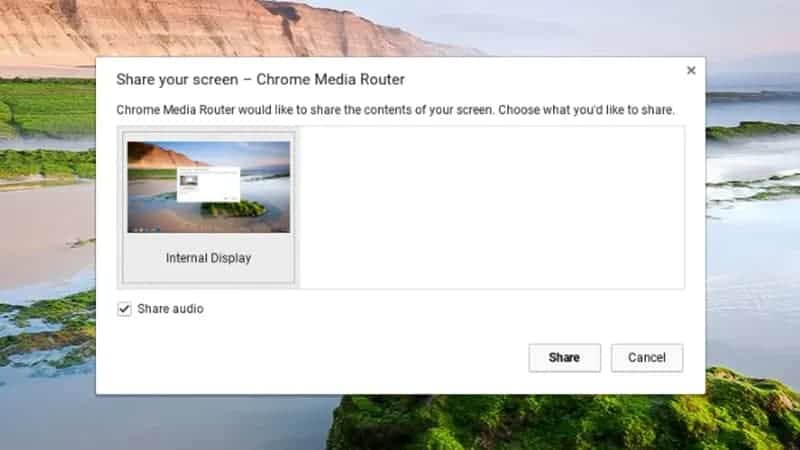
A Chromecast gives you an easy way of getting your laptop’s display up on your television screen. Click the status bar in the lower right-hand corner, then pick the Chromecast option and select your HDMI dongle from the list. Confirm the action on the next dialog box.
The casting feature lets you send audio as well as visuals over to the Chromecast dongle, so it’s one way of getting video from Chrome OS to a TV or monitor. It also works well for photo slideshows. To stop casting, click on the status bar again, then select Stop next to the Chromecast option on the pop-up menu.
Fit more on the screen

Most Chromebooks don’t come with the best-looking displays, but you can adjust this (and fit more on the screen) by clicking on Display settings in the Settings menu and changing the resolution manually. You can usually increase the resolution without causing any glitches.
Of course, there are also the standard zoom tools available in the Chrome browser as well if you’re having trouble fitting everything on one screen. Use the zoom tools in the main Chrome OS menu or Ctrl+plus or Ctrl+minus to change the zoom level. Ctrl+0 resets the zoom level back to 100 percent.
Unlock Chrome OS with your smartphone
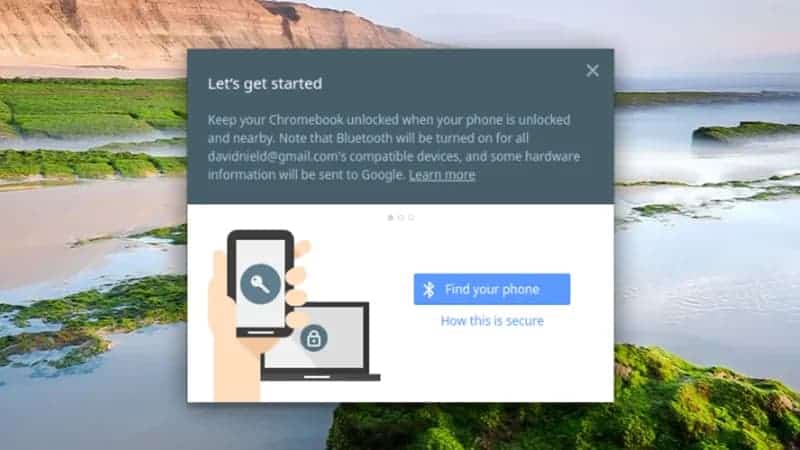
Having to type out your Google password every time you start up your Chromebook isn’t ideal, as secure as it might be. Instead, you can tell Chrome OS to sign you in automatically if it detects a trusted smartphone is nearby. Open up the Settings page then click Show advanced settings to get started.
Smart Lock is the option you need. Click Set up and you’ll be guided through the process of connecting Chromebook to phone (Bluetooth needs to be switched on on both devices). When your phone is in range in the future, you’ll just need to click on your user account avatar to get into your Chromebook.
Troubleshoot problems with the Chromebook task manager
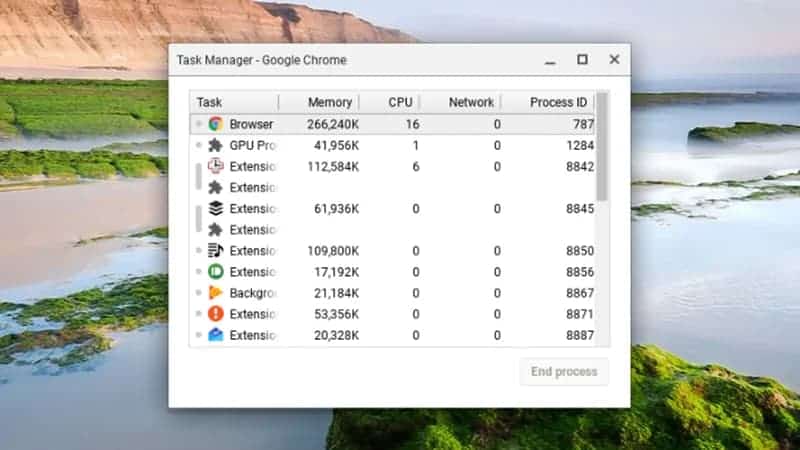
As straightforward and lightweight as Chrome OS is compared with other operating systems like Windows and macOS, there might still be occasions when you run into problems. If that happens, the task manager can help. Launch it with Shift+Esc from the desktop and it appears in a separate window.
It will be familiar to anyone who’s ever seen a task manager before. You can see each open tab and every running extension, together with how much CPU time, memory space and network bandwidth they’re all using up. Select any entry and click End process to stop any troublesome apps or add-ons.
Talk to your Chromebook
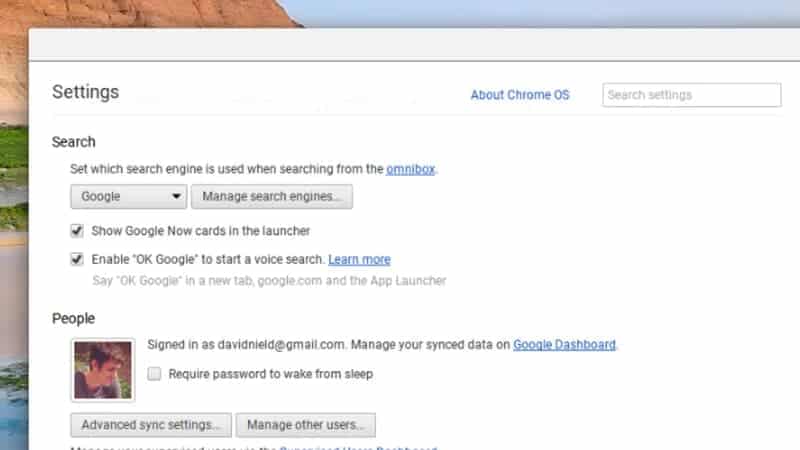
Everyone’s talking to their computers these days, and you can set up the same “OK Google” voice trigger available on Android on Chrome OS as well. All you need to do is open up the Settings dialog and tick the box marked Enable “OK Google” to start a voice search (under the Search heading).
With that done, you can say “OK Google” on the Google website, with a new tab open, or with the Chrome OS app launcher. You’ll need to grant permission to use the microphone the first time, and you can then run any search query using your voice, with the results shown on screen and read back to you.
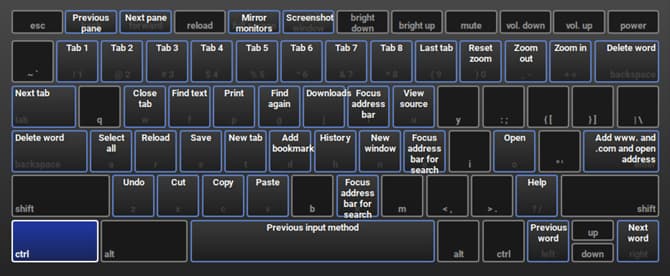
Learn some Chromebook keyboard shortcuts
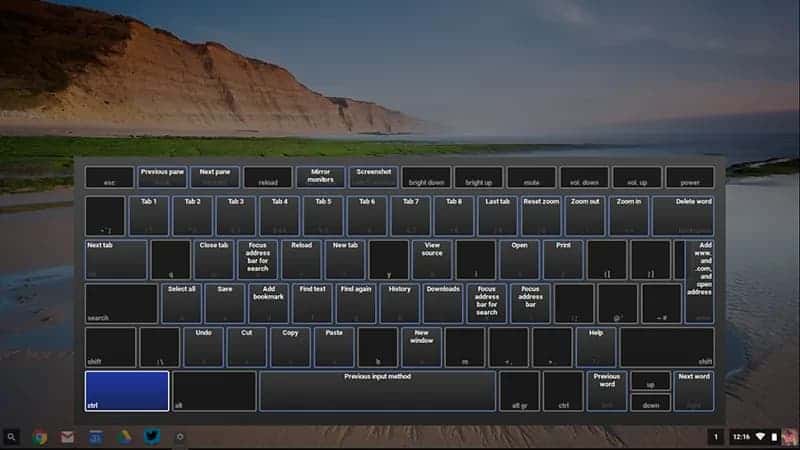
The Chromebook keyboard has some unusual tweaks—a search key instead of a Caps Lock button for example—and there are also plenty of keyboard shortcuts built into the OS. To see them all, press Ctrl+Alt+?. Hold down Alt, Ctrl, Shift or Search to see the shortcuts associated with each one.
There are plenty of shortcuts to play around with but some of the ones we found ourselves using most often include Ctrl+W to close a tab and Ctrl+Shift+T to bring back the most recently closed tab. Alt+[ or Alt+] are also useful shortcuts for docking Chrome OS windows to the left or right of the display.
Open Apps in Separate Windows
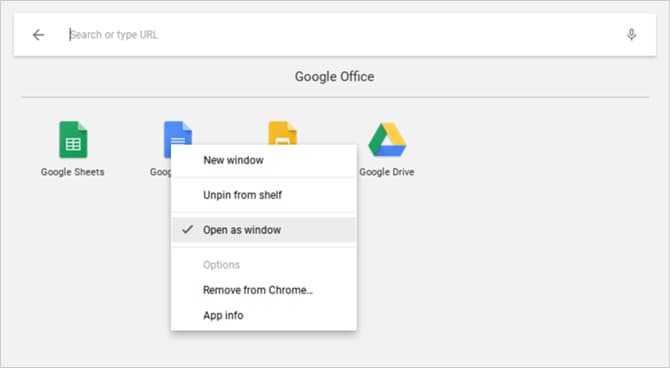
Since all Chromebook apps are actually web apps in disguise, first-time users tend to be put off by the fact that apps always open in Chrome. Fortunately, it’s possible to force any installed app to open in its own separate window.
Find the desired app in the App Launcher or the Taskbar, right-click on it, and select Open as window. It’s that simple! Now your device will feel like a real laptop, not just a glorified Chrome browser.
Turn Websites Into Apps

Remember, Chromebook apps are basically just websites disguised as apps. While this does come with a few downsides, there’s one truly nifty benefit: you can turn any website into an app and run it in its own separate window.
Open Chrome, navigate to the website you want to appify, and click the three-dot button at the top right. Go down to More tools, then select Add to shelf… Give the app a name, make sure you check Open as window, and then click Add.
Preview Files Before Opening
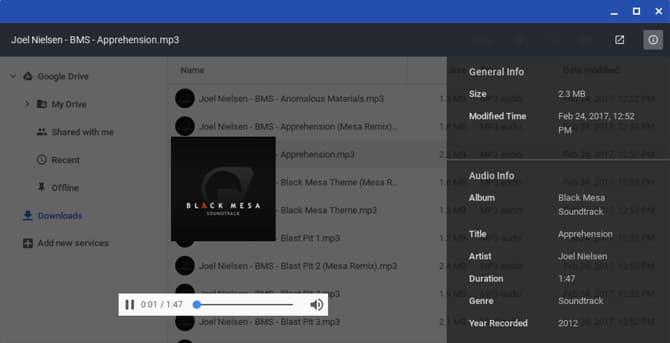
One of the coolest things about Finder on macOS is that you can highlight most any file and press Spacebar to get a preview of that file without actually launching it in its associated app. Did you know that Chrome OS also has a similar preview feature?
Open the Files app, select any file without actually opening it, and press Spacebar. You’ll see an overlay with some file details (e.g. size, type, last modified time, etc) and some information specific to the file type (e.g. ID3 tags for MP3s). Some types, like images and audio, will also have a preview.
Force Quit for Frozen Apps
You probably won’t run into frozen apps as often on Chrome OS as on Windows or even Mac, but if you do, all you need to do is open the Task Manager (using the Search button + Escape keyboard shortcut).
Once that’s open, just find the frozen process, select it, and click End process. The Task Manager is one of the most important Chrome OS features, so be sure you start using this crucial system feature.
Force Reboot for a Frozen System
In the rare case that something goes wrong at the system level, you may find that the Task Manager won’t open or isn’t able to unfreeze your device. If that happens, you can always use the last resort option: Hard Reboot.
Every Chromebook comes with a special set of media keys above the number key row. One of them is the Refresh key (looks like a circular arrow) and one of them is the Power key (looks like a circle with a vertical line). Press Power + Refresh to immediately reboot.
Note that this will make you lose any unsaved data in open apps. Also note that this isn’t the same thing as a Powerwash, which is covered in more detail in Tip below.
Master the Built-In Search Key
One thing unique about Chromebook keyboards is the lack of a Windows key or Command key. Instead, Google opted to replace the Caps Lock key with a Search key, which opens the App Launcher when pressed.
This key is useful in three core ways:
- Quickly launch any app by typing its name. In this sense, it’s very similar to the Windows 10 Start Menu and Mac Spotlight.
- Quickly launch any website URL or search engine query.
- Activate a voice search by clicking the microphone button.
It may feel weird to use the Caps Lock key in this way, but it’s one of those things where going back is impossible once you get into the groove.
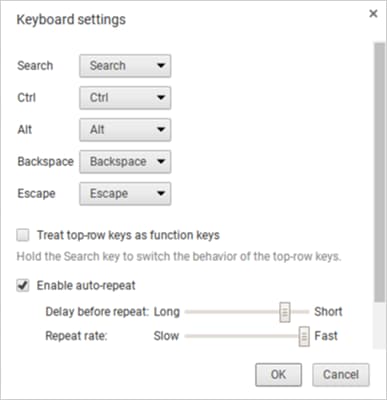
Rebind the Special Keys
Chrome OS treats five keys as special, allowing you to rebind them if you wish: Search, Ctrl, Alt, Backspace, and Escape. You can rebind these to any of the other five, plus Caps Lock and Disabled. Hate the Search key? Revert it to Caps Lock here. Or turn it off altogether.
Click your profile icon at the bottom right, then click the gear icon to open Settings. Scroll down to the Device section and click Keyboard settings. Just change the key bindings with the drop-down menus. You can also turn the top-row media keys into function keys by enabling the checkbox.
Learn the System’s Keyboard Shortcuts
In addition to having a different keyboard layout, Chromebooks have different keyboard shortcuts for system-level actions. Fortunately, Google made it extremely easy to learn these new shortcuts: all you need is the Ctrl + Alt + ? keyboard shortcut.
This brings up an interactive keyboard map that shows you what every shortcut does. If you hold Search, it shows every shortcut that involves the Search key. Same goes for the Ctrl, Alt, and Shift keys. That being said, get a jump start with our overview of the most important Chromebook shortcuts.
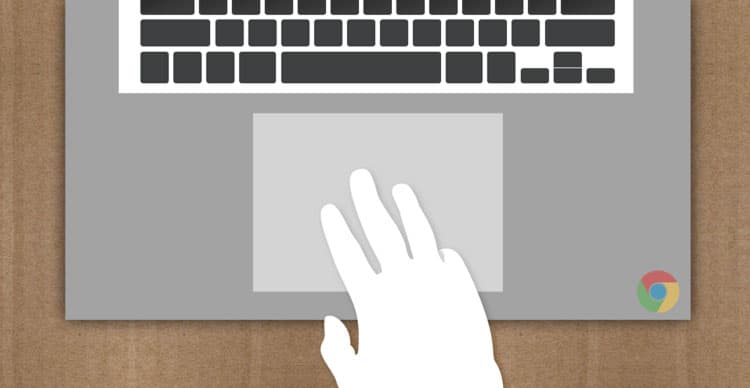
Right-Click and Middle-Click on Touchpad
I hated my first three days on my Chromebook because the touchpad doesn’t come with any mouse buttons. This made web browsing a nightmare because I didn’t have access to right-clicking or middle-clicking. As it turns out, both of these actions are simpler than I thought.
To right-click, you just need to tap the touchpad with two simultaneous fingers. To middle-click, you just need to tap the touchpad with three simultaneous fingers. This tip alone will make your Chromebook experience a million times better.
Swipe Gestures for the Touchpad
All modern Chromebooks come with a gesture-enabled touchpad and these gestures will change your life. While many gestures are supported, there are four in particular that every Chromebook newbie should know:
- Swipe horizontally with two fingers to go Forward and Back in Chrome.
- Swipe vertically with two fingers to scroll up and down.
- Swipe horizontally with three fingers to slide between open tabs in Chrome. This is even faster than using Ctrl + Tab.
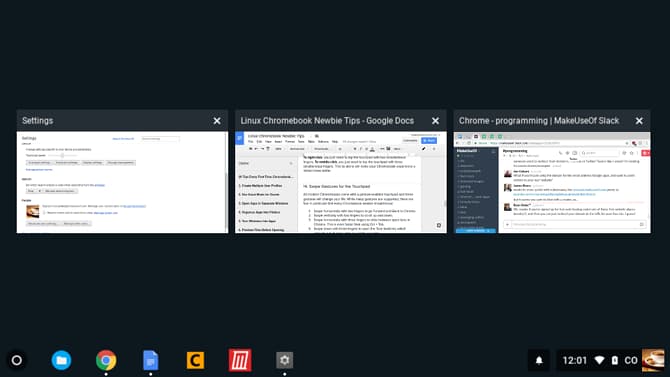
- Swipe down with three fingers to open the Task Switcher, which spreads out all open apps in a bird’s eye view.
Quickly Free Up Disk Space
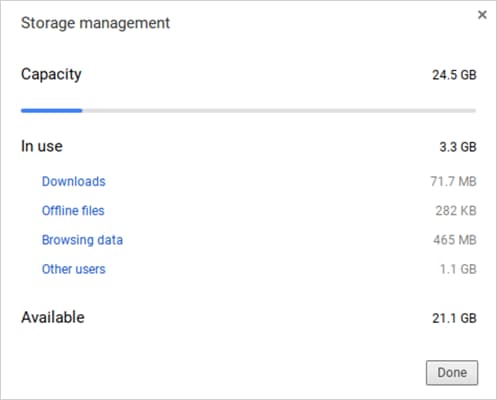
All Chromebooks come with some form of SSD for data storage. While this is great news for speed and performance, there is one downside: SSDs have small storage sizes. You’d be hard-pressed to find an affordable Chromebook that can store more than 32 GB.
Which is why disk space management is so important. Click on your profile icon at the bottom right, then click the gear icon to open Settings. Under the Device section, click Storage management. Here you can see what’s taking up space on your system and one-click delete when necessary.
Disable Sleep Mode
As of this writing, Chrome OS doesn’t offer any ways to tweak power-saving options. When unplugged, the screen turns off after a few minutes of inactivity. When plugged in, the delay stretches by a few minutes, but still turns off with inactivity.
If this bothers you, there is a Chrome extension that disables Sleep Mode — and not only that but also lets you pick between modes for screen-only sleep and screen-and-system sleep.
Take Easy Screenshots
If your Chromebook doesn’t have a Print Screen button, how are you supposed to capture an image of your screen? Simply press Ctrl + Switch Window key. (Switch Window is a special top-row key that looks like a rectangle with two vertical lines beside it.)
Saved screenshots appear in your Downloads folder, which you can access using the Files app. Note that you can also use Ctrl + Shift + Switch Window to limit your screenshot to a certain region of the screen.
Enable Optional Features With Flags
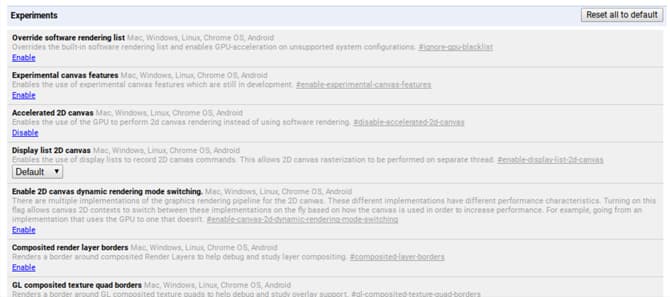
Open Chrome and type chrome://flags in the URL bar to access a bunch of optional Chrome OS features. Feel free to browse through them at your leisure, but if you don’t, at least check out these flags that might improve performance.
Note that these optional features may not be completely stable. At best, they may not function as intended. At worst, they can be buggy enough to cause losses of data. Most of them are close to stable and extreme bugs are rare, but this risk is always present with these optional features.
Factory Reset Using Powerwash
If you ever want to start over with a blank slate, or if you ever plan on selling your Chromebook, or if you ever run into a catastrophic error that causes your system to crash all the time, then you may need to Powerwash your device.
Powerwash is Google’s term for a “factory reset.” It deletes all of the data on your Chromebook and returns its state back to how it was when it left the factory. Despite losing local data, your Google accounts and profiles won’t be affected, nor will any of your data synced to Google’s cloud.