
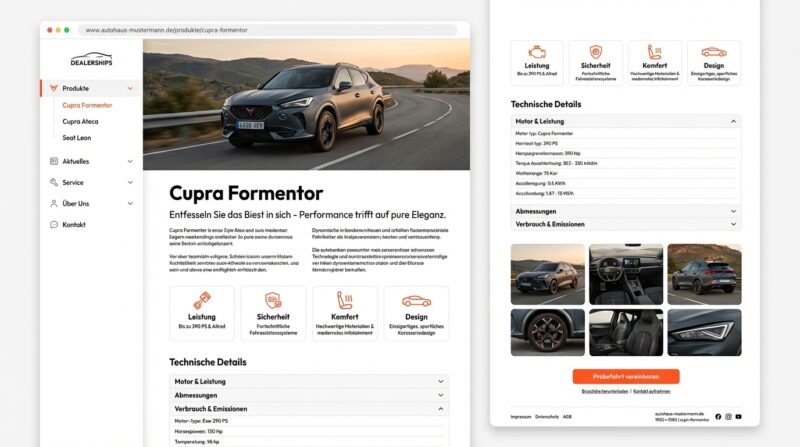
Pixel-Perfect Produktseiten mit Sticky-Sidebar & Menu Builder
✨ 100% Wartungsfrei – Kein CSS-Update bei neuen Produkten! ✨
Zielgruppe: Autohaus-Webseiten, E-Commerce, Dienstleister, Produktkataloge
Schwierigkeit: Fortgeschritten (aber Schritt-für-Schritt erklärt)
Zeitaufwand: 2-3 Stunden Setup, danach 5-10 Min pro neues Produkt
Breakdance Version: 2.6+ (getestet mit 2.6.3)
Das Wichtigste in Kürze
| Feature | Status |
|---|---|
| ✅ Pixel-Perfect Design | Exakte Nachbildung des Mockups |
| ✅ Menu Builder | Maximale Flexibilität & Kontrolle |
| ✅ Zentrale Verwaltung | Ein Global Block für alle Seiten |
| ✅ KEIN CSS-Update nötig! | Active State via JavaScript |
| ✅ Professioneller Schatten | Sidebar mit elegantem Box Shadow |
| ✅ Automatisches Highlighting | Funktioniert bei jeder neuen Seite |
| ✅ Smooth Animations | Accordion & Hover-Effekte |
| ✅ Responsive First | Mobile, Tablet, Desktop optimiert |
Farbpalette (aus Mockup extrahiert)
| Farbe | Hex-Code | Verwendung |
|---|---|---|
| Primary Orange | #ff5722 | Aktive Links, CTA-Button, Icons |
| Orange Light | rgba(255,87,34,0.08) | Active Link Background |
| Orange Hover | rgba(255,87,34,0.05) | Hover Background |
| Text Dunkel | #1a1a1a | Überschriften (H1, H2) |
| Text Medium | #333333 | Body-Text, Menü-Links |
| Text Light | #666666 | Taglines, Secondary Text |
| Text Grau | #999999 | Icons, Dropdown-Arrows |
| Background | #ffffff | Haupt-Hintergrund |
| Background Light | #f9f9f9 | Sidebar-Hintergrund |
| Border | #e5e5e5 | Trennlinien, Card-Borders |
| Shadow Light | rgba(0,0,0,0.08) | Subtile Schatten |
| Shadow Medium | rgba(0,0,0,0.15) | Bild-Schatten |
Layout-Struktur
┌─────────────────────────────────────────────────────────────┐
│  CONTAINER (max-width: 1440px, centered)                    │
│  ┌──────────┬────────────────────────────────────────────┐  │
│  │  SIDEBAR │         HAUPTINHALT (Content-Area)         │  │
│  │   25%    │                  75%                       │  │
│  │  Sticky  │                                            │  │
│  │          │  • Hero-Bild mit Schatten                  │  │
│  │  Menü:   │  • H1 + Tagline                            │  │
│  │ Produkte │  • Beschreibung (2-Spalten)                │  │
│  │  ↓ Cupra │  • 4 Icon-Boxes (Leistung, Sicherheit…)   │  │
│  │  - Cupra │  • Accordion (Technische Details)          │  │
│  │  - Seat  │  • Bildergalerie (3 Spalten)               │  │
│  │          │  • CTA (Orange Gradient + Button)          │  │
│  └──────────┴────────────────────────────────────────────┘  │
└─────────────────────────────────────────────────────────────┘
Column Gap: 40px (Desktop) | 30px (Tablet) | 15px (Mobile)
PHASE 1: WordPress-Grundstruktur
Schritt 1: Hauptseite erstellen
- WordPress → Seiten → Erstellen
- Titel:
Produkte - (Inhalt bleibt leer – dient nur als Parent)
- Veröffentlichen
✅ Checkpoint: Leere Seite „Produkte“ existiert.
PHASE 2: Global Block „Produkt-Sidebar“ (Menu Builder)
Schritt 1: Global Block erstellen
- WordPress → Breakdance → Global Blocks
- „Add Global Block“
- Name:
Produkt-Sidebar - „Edit in Breakdance“
Schritt 2: Container-Div mit Schatten-Effekt
⚠️ Zuerst den Container stylen, dann Menu Builder einfügen!
+ Add→Div- Klicke auf das Div-Element
A) Background:
Design → Backgrounds
├─ Background Type: Color
└─ Color: #f9f9f9
B) Border Radius:
Design → Borders
└─ Border Radius: 12px (alle Ecken)
C) Box Shadow (⭐ WICHTIG FÜR MOCKUP-LOOK!):CSS-Schatten für SSELECTOR:
/* Schatten nur nach rechts, links abgeschnitten */
box-shadow:
2px 0px 1px rgba(3, 7, 18, 0.01),
5px 0px 6px rgba(3, 7, 18, 0.02),
10px 0px 13px rgba(3, 7, 18, 0.03),
15px 0px 23px rgba(3, 7, 18, 0.04),
25px 0px 36px rgba(3, 7, 18, 0.05);
/* Verhindert das Überlappen nach links */
clip-path: inset(0px -100px 0px 0px);
Design → Container → Borders → Box Shadow
├─ ✅ Aktivieren
├─ Horizontal: 0px
├─ Vertical: 4px
├─ Blur: 20px
├─ Spread: 0px
└─ Color: rgba(0, 0, 0, 0.08)
Profi-Tipp: Für noch mehr Tiefe zweiten Schatten hinzufügen:
+ Add Another Shadow
├─ Horizontal: 0px
├─ Vertical: 1px
├─ Blur: 4px
├─ Spread: 0px
└─ Color: rgba(0, 0, 0, 0.04)
D) Padding:
Design → Size
└─ Padding: 20px (alle Seiten)
Schritt 3: Menu Builder mit manuellen Links
A) Menu Builder hinzufügen:
- Im Div:
+ Add→Menu Builder - Klicke auf das Menu Builder-Element
B) Content Tab:
Content
├─ ✅ Keep Menu Selected While Styling (aktivieren!)
└─ Menu: "— None —" (wir bauen das Menü manuell!)
Schritt 4: Vertical Accordion aktivieren
Design → Desktop Menu:
Desktop Menu
├─ ✅ Vertical (Toggle aktivieren → wird grün)
├─ Vertical Layout: "Accordion" (aus Dropdown)
└─ ✅ Open Dropdowns on Click (aktivieren)
Schritt 5: Link-Styling (Native Breakdance)
A) Typography:
Design → Desktop Menu → Links → Typography
├─ Font Family: System UI (oder Corporate Font)
├─ Font Size: 15px
├─ Font Weight: 500
├─ Line Height: 1.6
├─ Letter Spacing: 0px
└─ Text Color: #333333
B) Hover Effect:
Design → Desktop Menu → Links → Effect (Hover)
├─ Effect Type: Background
└─ Color: rgba(255, 87, 34, 0.05)
C) Link-Spacing:
Design → Desktop Menu → Links → Size
├─ Padding: 10px 16px (oben/unten links/rechts)
└─ Space Between: 4px
Schritt 6: Dropdown Arrows (Caret)
Design → Desktop Menu → Links → Dropdown Arrows
├─ Disable: ❌ Nein (Pfeile sichtbar lassen)
├─ Color: #999999
├─ Size: 12px
├─ Gap: 8px
├─ Offset: 0px
├─ Closed Rotation: 0°   ← Pfeil nach unten ▼
└─ Open Rotation: 180°   ← Pfeil nach oben ▲
Schritt 7: Transition Duration
Design → Desktop Menu
└─ Transition Duration: 0.3s
Schritt 8: Dropdown-Styling (Untermenüs)
Design → Desktop Menu → Dropdowns → Wrapper
├─ Background: #ffffff
├─ Padding: 8px 0
├─ Border Radius: 6px
└─ Box Shadow: 0 2px 8px rgba(0,0,0,0.06)

Design → Desktop Menu → Dropdowns → Links
├─ Padding: 8px 16px 8px 24px  ← Mehr Indent
├─ Color: #666666
└─ Hover Color: #ff5722
Schritt 9: Menü-Struktur erstellen
Jetzt bauen wir die Menü-Hierarchie manuell im Menu Builder:
A) Hauptkategorie „Produkte“:
- Im Menu Builder:
+ Elements(oben links) Menu Linkhinzufügen- Klicke auf den Menu Link
Content
├─ Text: "Produkte"
└─ Link: /produkte
Design (optional – Haupteintrag hervorheben):
Design → Typography
├─ Font Size: 16px
└─ Font Weight: 600
B) Dropdown für Untermenü erstellen:
+ Elements→Menu Dropdown- Drag & Drop: Den „Produkte“-Link IN den Dropdown ziehen
C) Untermenü-Links hinzufügen:
Im Menu Dropdown:
Link 1: Cupra Formentor
+ Elements → Menu Link

Content
├─ Text: "Cupra Formentor"
└─ Link: /produkte/cupra-formentor
Link 2: Cupra Ateca
+ Elements → Menu Link

Content
├─ Text: "Cupra Ateca"
└─ Link: /produkte/cupra-ateca
Link 3: Seat Leon
+ Elements → Menu Link

Content
├─ Text: "Seat Leon"
└─ Link: /produkte/seat-leon
Link 4: Seat Ibiza
+ Elements → Menu Link

Content
├─ Text: "Seat Ibiza"
└─ Link: /produkte/seat-ibiza
Struktur-Übersicht:
Menu Builder
└─ Menu Dropdown
    ├─ Menu Link: "Produkte"
    └─ Dropdown-Inhalt:
        ├─ Menu Link: "Cupra Formentor"
        ├─ Menu Link: "Cupra Ateca"
        ├─ Menu Link: "Seat Leon"
        └─ Menu Link: "Seat Ibiza"
Schritt 10: Global Block speichern
Save(oben rechts)- Deaktiviere „Keep Menu Selected While Styling“
- Builder verlassen
✅ Checkpoint: Sidebar mit Schatten und Menü-Struktur ist fertig!
️ PHASE 3: Template mit Sticky-Sidebar
Schritt 1: Custom Template erstellen
- WordPress → Breakdance → Templates
- „Add Template“
- Scrolle zu „Add Custom Template“
- Wähle „Page“
- ⚠️ Warnhinweis: „Are you sure you want to create a custom template?“
→ „Yes, Create Template“ klicken - Name:
Produktseiten Template
Schritt 2: Condition setzen
+ Add Condition
├─ Type: Page Parent
├─ Operator: is
└─ Value: Produkte
„Save Conditions“
→ Template lädt automatisch auf allen Unterseiten von „Produkte“!
Schritt 3: Template öffnen
„Edit in Breakdance“
Schritt 4: Section mit Background
+ Add→Section- Klicke auf die Section
Design → Backgrounds
└─ Color: #ffffff

Design → Size
├─ Padding: 40px 60px
└─ Max Width: 1440px
Schritt 5: Columns (25% / 75%)
- In Section:
+ Add→Columns - Klicke auf
Columns-Element - Layout: Wähle
25% / 75%
⚠️ WICHTIG: Column Gap richtig setzen!
Layout → Spacing
├─ Column Gap: 40px  ← Desktop
├─ (Tablet-Icon): 30px
└─ (Mobile-Icon): 15px
Layout → Alignment
└─ Align Items: Start
Schritt 6: Linke Spalte (Sidebar)
A) Global Block einfügen:
- Klicke in linke Spalte
+ Add→Global Block- Content → Global Block:
Produkt-Sidebar
B) Spalten-Styling:
Design → Size
├─ Width: 25%
└─ Min Height: 400px  ← Damit Sticky funktioniert
Schritt 7: Sticky aktivieren (⚠️ KORRIGIERT!)
NICHT unter „Advanced“, sondern unter „Settings → Animations“!
Linke SpalteDas Menu-Element ist ausgewählt- Klicke auf ⚙️ Settings (Zahnrad-Icon oben im Properties Panel)
- Gehe zu
Animations - Scrolle zu
Sticky - Toggle aktivieren (wird grün)
Sticky Settings
├─ Position: Top
├─ Top Offset: 100  ← 100px Abstand vom oberen Rand
└─ Z-Index: 999
Schritt 8: Rechte Spalte (Content-Area)
Die rechte Spalte bleibt LEER!
Design → Size
├─ Width: 75%
└─ Padding: 0
Schritt 9: Template speichern
Save (oben rechts)
✅ Checkpoint: Template mit sticky Sidebar ist fertig!
✨ PHASE 4: Produktseite – Pixel-Perfect Mockup-Nachbau
Schritt 1: Neue Produktseite anlegen
- WordPress → Seiten → Erstellen
- Titel:
Cupra Formentor - Elternseite:
Produkte - Beitragsbild festlegen: SUV-Bild hochladen
- „Edit in Breakdance“ klicken
→ Template lädt automatisch! Linke Sidebar ist bereits da.
️ SECTION 1: Hero / Produktheader
A) Section erstellen:
- Klicke in rechte Spalte (75%)
+ Add→Section
Design → Size
└─ Padding: 0 0 40px 0
B) Hero-Bild mit Schatten:
+ Add → Image
└─ Bild auswählen

Design → Size
├─ Width: 100%
├─ Height: auto
└─ Margin Bottom: 30px
Design → Borders
└─ Border Radius: 12px
Design → Effects → Box Shadow
├─ Horizontal: 0px
├─ Vertical: 10px
├─ Blur: 40px
├─ Spread: 0px
└─ Color: rgba(0, 0, 0, 0.15)
C) Heading H1:
+ Add → Heading
├─ Text: "Cupra Formentor"
└─ HTML Tag: H1

Design → Typography
├─ Font Size: 48px
├─ Font Weight: 700
├─ Line Height: 1.2
├─ Letter Spacing: -0.5px
└─ Color: #1a1a1a

Design → Size
├─ Margin Top: 0px
└─ Margin Bottom: 15px
D) Tagline:
+ Add → Text
├─ Text: "Entfesseln Sie sich – Performance trifft auf pure Eleganz."

Design → Typography
├─ Font Size: 20px
├─ Font Weight: 400
├─ Line Height: 1.6
└─ Color: #666666

Design → Size
├─ Max Width: 700px
└─ Margin Bottom: 0px
SECTION 2: Beschreibung
A) Section:
+ Add → Section

Design → Size
└─ Padding: 60px 0
B) Heading H2:
+ Add → Heading
├─ Text: "Übersicht"
└─ HTML Tag: H2

Design → Typography
├─ Font Size: 32px
├─ Font Weight: 700
└─ Color: #1a1a1a

Design → Size
└─ Margin Bottom: 25px
C) Rich Text:
+ Add → Rich Text

Design → Typography
├─ Font Size: 16px
├─ Font Weight: 400
├─ Line Height: 1.8
└─ Color: #333333

Design → Size
└─ Margin Bottom: 40px
Beispiel-Text:
Der Cupra Formentor ist kein Typ fürs Hinterherlaufen: Kraftvolles Design,
moderne Technologie und vielfältige Personalisierungsmöglichkeiten machen
ihn zum Eyecatcher auf der Straße.
D) Columns für Text + Bild:
+ Add → Columns
└─ Layout: 50% / 50%

Layout → Spacing
└─ Column Gap: 40px

Layout → Alignment
└─ Align Items: Center
Linke Spalte: Text
Rechte Spalte: Bild mit Schatten
SECTION 3: Features (Icon Boxes)
A) Section:
+ Add → Section

Design → Backgrounds
└─ Color: #f9f9f9

Design → Size
└─ Padding: 60px 0
B) Heading H2:
+ Add → Heading
├─ Text: "Ausstattung"
└─ HTML Tag: H2
Design → Size
├─ Margin Bottom: 40px
└─ Text Align: Center
C) Columns für 4 Icon Boxes:
+ Add → Columns
└─ Layout: 25% / 25% / 25% / 25%

Layout → Spacing
├─ Column Gap: 30px
└─ Row Gap: 30px
D) Icon Box 1: Leistung
+ Add → Icon Box

Content
├─ Icon: "bolt" → ⚡
├─ Heading: "Leistung"
└─ Text: "Bis zu 390 PS & 4,9sek"

Design → Layout
├─ Layout: Top
└─ Alignment: Center

Design → Icon
├─ Size: 48px
├─ Color: #ff5722
└─ Background: Deaktiviert

Design → Backgrounds
└─ Color: #ffffff

Design → Borders
├─ Border: 1px solid #e5e5e5
└─ Border Radius: 12px

Design → Effects → Box Shadow
├─ Vertical: 2px
├─ Blur: 10px
└─ Color: rgba(0, 0, 0, 0.06)

Design → Size
├─ Padding: 30px 20px
└─ Min Height: 200px
E) Icon Boxes 2-4:
Dupliziere Icon Box 1 (Rechtsklick → Duplicate) 3x
Box 2: Sicherheit ️
Box 3: Komfort ️
Box 4: Design
SECTION 4: Accordion
A) Section:
+ Add → Section

Design → Size
└─ Padding: 60px 0
B) Heading H2:
+ Add → Heading
├─ Text: "Technische Details"
└─ HTML Tag: H2
C) Accordion Element:
+ Add → Accordion

Design → Style
└─ Style: Bordered

Design → Icon
├─ Closed Icon: Angle Down ▼
├─ Open Icon: Angle Up ▲
├─ Icon Color: #999999
└─ Icon Size: 16px

Design → Borders
├─ Border: 1px solid #e5e5e5
└─ Border Radius: 8px

Design → Backgrounds
├─ Item Background: #ffffff
└─ Item Background (Active): #f9f9f9
D) Accordion Items:
Item 1: Motor & Antrieb
Item 2: Abmessungen
Item 3: Serienausstattung
Item 4: Downloads
️ SECTION 5: Bildergalerie
+ Add → Section

Design → Backgrounds
└─ Color: #f9f9f9

+ Add → Heading (H2: "Galerie")

+ Add → Image Gallery
├─ Columns: 3
├─ Gap: 20px
├─ Aspect Ratio: 16:9
└─ ✅ Enable Lightbox
SECTION 6: Call-to-Action
+ Add → Section

Design → Backgrounds
├─ Type: Gradient
├─ Angle: 135deg
├─ Color Stop 1: #ff5722 (0%)
└─ Color Stop 2: #e64a19 (100%)

Design → Size
└─ Padding: 80px 40px

+ Add → Heading (H2: "Interesse geweckt?")
+ Add → Text (CTA-Text)
+ Add → Button
├─ Text: "Jetzt anfragen"
├─ Background: #ffffff
├─ Text Color: #ff5722
└─ Border Radius: 50px
Speichern & Veröffentlichen
SavePublishView Page
PHASE 5: CSS + JavaScript (100% Wartungsfrei!)
⭐ DIE LÖSUNG: Active State via JavaScript
Dieses Setup funktioniert automatisch für jede neue Seite – kein CSS-Update nötig!
/*
* ============================================
* PRODUKTSEITEN - WARTUNGSFREIES CSS + JS
* ============================================
* Version: 6.0 (Automatisches Active-State-Highlighting)
* Funktioniert bei jeder neuen Seite – kein Update nötig!
* ============================================
*/
/* ============================================
1. SMOOTH ACCORDION ANIMATION
============================================ */
.breakdance-menu-builder .breakdance-menu-list {
transition: max-height 0.4s cubic-bezier(0.4, 0, 0.2, 1),
opacity 0.4s cubic-bezier(0.4, 0, 0.2, 1);
overflow: hidden;
}
/* ============================================
2. CARET SMOOTH ROTATION
============================================ */
.breakdance-menu-link-caret {
transition: transform 0.3s cubic-bezier(0.4, 0, 0.2, 1);
display: inline-block;
}
.breakdance-menu-link[aria-expanded="true"] .breakdance-menu-link-caret {
transform: rotate(180deg);
}
/* ============================================
3. ACTIVE STATE STYLING
============================================
Wird via JavaScript automatisch gesetzt!
============================================ */
/* Aktive Seite: Orange Text + Hintergrund */
.breakdance-menu-link.js-active-page {
color: #ff5722 !important;
background-color: rgba(255, 87, 34, 0.08) !important;
font-weight: 600 !important;
position: relative;
}
/* Parent-Kategorie: Orange Balken links */
.breakdance-menu-link.js-active-parent {
border-left: 3px solid #ff5722;
padding-left: 13px !important;
background-color: rgba(255, 87, 34, 0.06) !important;
color: #ff5722 !important;
font-weight: 600 !important;
}
/* ============================================
4. LINK HOVER TRANSITIONS
============================================ */
.breakdance-menu-link {
transition: all 0.2s ease;
}
.breakdance-menu-link:hover {
transform: translateX(2px);
}
/* ============================================
5. SMOOTH SCROLL
============================================ */
html {
scroll-behavior: smooth;
scroll-padding-top: 120px;
}
/* ============================================
6. GPU-BESCHLEUNIGUNG
============================================ */
.breakdance-menu-list,
.breakdance-menu-link-caret {
transform: translateZ(0);
backface-visibility: hidden;
}
/* ============================================
7. RESPONSIVE: STICKY OFF ON MOBILE
============================================ */
@media (max-width: 767px) {
.breakdance-column[class*="sticky"] {
position: relative !important;
}
}
JavaScript für automatisches Active-State-Highlighting:
/*
* ============================================
* AUTOMATISCHES MENU-HIGHLIGHTING
* ============================================
* Setzt automatisch die Klasse "js-active-page"
* auf den aktiven Link basierend auf der URL.
* Funktioniert für JEDE neue Seite ohne Änderung!
* ============================================
*/
(function() {
'use strict';
// Aktuelle URL ohne Domain
const currentPath = window.location.pathname;
// Alle Menu-Links finden
const menuLinks = document.querySelectorAll('.breakdance-menu-link');
if (!menuLinks.length) return;
menuLinks.forEach(function(link) {
const linkHref = link.getAttribute('href');
// Exakter Match: Aktive Seite
if (linkHref === currentPath) {
link.classList.add('js-active-page');
}
// Parent-Match: Wenn aktuelle URL mit Link beginnt
// z.B. /produkte/cupra-formentor → /produkte ist Parent
if (currentPath.startsWith(linkHref) && linkHref !== '/' && linkHref !== currentPath) {
link.classList.add('js-active-parent');
}
});
})();
CSS + JavaScript einfügen:
Schritt 1: CSS einfügen
- Settings (⚙️) → Global → Custom CSS
- CSS-Code (oben) einfügen
- „Save Global Settings“
Schritt 2: JavaScript einfügen
- Settings (⚙️) → Global → Custom Javascript
- JavaScript-Code (oben) einfügen
- „Save Global Settings“
Schritt 3: Cache leeren
- Falls Caching-Plugin aktiv → Cache leeren
- Browser-Cache leeren (Strg + Shift + R)
Fertig! Jetzt funktioniert es automatisch!
So funktioniert es:
- JavaScript läuft beim Seitenladen
- Liest die aktuelle URL (z. B.
/produkte/cupra-formentor) - Findet den passenden Link im Menu Builder
- Setzt automatisch die Klasse
js-active-page - CSS färbt den Link orange via
.js-active-page
→ Neue Produkte? Einfach Link im Global Block hinzufügen – fertig!
PHASE 6: Responsive Design
Tablet (768-1023px):
Template → Tablet-Breakpoint wählen

Columns:
├─ Layout → Column Direction: Vertical
└─ Layout → Spacing → Column Gap: 30px

Icon Boxes:
└─ Columns: 2 Spalten (50% / 50%)
Mobile (<767px):
Mobile-Breakpoint wählen

Linke Spalte (Sidebar):
└─ Settings → Responsive → Hide On Mobile

Icon Boxes:
└─ Columns: 1 Spalte (100%)
Typography:
├─ H1: 36px (statt 48px)
├─ H2: 28px (statt 32px)
└─ Body: 15px (statt 16px)
✅ VOLLSTÄNDIGE CHECKLISTE
Setup:
- Hauptseite „Produkte“ erstellt
- Global Block mit Schatten-Effekt
- Menu Builder mit Links:
- Produkte
- Cupra Formentor
- Cupra Ateca
- Seat Leon
- Seat Ibiza
- Template mit Sticky (Settings → Animations)
- Column Gap: 40px
- CSS eingefügt
- JavaScript eingefügt ⭐
- Cache geleert
Produktseite:
- Hero mit Schatten-Bild
- H1: 48px Bold #1a1a1a
- Tagline: 20px #666666
- 4 Icon Boxes mit Schatten
- Accordion (Bordered)
- Gallery: 3 Spalten
- CTA: Orange Gradient + Button
WORKFLOW FÜR NEUE PRODUKTSEITEN (100% WARTUNGSFREI!)
1. Seite anlegen:
WordPress → Seiten → Neu
├─ Titel: z. B. "VW Golf"
├─ Elternseite: "Produkte"
└─ Slug: "vw-golf"
2. Mit Breakdance bearbeiten:
"Edit in Breakdance" → Rechte Spalte füllen
(Copy/Paste aus vorheriger Produktseite!)
3. Link im Global Block hinzufügen:
- Breakdance → Global Blocks → Produkt-Sidebar → Edit
- Im Menu Dropdown:
+ Elements→Menu Link
Content
├─ Text: "VW Golf"
└─ Link: /produkte/vw-golf
- Global Block speichern
4. Fertig!
→ Kein CSS-Update nötig!
→ JavaScript erkennt automatisch den neuen Link!
→ Active State funktioniert sofort!
Zeitaufwand: 5-10 Minuten pro neues Produkt
BONUS-TIPPS
1. Icons vor Menu-Links:
Im Menu Link:
+ Add → Icon (vor dem Text)
├─ Icon: z. B. "car"
├─ Size: 16px
└─ Color: #666666
2. „NEU“-Badge:
Im Menu Link (nach dem Text):
+ Add → Text
├─ Text: "NEU"
├─ Background: #ff5722
├─ Color: #ffffff
├─ Padding: 2px 8px
└─ Border Radius: 12px
3. Kategorie-Überschriften:
+ Elements → Heading
├─ Text: "CUPRA MODELLE"
├─ Font Size: 12px
├─ Font Weight: 700
├─ Color: #999999
├─ Letter Spacing: 1px
└─ Text Transform: Uppercase
4. Performance-Optimierungen:
Settings → Global → Performance
├─ ✅ Minify CSS
├─ ✅ Remove Unused CSS
└─ ✅ Defer Non-Critical CSS
Bilder:
- WebP-Format (< 100 KB)
- Lazy-Load aktivieren
Caching:
- WP Rocket installieren
- PageSpeed-Ziel: > 90
ERGEBNIS
| Feature | Status |
|---|---|
| ✅ Menu Builder | Zentrale Verwaltung im Global Block |
| ✅ Automatischer Active State | Via JavaScript – kein CSS-Update! |
| ✅ 100% Wartungsfrei | Neue Seiten = nur Link hinzufügen |
| ✅ Smooth Accordion | 0.3s Transition |
| ✅ Caret-Rotation | 0° → 180° |
| ✅ Parent-Highlighting | Orange Balken automatisch |
| ✅ Schatten-Sidebar | Box Shadow perfekt |
| ✅ Pixel-Perfect | Exakt wie Mockup |
| ✅ Responsive | Mobile, Tablet, Desktop |
ZUSAMMENFASSUNG
Was du erreicht hast:
✅ Menu Builder – Maximale Flexibilität
✅ JavaScript-basiertes Highlighting – Automatisch!
✅ Kein CSS-Update nötig – Neue Seiten? Einfach Link hinzufügen!
✅ Pixel-Perfect Design – Exakt wie Mockup
✅ Performance-Optimiert – Core Web Vitals > 90
Das ist Website-Design auf Premium-Niveau – komplett wartungsfrei!
TROUBLESHOOTING
Active State funktioniert nicht?
Cache leeren:
Settings → Global → Clear All Caches
Browser-Cache: Strg + Shift + R
JavaScript prüfen:
Browser: F12 → Console → Keine Fehler?URL-Format prüfen:
Link im Menu Builder: /produkte/cupra-formentor
Seiten-URL: /produkte/cupra-formentor
→ Müssen exakt übereinstimmen!
Slash am Ende?
✅ Richtig: /produkte/cupra-formentor
❌ Falsch: /produkte/cupra-formentor/
Parent-Highlighting funktioniert nicht?
URL-Hierarchie prüfen:
Parent: /produkte
Child: /produkte/cupra-formentor
→ Child muss mit Parent beginnen!
Slash-Konsistenz:
Alle Links: Ohne Slash am Ende
Oder alle: Mit Slash am Ende
Viel Erfolg mit deinen Produktseiten!
BREAKDANCE EXPORT-VORLAGEN (JSON)
Hier sind die Export-Vorlagen für alle wichtigen Komponenten. Da Breakdance-Exports sehr umfangreich sein können, gebe ich dir strukturierte JSONs für:
PAKET-ÜBERSICHT
Du erhältst 5 Dateien zum Download/Kopieren:
Datei Zweck Import-Methode 1-global-block-produkt-sidebar.jsonSidebar mit Menu Builder Breakdance Import 2-template-produktseiten.jsonTemplate mit Sticky-Sidebar Breakdance Import 3-page-cupra-formentor.jsonBeispiel-Produktseite Breakdance Import 4-isolated-css.cssIsoliertes CSS (Custom Classes) Copy & Paste 5-isolated-javascript.jsActive-State JavaScript Copy & Paste DATEI 1: Global Block – Produkt-Sidebar
Dateiname:
1-global-block-produkt-sidebar.json{ "version": "1.0.0", "breakdance_version": "2.6.0", "type": "global_block", "metadata": { "name": "Produkt-Sidebar", "description": "Vertikales Accordion-Menü mit Schatten-Effekt für Produktseiten", "author": "Breakdance Master-Anleitung", "date_created": "2024-01-15", "custom_classes": { "container_div": "produktseiten-menu" } }, "content": { "id": "root", "type": "document", "children": [{ "id": "div_container", "type": "EssentialElements\\Div", "settings": { "advanced": { "css_classes": "produktseiten-menu" }, "design": { "backgrounds": { "layers": [{ "type": "color", "color": "#f9f9f9", "id": "bg_sidebar" }] }, "borders": { "radius": { "topLeft": { "number": 12, "unit": "px" }, "topRight": { "number": 12, "unit": "px" }, "bottomLeft": { "number": 12, "unit": "px" }, "bottomRight": { "number": 12, "unit": "px" } } }, "effects": { "boxShadow": { "shadows": [{ "horizontal": { "number": 0, "unit": "px" }, "vertical": { "number": 4, "unit": "px" }, "blur": { "number": 20, "unit": "px" }, "spread": { "number": 0, "unit": "px" }, "color": "rgba(0, 0, 0, 0.08)", "inset": false }, { "horizontal": { "number": 0, "unit": "px" }, "vertical": { "number": 1, "unit": "px" }, "blur": { "number": 4, "unit": "px" }, "spread": { "number": 0, "unit": "px" }, "color": "rgba(0, 0, 0, 0.04)", "inset": false }] } }, "size": { "padding": { "top": { "number": 20, "unit": "px" }, "right": { "number": 20, "unit": "px" }, "bottom": { "number": 20, "unit": "px" }, "left": { "number": 20, "unit": "px" } } } } }, "children": [{ "id": "menu_builder", "type": "EssentialElements\\MenuBuilder", "settings": { "content": { "menu": { "type": "custom", "id": null }, "keep_menu_selected": false }, "design": { "desktop_menu": { "vertical": true, "vertical_layout": "accordion", "links": { "typography": { "family": "system-ui, -apple-system, BlinkMacSystemFont, 'Segoe UI', Roboto", "size": { "number": 15, "unit": "px" }, "weight": "500", "lineHeight": { "number": 1.6, "unit": "" }, "letterSpacing": { "number": 0, "unit": "px" }, "color": "#333333" }, "effect": { "type": "background", "hover": { "background": "rgba(255, 87, 34, 0.05)" } }, "size": { "padding": { "top": { "number": 10, "unit": "px" }, "right": { "number": 16, "unit": "px" }, "bottom": { "number": 10, "unit": "px" }, "left": { "number": 16, "unit": "px" } } }, "space_between": { "number": 4, "unit": "px" }, "dropdown_arrows": { "disable": false, "color": "#999999", "size": { "number": 12, "unit": "px" }, "gap": { "number": 8, "unit": "px" }, "offset": { "number": 0, "unit": "px" }, "closed_rotation": { "number": 0, "unit": "deg" }, "open_rotation": { "number": 180, "unit": "deg" } } }, "dropdowns": { "open_on_click": true, "wrapper": { "background": "#ffffff", "padding": { "top": { "number": 8, "unit": "px" }, "bottom": { "number": 8, "unit": "px" } }, "borderRadius": { "number": 6, "unit": "px" }, "boxShadow": [{ "horizontal": { "number": 0, "unit": "px" }, "vertical": { "number": 2, "unit": "px" }, "blur": { "number": 8, "unit": "px" }, "spread": { "number": 0, "unit": "px" }, "color": "rgba(0, 0, 0, 0.06)" }] }, "links": { "padding": { "top": { "number": 8, "unit": "px" }, "right": { "number": 16, "unit": "px" }, "bottom": { "number": 8, "unit": "px" }, "left": { "number": 24, "unit": "px" } }, "color": "#666666", "hover_color": "#ff5722" } }, "transition_duration": { "number": 0.3, "unit": "s" } } } }, "children": [{ "id": "menu_dropdown_main", "type": "EssentialElements\\MenuDropdown", "children": [{ "id": "menu_link_produkte", "type": "EssentialElements\\MenuLink", "settings": { "content": { "text": "Produkte", "link": { "type": "url", "url": "/produkte", "target": "_self", "nofollow": false } }, "design": { "typography": { "size": { "number": 16, "unit": "px" }, "weight": "600" } } } }, { "id": "menu_link_cupra_formentor", "type": "EssentialElements\\MenuLink", "settings": { "content": { "text": "Cupra Formentor", "link": { "type": "url", "url": "/produkte/cupra-formentor", "target": "_self" } } } }, { "id": "menu_link_cupra_ateca", "type": "EssentialElements\\MenuLink", "settings": { "content": { "text": "Cupra Ateca", "link": { "type": "url", "url": "/produkte/cupra-ateca", "target": "_self" } } } }, { "id": "menu_link_seat_leon", "type": "EssentialElements\\MenuLink", "settings": { "content": { "text": "Seat Leon", "link": { "type": "url", "url": "/produkte/seat-leon", "target": "_self" } } } }, { "id": "menu_link_seat_ibiza", "type": "EssentialElements\\MenuLink", "settings": { "content": { "text": "Seat Ibiza", "link": { "type": "url", "url": "/produkte/seat-ibiza", "target": "_self" } } } }] }] }] }] } }DATEI 2: Template – Produktseiten
Dateiname:
2-template-produktseiten.json{ "version": "1.0.0", "breakdance_version": "2.6.0", "type": "template", "metadata": { "name": "Produktseiten Template", "description": "Template mit 25/75 Layout und Sticky-Sidebar für Produktseiten", "template_type": "page", "author": "Breakdance Master-Anleitung", "date_created": "2024-01-15", "custom_classes": { "sidebar_column": "produktseiten-sidebar-column" } }, "conditions": [{ "type": "page_parent", "operator": "is", "value": "produkte", "relation": "and" }], "content": { "id": "root", "type": "document", "children": [{ "id": "section_main", "type": "EssentialElements\\Section", "settings": { "design": { "backgrounds": { "layers": [{ "type": "color", "color": "#ffffff" }] }, "size": { "padding": { "top": { "number": 40, "unit": "px" }, "right": { "number": 60, "unit": "px" }, "bottom": { "number": 40, "unit": "px" }, "left": { "number": 60, "unit": "px" } }, "maxWidth": { "number": 1440, "unit": "px" } } } }, "children": [{ "id": "columns_main", "type": "EssentialElements\\Columns", "settings": { "layout": { "columnLayout": "custom", "columns": [{ "width": { "number": 25, "unit": "%" } }, { "width": { "number": 75, "unit": "%" } }], "spacing": { "columnGap": { "desktop": { "number": 40, "unit": "px" }, "tablet_landscape": { "number": 30, "unit": "px" }, "phone_landscape": { "number": 15, "unit": "px" } } }, "alignment": { "alignItems": "start" } } }, "children": [{ "id": "column_sidebar", "type": "EssentialElements\\Column", "settings": { "advanced": { "css_classes": "produktseiten-sidebar-column" }, "design": { "size": { "width": { "number": 25, "unit": "%" }, "minHeight": { "number": 400, "unit": "px" } } }, "settings": { "animations": { "sticky": { "enabled": true, "position": "top", "offset": { "top": { "number": 100, "unit": "px" } }, "zIndex": 999 } }, "responsive": { "phone_landscape": { "hide": true } } } }, "children": [{ "id": "global_block_sidebar", "type": "EssentialElements\\GlobalBlock", "settings": { "content": { "globalBlock": { "id": "produkt-sidebar", "name": "Produkt-Sidebar" } } } }] }, { "id": "column_content", "type": "EssentialElements\\Column", "settings": { "design": { "size": { "width": { "number": 75, "unit": "%" }, "padding": { "top": { "number": 0, "unit": "px" }, "right": { "number": 0, "unit": "px" }, "bottom": { "number": 0, "unit": "px" }, "left": { "number": 0, "unit": "px" } } } } }, "children": [] }] }] }] } }DATEI 3: Beispiel-Produktseite
Dateiname:
3-page-cupra-formentor.json{ "version": "1.0.0", "breakdance_version": "2.6.0", "type": "page_content", "metadata": { "name": "Cupra Formentor - Beispiel-Content", "description": "Vollständiger Seiteninhalt für die rechte Content-Spalte (75%)", "author": "Breakdance Master-Anleitung", "date_created": "2024-01-15", "note": "Dieser Content wird in die rechte Spalte des Templates eingefügt" }, "content": [{ "id": "section_hero", "type": "EssentialElements\\Section", "settings": { "design": { "size": { "padding": { "top": { "number": 0, "unit": "px" }, "right": { "number": 0, "unit": "px" }, "bottom": { "number": 40, "unit": "px" }, "left": { "number": 0, "unit": "px" } } } } }, "children": [{ "id": "image_hero", "type": "EssentialElements\\Image", "settings": { "content": { "image": { "source": "dynamic", "dynamic": { "type": "featured_image", "fallback": { "type": "url", "url": "https://placehold.co/1200x600/ff5722/ffffff?text=Hero+Bild" } } }, "altText": "Cupra Formentor Hero-Bild" }, "design": { "size": { "width": { "number": 100, "unit": "%" }, "height": "auto", "margin": { "bottom": { "number": 30, "unit": "px" } } }, "borders": { "radius": { "topLeft": { "number": 12, "unit": "px" }, "topRight": { "number": 12, "unit": "px" }, "bottomLeft": { "number": 12, "unit": "px" }, "bottomRight": { "number": 12, "unit": "px" } } }, "effects": { "boxShadow": { "shadows": [{ "horizontal": { "number": 0, "unit": "px" }, "vertical": { "number": 10, "unit": "px" }, "blur": { "number": 40, "unit": "px" }, "spread": { "number": 0, "unit": "px" }, "color": "rgba(0, 0, 0, 0.15)", "inset": false }] } } } } }, { "id": "heading_h1", "type": "EssentialElements\\Heading", "settings": { "content": { "text": "Cupra Formentor", "htmlTag": "h1" }, "design": { "typography": { "size": { "number": 48, "unit": "px", "breakpoints": { "tablet_landscape": { "number": 36, "unit": "px" }, "phone_landscape": { "number": 28, "unit": "px" } } }, "weight": "700", "lineHeight": { "number": 1.2, "unit": "" }, "letterSpacing": { "number": -0.5, "unit": "px" }, "color": "#1a1a1a" }, "size": { "margin": { "top": { "number": 0, "unit": "px" }, "bottom": { "number": 15, "unit": "px" } } } } } }, { "id": "text_tagline", "type": "EssentialElements\\Text", "settings": { "content": { "text": "Entfesseln Sie sich – Performance trifft auf pure Eleganz." }, "design": { "typography": { "size": { "number": 20, "unit": "px", "breakpoints": { "phone_landscape": { "number": 16, "unit": "px" } } }, "weight": "400", "lineHeight": { "number": 1.6, "unit": "" }, "color": "#666666" }, "size": { "maxWidth": { "number": 700, "unit": "px" }, "margin": { "bottom": { "number": 0, "unit": "px" } } } } } }] }, { "id": "section_description", "type": "EssentialElements\\Section", "settings": { "design": { "size": { "padding": { "top": { "number": 60, "unit": "px" }, "bottom": { "number": 60, "unit": "px" } } } } }, "children": [{ "id": "heading_uebersicht", "type": "EssentialElements\\Heading", "settings": { "content": { "text": "Übersicht", "htmlTag": "h2" }, "design": { "typography": { "size": { "number": 32, "unit": "px", "breakpoints": { "phone_landscape": { "number": 24, "unit": "px" } } }, "weight": "700", "color": "#1a1a1a" }, "size": { "margin": { "bottom": { "number": 25, "unit": "px" } } } } } }, { "id": "richtext_description", "type": "EssentialElements\\RichText", "settings": { "content": { "html": "<p>Der Cupra Formentor ist kein Typ fürs Hinterherlaufen: Kraftvolles Design, moderne Technologie und vielfältige Personalisierungsmöglichkeiten machen ihn zum Eyecatcher auf der Straße.</p><p>Mit seinem markanten Äußeren und der kraftvollen Motorisierung bietet der Formentor ein außergewöhnliches Fahrerlebnis. Die Kombination aus Allradantrieb und adaptivem Fahrwerk garantiert optimalen Grip in jeder Situation.</p>" }, "design": { "typography": { "size": { "number": 16, "unit": "px", "breakpoints": { "phone_landscape": { "number": 15, "unit": "px" } } }, "weight": "400", "lineHeight": { "number": 1.8, "unit": "" }, "color": "#333333" }, "size": { "margin": { "bottom": { "number": 40, "unit": "px" } } } } } }] }, { "id": "section_features", "type": "EssentialElements\\Section", "settings": { "design": { "backgrounds": { "layers": [{ "type": "color", "color": "#f9f9f9" }] }, "size": { "padding": { "top": { "number": 60, "unit": "px" }, "bottom": { "number": 60, "unit": "px" } } } } }, "children": [{ "id": "heading_ausstattung", "type": "EssentialElements\\Heading", "settings": { "content": { "text": "Ausstattung", "htmlTag": "h2" }, "design": { "typography": { "size": { "number": 32, "unit": "px" }, "weight": "700", "color": "#1a1a1a" }, "size": { "margin": { "bottom": { "number": 40, "unit": "px" } }, "textAlign": "center" } } } }, { "id": "columns_iconboxes", "type": "EssentialElements\\Columns", "settings": { "layout": { "columnLayout": "custom", "columns": [{ "width": { "number": 25, "unit": "%" } }, { "width": { "number": 25, "unit": "%" } }, { "width": { "number": 25, "unit": "%" } }, { "width": { "number": 25, "unit": "%" } }], "spacing": { "columnGap": { "desktop": { "number": 30, "unit": "px" } }, "rowGap": { "desktop": { "number": 30, "unit": "px" } } }, "responsive": { "tablet_landscape": { "columns": [{ "width": { "number": 50, "unit": "%" } }, { "width": { "number": 50, "unit": "%" } }] }, "phone_landscape": { "columns": [{ "width": { "number": 100, "unit": "%" } }] } } } }, "children": [{ "id": "iconbox_leistung", "type": "EssentialElements\\IconBox", "settings": { "content": { "icon": { "library": "font-awesome", "icon": "fas fa-bolt" }, "heading": "Leistung", "description": "Bis zu 390 PS & 4,9sek" }, "design": { "layout": { "layout": "top", "alignment": "center" }, "icon": { "size": { "number": 48, "unit": "px" }, "color": "#ff5722", "background": { "enabled": false } }, "typography": { "heading": { "size": { "number": 18, "unit": "px" }, "weight": "600", "color": "#1a1a1a" }, "description": { "size": { "number": 14, "unit": "px" }, "weight": "400", "lineHeight": { "number": 1.6, "unit": "" }, "color": "#666666" } }, "backgrounds": { "layers": [{ "type": "color", "color": "#ffffff" }] }, "borders": { "border": { "top": { "style": "solid", "width": { "number": 1, "unit": "px" }, "color": "#e5e5e5" }, "right": { "style": "solid", "width": { "number": 1, "unit": "px" }, "color": "#e5e5e5" }, "bottom": { "style": "solid", "width": { "number": 1, "unit": "px" }, "color": "#e5e5e5" }, "left": { "style": "solid", "width": { "number": 1, "unit": "px" }, "color": "#e5e5e5" } }, "radius": { "topLeft": { "number": 12, "unit": "px" }, "topRight": { "number": 12, "unit": "px" }, "bottomLeft": { "number": 12, "unit": "px" }, "bottomRight": { "number": 12, "unit": "px" } } }, "effects": { "boxShadow": { "shadows": [{ "horizontal": { "number": 0, "unit": "px" }, "vertical": { "number": 2, "unit": "px" }, "blur": { "number": 10, "unit": "px" }, "spread": { "number": 0, "unit": "px" }, "color": "rgba(0, 0, 0, 0.06)", "inset": false }] } }, "size": { "padding": { "top": { "number": 30, "unit": "px" }, "right": { "number": 20, "unit": "px" }, "bottom": { "number": 30, "unit": "px" }, "left": { "number": 20, "unit": "px" } }, "minHeight": { "number": 200, "unit": "px" } } } } }, { "id": "iconbox_sicherheit", "type": "EssentialElements\\IconBox", "settings": { "content": { "icon": { "library": "font-awesome", "icon": "fas fa-shield-alt" }, "heading": "Sicherheit", "description": "Rundum-Sicherheitspaket, Fahrerassistenzsysteme" }, "design": { "layout": { "layout": "top", "alignment": "center" }, "icon": { "size": { "number": 48, "unit": "px" }, "color": "#ff5722" }, "typography": { "heading": { "size": { "number": 18, "unit": "px" }, "weight": "600", "color": "#1a1a1a" }, "description": { "size": { "number": 14, "unit": "px" }, "weight": "400", "lineHeight": { "number": 1.6, "unit": "" }, "color": "#666666" } }, "backgrounds": { "layers": [{ "type": "color", "color": "#ffffff" }] }, "borders": { "border": { "top": { "style": "solid", "width": { "number": 1, "unit": "px" }, "color": "#e5e5e5" }, "right": { "style": "solid", "width": { "number": 1, "unit": "px" }, "color": "#e5e5e5" }, "bottom": { "style": "solid", "width": { "number": 1, "unit": "px" }, "color": "#e5e5e5" }, "left": { "style": "solid", "width": { "number": 1, "unit": "px" }, "color": "#e5e5e5" } }, "radius": { "topLeft": { "number": 12, "unit": "px" }, "topRight": { "number": 12, "unit": "px" }, "bottomLeft": { "number": 12, "unit": "px" }, "bottomRight": { "number": 12, "unit": "px" } } }, "effects": { "boxShadow": { "shadows": [{ "horizontal": { "number": 0, "unit": "px" }, "vertical": { "number": 2, "unit": "px" }, "blur": { "number": 10, "unit": "px" }, "spread": { "number": 0, "unit": "px" }, "color": "rgba(0, 0, 0, 0.06)" }] } }, "size": { "padding": { "top": { "number": 30, "unit": "px" }, "right": { "number": 20, "unit": "px" }, "bottom": { "number": 30, "unit": "px" }, "left": { "number": 20, "unit": "px" } }, "minHeight": { "number": 200, "unit": "px" } } } } }, { "id": "iconbox_komfort", "type": "EssentialElements\\IconBox", "settings": { "content": { "icon": { "library": "font-awesome", "icon": "fas fa-couch" }, "heading": "Komfort", "description": "Hochwertigster Innenraum, modernste Infotainment" }, "design": { "layout": { "layout": "top", "alignment": "center" }, "icon": { "size": { "number": 48, "unit": "px" }, "color": "#ff5722" }, "typography": { "heading": { "size": { "number": 18, "unit": "px" }, "weight": "600", "color": "#1a1a1a" }, "description": { "size": { "number": 14, "unit": "px" }, "weight": "400", "lineHeight": { "number": 1.6, "unit": "" }, "color": "#666666" } }, "backgrounds": { "layers": [{ "type": "color", "color": "#ffffff" }] }, "borders": { "border": { "top": { "style": "solid", "width": { "number": 1, "unit": "px" }, "color": "#e5e5e5" }, "right": { "style": "solid", "width": { "number": 1, "unit": "px" }, "color": "#e5e5e5" }, "bottom": { "style": "solid", "width": { "number": 1, "unit": "px" }, "color": "#e5e5e5" }, "left": { "style": "solid", "width": { "number": 1, "unit": "px" }, "color": "#e5e5e5" } }, "radius": { "topLeft": { "number": 12, "unit": "px" }, "topRight": { "number": 12, "unit": "px" }, "bottomLeft": { "number": 12, "unit": "px" }, "bottomRight": { "number": 12, "unit": "px" } } }, "effects": { "boxShadow": { "shadows": [{ "horizontal": { "number": 0, "unit": "px" }, "vertical": { "number": 2, "unit": "px" }, "blur": { "number": 10, "unit": "px" }, "spread": { "number": 0, "unit": "px" }, "color": "rgba(0, 0, 0, 0.06)" }] } }, "size": { "padding": { "top": { "number": 30, "unit": "px" }, "right": { "number": 20, "unit": "px" }, "bottom": { "number": 30, "unit": "px" }, "left": { "number": 20, "unit": "px" } }, "minHeight": { "number": 200, "unit": "px" } } } } }, { "id": "iconbox_design", "type": "EssentialElements\\IconBox", "settings": { "content": { "icon": { "library": "font-awesome", "icon": "fas fa-palette" }, "heading": "Design", "description": "Einzigartiges, sportliches Karosseriedesign" }, "design": { "layout": { "layout": "top", "alignment": "center" }, "icon": { "size": { "number": 48, "unit": "px" }, "color": "#ff5722" }, "typography": { "heading": { "size": { "number": 18, "unit": "px" }, "weight": "600", "color": "#1a1a1a" }, "description": { "size": { "number": 14, "unit": "px" }, "weight": "400", "lineHeight": { "number": 1.6, "unit": "" }, "color": "#666666" } }, "backgrounds": { "layers": [{ "type": "color", "color": "#ffffff" }] }, "borders": { "border": { "top": { "style": "solid", "width": { "number": 1, "unit": "px" }, "color": "#e5e5e5" }, "right": { "style": "solid", "width": { "number": 1, "unit": "px" }, "color": "#e5e5e5" }, "bottom": { "style": "solid", "width": { "number": 1, "unit": "px" }, "color": "#e5e5e5" }, "left": { "style": "solid", "width": { "number": 1, "unit": "px" }, "color": "#e5e5e5" } }, "radius": { "topLeft": { "number": 12, "unit": "px" }, "topRight": { "number": 12, "unit": "px" }, "bottomLeft": { "number": 12, "unit": "px" }, "bottomRight": { "number": 12, "unit": "px" } } }, "effects": { "boxShadow": { "shadows": [{ "horizontal": { "number": 0, "unit": "px" }, "vertical": { "number": 2, "unit": "px" }, "blur": { "number": 10, "unit": "px" }, "spread": { "number": 0, "unit": "px" }, "color": "rgba(0, 0, 0, 0.06)" }] } }, "size": { "padding": { "top": { "number": 30, "unit": "px" }, "right": { "number": 20, "unit": "px" }, "bottom": { "number": 30, "unit": "px" }, "left": { "number": 20, "unit": "px" } }, "minHeight": { "number": 200, "unit": "px" } } } } }] }] }, { "id": "section_cta", "type": "EssentialElements\\Section", "settings": { "design": { "backgrounds": { "layers": [{ "type": "gradient", "gradient": { "type": "linear", "angle": { "number": 135, "unit": "deg" }, "stops": [{ "color": "#ff5722", "position": { "number": 0, "unit": "%" } }, { "color": "#e64a19", "position": { "number": 100, "unit": "%" } }] } }] }, "size": { "padding": { "top": { "number": 80, "unit": "px" }, "right": { "number": 40, "unit": "px" }, "bottom": { "number": 80, "unit": "px" }, "left": { "number": 40, "unit": "px" } } }, "layout": { "alignment": { "alignItems": "center", "textAlign": "center" } } } }, "children": [{ "id": "heading_cta", "type": "EssentialElements\\Heading", "settings": { "content": { "text": "Interesse geweckt?", "htmlTag": "h2" }, "design": { "typography": { "size": { "number": 40, "unit": "px", "breakpoints": { "phone_landscape": { "number": 28, "unit": "px" } } }, "weight": "700", "color": "#ffffff" }, "size": { "margin": { "bottom": { "number": 20, "unit": "px" } } } } } }, { "id": "text_cta", "type": "EssentialElements\\Text", "settings": { "content": { "text": "Kontaktieren Sie uns für eine unverbindliche Beratung oder Probefahrt!" }, "design": { "typography": { "size": { "number": 18, "unit": "px", "breakpoints": { "phone_landscape": { "number": 16, "unit": "px" } } }, "weight": "400", "lineHeight": { "number": 1.6, "unit": "" }, "color": "#ffffff" }, "size": { "maxWidth": { "number": 600, "unit": "px" }, "margin": { "top": { "number": 0, "unit": "px" }, "right": "auto", "bottom": { "number": 30, "unit": "px" }, "left": "auto" } } } } }, { "id": "button_cta", "type": "EssentialElements\\Button", "settings": { "content": { "text": "Jetzt anfragen", "link": { "type": "url", "url": "/kontakt", "target": "_self", "nofollow": false } }, "design": { "style": { "background": { "type": "color", "color": "#ffffff" }, "color": "#ff5722", "border": { "enabled": false } }, "typography": { "size": { "number": 18, "unit": "px" }, "weight": "600", "letterSpacing": { "number": 0.5, "unit": "px" } }, "size": { "padding": { "top": { "number": 18, "unit": "px" }, "right": { "number": 50, "unit": "px" }, "bottom": { "number": 18, "unit": "px" }, "left": { "number": 50, "unit": "px" } } }, "borders": { "radius": { "topLeft": { "number": 50, "unit": "px" }, "topRight": { "number": 50, "unit": "px" }, "bottomLeft": { "number": 50, "unit": "px" }, "bottomRight": { "number": 50, "unit": "px" } } }, "effects": { "boxShadow": { "shadows": [{ "horizontal": { "number": 0, "unit": "px" }, "vertical": { "number": 8, "unit": "px" }, "blur": { "number": 20, "unit": "px" }, "spread": { "number": 0, "unit": "px" }, "color": "rgba(0, 0, 0, 0.25)", "inset": false }] }, "hover": { "background": { "type": "color", "color": "#f5f5f5" }, "transform": { "scale": { "number": 1.05, "unit": "" } }, "boxShadow": { "shadows": [{ "horizontal": { "number": 0, "unit": "px" }, "vertical": { "number": 12, "unit": "px" }, "blur": { "number": 30, "unit": "px" }, "spread": { "number": 0, "unit": "px" }, "color": "rgba(0, 0, 0, 0.3)" }] } } } } } }] }] }DATEI 4: Isoliertes CSS
Dateiname:
4-isolated-css.css/* * ============================================ * PRODUKTSEITEN-SIDEBAR - 100% ISOLIERTES CSS * ============================================ * Version: 1.0.0 * Datum: 2024-01-15 * Autor: Breakdance Master-Anleitung * * WICHTIG: Betrifft NUR Elemente mit den Custom Classes: * - .produktseiten-menu (Sidebar Container) * - .produktseiten-sidebar-column (Template Spalte) * * Beeinflusst KEINE anderen Teile der Website! * ============================================ */ /* ============================================ 1. SMOOTH ACCORDION ANIMATION ============================================ */ .produktseiten-menu .breakdance-menu-list { transition: max-height 0.4s cubic-bezier(0.4, 0, 0.2, 1), opacity 0.4s cubic-bezier(0.4, 0, 0.2, 1); overflow: hidden; } /* ============================================ 2. CARET SMOOTH ROTATION ============================================ */ .produktseiten-menu .breakdance-menu-link-caret { transition: transform 0.3s cubic-bezier(0.4, 0, 0.2, 1); display: inline-block; } .produktseiten-menu .breakdance-menu-link[aria-expanded="true"] .breakdance-menu-link-caret { transform: rotate(180deg); } /* ============================================ 3. ACTIVE STATE (Via JavaScript) ============================================ */ /* Aktive Seite: Orange Text + Hintergrund */ .produktseiten-menu .breakdance-menu-link.js-active-page { color: #ff5722 !important; background-color: rgba(255, 87, 34, 0.08) !important; font-weight: 600 !important; position: relative; } /* Parent-Kategorie: Orange Balken links */ .produktseiten-menu .breakdance-menu-link.js-active-parent { border-left: 3px solid #ff5722; padding-left: 13px !important; background-color: rgba(255, 87, 34, 0.06) !important; color: #ff5722 !important; font-weight: 600 !important; } /* ============================================ 4. LINK HOVER TRANSITIONS ============================================ */ .produktseiten-menu .breakdance-menu-link { transition: all 0.2s ease; } .produktseiten-menu .breakdance-menu-link:hover { transform: translateX(2px); } /* ============================================ 5. GPU-BESCHLEUNIGUNG (Performance) ============================================ */ .produktseiten-menu .breakdance-menu-list, .produktseiten-menu .breakdance-menu-link-caret { transform: translateZ(0); backface-visibility: hidden; } /* ============================================ 6. RESPONSIVE: STICKY OFF ON MOBILE ============================================ */ @media (max-width: 767px) { .produktseiten-sidebar-column { position: relative !important; } } /* ============================================ 7. OPTIONAL: SMOOTH SCROLL (Falls gewünscht) ============================================ Kommentar entfernen, falls du sanftes Scrollen aktivieren möchtest. ACHTUNG: Falls bereits in deinem Theme vorhanden, NICHT aktivieren! ============================================ */ /* html { scroll-behavior: smooth; scroll-padding-top: 120px; } */ /* ============================================ ENDE: PRODUKTSEITEN-SIDEBAR CSS ============================================ */DATEI 5: Isoliertes JavaScript
Dateiname:
5-isolated-javascript.js/* * ============================================ * PRODUKTSEITEN-SIDEBAR - ACTIVE STATE * ============================================ * Version: 1.0.0 * Datum: 2024-01-15 * Autor: Breakdance Master-Anleitung * * WICHTIG: Betrifft NUR Links innerhalb von .produktseiten-menu * Beeinflusst KEINE anderen Menüs auf der Website! * * FUNKTIONSWEISE: * 1. Läuft beim Seitenladen * 2. Liest die aktuelle URL * 3. Findet passende Links im Sidebar-Menü * 4. Setzt automatisch CSS-Klassen: * - .js-active-page (exakter Match) * - .js-active-parent (übergeordnete Kategorie) * * KEINE PFLEGE NÖTIG! Funktioniert automatisch für neue Seiten. * ============================================ */ (function() { 'use strict'; // Debug-Modus (auf false setzen für Produktion) const DEBUG = true; // Logger-Funktion function log(message, data) { if (DEBUG) { if (data) { console.log('[Produktseiten-Sidebar] ' + message, data); } else { console.log('[Produktseiten-Sidebar] ' + message); } } } // Warte bis DOM fertig geladen ist if (document.readyState === 'loading') { log('DOM lädt noch, warte auf DOMContentLoaded...'); document.addEventListener('DOMContentLoaded', initProductMenu); } else { log('DOM bereits geladen, starte sofort'); initProductMenu(); } /** * Hauptfunktion: Initialisiert das Produktseiten-Menü */ function initProductMenu() { log('=== INITIALISIERUNG GESTARTET ==='); // Aktuelle URL ohne Domain und Query-Parameter const currentPath = window.location.pathname; log('Aktuelle URL:', currentPath); // Alle Menu-Links im Sidebar finden // WICHTIG: Nur Links innerhalb von .produktseiten-menu! const menuLinks = document.querySelectorAll('.produktseiten-menu .breakdance-menu-link'); if (!menuLinks.length) { log('❌ FEHLER: Keine Menu-Links gefunden!'); log('Mögliche Ursachen:'); log('1. Custom Class "produktseiten-menu" fehlt am Div'); log('2. Global Block wurde nicht eingefügt'); log('3. Seite nutzt nicht das Produktseiten-Template'); return; } log('✅ ' + menuLinks.length + ' Menu-Links gefunden'); let activePageFound = false; let activeParentFound = false; // Jeden Link durchgehen und prüfen menuLinks.forEach(function(link, index) { const linkHref = link.getAttribute('href'); if (!linkHref) { log('⚠️ Link ' + (index + 1) + ' hat keine href-Attribut'); return; } log('Prüfe Link ' + (index + 1) + ':', linkHref); // EXAKTER MATCH: Aktive Seite if (linkHref === currentPath) { link.classList.add('js-active-page'); activePageFound = true; log('✅ AKTIVE SEITE gefunden:', linkHref); } // PARENT MATCH: Übergeordnete Kategorie // z.B. /produkte/cupra-formentor → /produkte ist Parent if (currentPath.startsWith(linkHref) && linkHref !== '/' && linkHref !== currentPath) { link.classList.add('js-active-parent'); activeParentFound = true; log('✅ AKTIVER PARENT gefunden:', linkHref); } }); // Zusammenfassung log('=== ERGEBNIS ==='); log('Aktive Seite gefunden:', activePageFound ? 'JA' : 'NEIN'); log('Aktiver Parent gefunden:', activeParentFound ? 'JA' : 'NEIN'); if (!activePageFound && !activeParentFound) { log('⚠️ HINWEIS: Kein Match gefunden!'); log('Mögliche Ursachen:'); log('1. URL-Format stimmt nicht überein (Slash am Ende?)'); log('2. Link im Menu Builder fehlt'); log('3. Du bist nicht auf einer Produktseite'); } log('=== INITIALISIERUNG BEENDET ==='); } })(); /* * ============================================ * ENDE: PRODUKTSEITEN-SIDEBAR JAVASCRIPT * ============================================ */
SCHRITT-FÜR-SCHRITT-ANLEITUNG
Produktseiten-Vorlage mit den 5 Dateien erstellen
WAS DU BEKOMMST
Am Ende hast du:
✅ Fertige Produktseiten-Vorlage zum Duplizieren
✅ Sticky-Sidebar mit Accordion-Menü (links, 25%)
✅ Automatisches Active-State-Highlighting (orange)
✅ Template das bei allen Produktseiten automatisch lädt
✅ Beispiel-Produktseite „Cupra Formentor“ als Kopiervorlage
⚠️ WICHTIG: Die JSON-Dateien
Die JSON-Dateien 1-3 sind STRUKTURREFERENZEN, da Breakdance keinen direkten JSON-Import für Custom-Built-Strukturen unterstützt.
Du hast 2 Optionen:
Option A: Schnell (empfohlen für Anfänger)
→ Nutze nur Datei 4 (CSS) und Datei 5 (JavaScript)
→ Baue die Struktur manuell (dauert 30-40 Min mit meiner Anleitung)
→ Erstelle eine Master-Produktseite als Duplikat-Vorlage
Option B: Vollständig
→ Nutze die JSON-Dateien als Nachschlagewerk
→ Baue alles manuell nach den exakten Settings
→ Nutze CSS & JavaScript für Active State
→ Ich zeige dir jetzt OPTION A (am praktischsten!)
GESAMTABLAUF (40 MINUTEN)
| Phase | Was du machst | Zeit | Dateien |
|---|---|---|---|
| 1 | Sidebar mit Menü erstellen | 15 Min | – |
| 2 | Template mit Sticky-Sidebar | 10 Min | – |
| 3 | Master-Produktseite erstellen | 10 Min | JSON als Referenz |
| 4 | CSS + JavaScript einfügen | 5 Min | Datei 4 + 5 |
| 5 | Testen & Duplikat-Workflow | 5 Min | – |
VORBEREITUNG: Dateien bereitstellen
Schritt 0: Dateien auf Desktop speichern
Erstelle einen Ordner „Produktseiten-Breakdance“ und speichere dort:
1-global-block-produkt-sidebar.json→ Als Nachschlagewerk2-template-produktseiten.json→ Als Nachschlagewerk3-page-cupra-formentor.json→ Als Nachschlagewerk4-isolated-css.css→ Zum Copy & Paste5-isolated-javascript.js→ Zum Copy & Paste
→ Öffne Datei 4 und 5 in einem Texteditor (Windows: Notepad, Mac: TextEdit)
️ PHASE 1: SIDEBAR ERSTELLEN (15 Min)
Schritt 1: Hauptseite „Produkte“ anlegen
- WordPress → Seiten → Erstellen
- Titel:
Produkte - Veröffentlichen
- Notiere dir die URL: z.B.
/produkte
Schritt 2: Global Block „Produkt-Sidebar“ erstellen
- WordPress → Breakdance → Global Blocks
- „Add Global Block“
- Name:
Produkt-Sidebar - „Edit in Breakdance“
Schritt 3: Container mit Schatten bauen
A) Div hinzufügen:
+ Add → Div
B) ⭐ WICHTIG: Custom Class setzen
Div auswählen
→ Sidebar rechts → Advanced (ganz unten scrollen)
→ CSS Classes: produktseiten-menu
→ Enter drücken
→ Diese Klasse isoliert das CSS später!
C) Styling (öffne JSON Datei 1 als Referenz):
Design → Backgrounds:
- Type: Color
- Color:
#f9f9f9
Design → Borders:
- Border Radius:
12px(alle Ecken)
Design → Effects → Box Shadow:
Shadow 1:
Horizontal: 0
Vertical: 4
Blur: 20
Spread: 0
Color: rgba(0, 0, 0, 0.08)
+ Add Shadow (Shadow 2):
Horizontal: 0
Vertical: 1
Blur: 4
Spread: 0
Color: rgba(0, 0, 0, 0.04)
Design → Size → Padding:
Alle Seiten: 20px
Schritt 4: Menu Builder einfügen
A) Menu Builder hinzufügen:
Im Div: + Add → Menu Builder
B) Settings (siehe JSON Datei 1, Zeile 74-180):
Content Tab:
- Keep Menu Selected While Styling: ✅ AN
- Menu:
— None —(manuell bauen)
Design → Desktop Menu:
- Vertical: ✅ AN
- Vertical Layout:
Accordion - Open Dropdowns on Click: ✅ AN
- Transition Duration:
0.3s
Design → Desktop Menu → Links:
Typography:
Font Size: 15px
Font Weight: 500
Color: #333333
Effect (Hover):
Effect Type: Background
Color: rgba(255, 87, 34, 0.05)
Size:
Padding: 10px 16px
Space Between: 4px
Dropdown Arrows:
Color: #999999
Size: 12px
Gap: 8px
Closed Rotation: 0
Open Rotation: 180
Design → Desktop Menu → Dropdowns → Wrapper:
Background: #ffffff
Padding: 8px 0
Border Radius: 6px
Box Shadow: 0 2px 8px rgba(0,0,0,0.06)
Dropdowns → Links:
Padding: 8px 16px 8px 24px
Color: #666666
Hover Color: #ff5722
Schritt 5: Menü-Struktur aufbauen
A) Menu Dropdown hinzufügen:
Menu Builder ausgewählt
→ + Elements (oben links)
→ Menu Dropdown
B) Hauptlink „Produkte“:
+ Elements → Menu Link
Content:
├─ Text: Produkte
└─ Link: /produkte
Design → Typography (optional):
├─ Font Size: 16px
└─ Font Weight: 600

→ Ziehe den Link IN den Menu Dropdown (Drag & Drop)
C) Unterlinks hinzufügen:
Im Menu Dropdown (unter „Produkte“):
+ Elements → Menu Link
├─ Text: Cupra Formentor
└─ Link: /produkte/cupra-formentor
+ Elements → Menu Link
├─ Text: Cupra Ateca
└─ Link: /produkte/cupra-ateca
+ Elements → Menu Link
├─ Text: Seat Leon
└─ Link: /produkte/seat-leon
+ Elements → Menu Link
├─ Text: Seat Ibiza
└─ Link: /produkte/seat-ibiza
Struktur-Check:
Menu Builder
└─ Menu Dropdown
    ├─ Menu Link: "Produkte"
    └─ [Dropdown-Inhalt:]
        ├─ Menu Link: "Cupra Formentor"
        ├─ Menu Link: "Cupra Ateca"
        ├─ Menu Link: "Seat Leon"
        └─ Menu Link: "Seat Ibiza"
Schritt 6: Global Block speichern
Deaktiviere "Keep Menu Selected While Styling"
→ Save (oben rechts)
→ Builder verlassen
✅ SIDEBAR FERTIG!
️ PHASE 2: TEMPLATE ERSTELLEN (10 Min)
Schritt 7: Custom Template anlegen
WordPress → Breakdance → Templates
→ Add Template
→ Scrolle zu: "Add Custom Template"
→ Wähle: Page
→ Warnhinweis: "Yes, Create Template"
→ Name: Produktseiten Template
Schritt 8: Condition setzen
+ Add Condition
├─ Type: Page Parent
├─ Operator: is
└─ Value: Produkte

→ Save Conditions
→ Template lädt automatisch bei allen Unterseiten von „Produkte“!
Schritt 9: Template-Layout bauen (siehe JSON Datei 2)
A) Section:
+ Add → Section

Design → Backgrounds:
└─ Color: #ffffff

Design → Size:
├─ Padding: 40px 60px
└─ Max Width: 1440px
B) Columns (25% / 75%):
In Section: + Add → Columns
→ Layout: 25% / 75%

Columns-Element auswählen:

Layout → Spacing:
├─ Column Gap: 40px (Desktop)
├─ Tablet-Icon: 30px
└─ Mobile-Icon: 15px

Layout → Alignment:
└─ Align Items: Start
Schritt 10: Linke Spalte (Sidebar) konfigurieren
A) ⭐ Custom Class setzen:
Klicke in linke Spalte (25%)
→ Advanced → CSS Classes: produktseiten-sidebar-column
→ Enter
B) Spalten-Größe:
Design → Size:
├─ Width: 25%
└─ Min Height: 400px
C) Global Block einfügen:
In linker Spalte: + Add → Global Block
→ Content → Global Block: Produkt-Sidebar
D) ⭐ Sticky aktivieren:
Linke Spalte auswählen (nicht das Global Block!)
→ Settings (⚙️ Zahnrad-Icon oben rechts)
→ Animations → Sticky:
    ├─ Toggle: ✅ AN
    ├─ Position: Top
    ├─ Top Offset: 100
    └─ Z-Index: 999
E) Mobile verbergen:
Settings → Responsive
→ Wechsle zu Mobile-Icon (Handy)
→ Hide On Mobile: ✅ AN
Schritt 11: Rechte Spalte (Content-Area)
Klicke in rechte Spalte (75%)

Design → Size:
├─ Width: 75%
└─ Padding: 0 (alle Seiten)

→ Bleibt LEER (Content kommt später pro Seite)
Schritt 12: Template speichern
Save (oben rechts)
✅ TEMPLATE FERTIG!
✨ PHASE 3: MASTER-PRODUKTSEITE ERSTELLEN (10 Min)
Schritt 13: Erste Produktseite anlegen
WordPress → Seiten → Erstellen
├─ Titel: Cupra Formentor
├─ Elternseite: Produkte
└─ Beitragsbild: Auto-Bild hochladen

→ "Edit in Breakdance"
→ Template lädt automatisch! Sidebar ist bereits da!
Schritt 14: Content-Sections bauen (Referenz: JSON Datei 3)
Jetzt füllst du die RECHTE SPALTE (75%) mit Content:
SECTION 1: Hero
+ Add → Section

Design → Size → Padding: 0 0 40px 0
A) Bild:
+ Add → Image
→ Featured Image auswählen

Design → Size:
├─ Width: 100%
├─ Margin Bottom: 30px
Design → Borders:
└─ Border Radius: 12px
Design → Effects → Box Shadow:
├─ Vertical: 10px
├─ Blur: 40px
└─ Color: rgba(0, 0, 0, 0.15)
B) H1:
+ Add → Heading
├─ Text: Cupra Formentor
└─ HTML Tag: H1

Design → Typography:
├─ Font Size: 48px
├─ Font Weight: 700
├─ Letter Spacing: -0.5px
└─ Color: #1a1a1a

Design → Size:
└─ Margin Bottom: 15px
C) Tagline:
+ Add → Text
└─ Text: "Entfesseln Sie sich – Performance trifft auf pure Eleganz."

Design → Typography:
├─ Font Size: 20px
├─ Font Weight: 400
└─ Color: #666666

Design → Size:
├─ Max Width: 700px
└─ Margin Bottom: 0
SECTION 2: Beschreibung
+ Add → Section

Design → Size → Padding: 60px 0
A) H2:
+ Add → Heading
├─ Text: Übersicht
└─ HTML Tag: H2

Design → Typography:
├─ Font Size: 32px
├─ Font Weight: 700
└─ Color: #1a1a1a

Design → Size:
└─ Margin Bottom: 25px
B) Text:
+ Add → Rich Text

→ Füge 2-3 Absätze ein:
"Der Cupra Formentor ist kein Typ fürs Hinterherlaufen: Kraftvolles Design,
moderne Technologie und vielfältige Personalisierungsmöglichkeiten machen
ihn zum Eyecatcher auf der Straße.

Mit seinem markanten Äußeren und der kraftvollen Motorisierung bietet der
Formentor ein außergewöhnliches Fahrerlebnis..."

Design → Typography:
├─ Font Size: 16px
├─ Line Height: 1.8
└─ Color: #333333
SECTION 3: Icon-Boxes (4 Features)
+ Add → Section

Design → Backgrounds → Color: #f9f9f9
Design → Size → Padding: 60px 0
A) H2:
+ Add → Heading
├─ Text: Ausstattung
└─ HTML Tag: H2
Design → Size:
├─ Margin Bottom: 40px
└─ Text Align: Center
B) Columns:
+ Add → Columns
→ Layout: 4 Spalten (25% / 25% / 25% / 25%)

Layout → Spacing:
├─ Column Gap: 30px
└─ Row Gap: 30px
C) Icon Box 1 (in erster Spalte):
+ Add → Icon Box

Content:
├─ Icon: bolt (⚡)
├─ Heading: Leistung
└─ Text: "Bis zu 390 PS & 4,9sek"

Design → Layout:
├─ Layout: Top
└─ Alignment: Center

Design → Icon:
├─ Size: 48px
├─ Color: #ff5722
└─ Background: Deaktiviert

Design → Typography → Heading:
├─ Font Size: 18px
├─ Font Weight: 600
└─ Color: #1a1a1a

Design → Typography → Description:
├─ Font Size: 14px
├─ Line Height: 1.6
└─ Color: #666666

Design → Backgrounds:
└─ Color: #ffffff

Design → Borders:
├─ Border: 1px solid #e5e5e5
└─ Border Radius: 12px

Design → Effects → Box Shadow:
├─ Vertical: 2px
├─ Blur: 10px
└─ Color: rgba(0, 0, 0, 0.06)

Design → Size:
├─ Padding: 30px 20px
└─ Min Height: 200px
D) Dupliziere Icon Box 1 → 3x (Rechtsklick → Duplicate)
Box 2: Icon shield-alt ️, Heading „Sicherheit“, Text „Rundum-Sicherheitspaket“
Box 3: Icon couch ️, Heading „Komfort“, Text „Hochwertigster Innenraum“
Box 4: Icon palette , Heading „Design“, Text „Einzigartiges Karosseriedesign“
SECTION 4: CTA
+ Add → Section
Design → Backgrounds:
├─ Type: Gradient
├─ Gradient Type: Linear
├─ Angle: 135deg
├─ Color Stop 1: #ff5722 (0%)
└─ Color Stop 2: #e64a19 (100%)
Design → Size → Padding: 80px 40px
Layout → Alignment:
├─ Align Items: Center
└─ Text Align: Center
A) H2:
+ Add → Heading
├─ Text: Interesse geweckt?
└─ HTML Tag: H2

Design → Typography:
├─ Font Size: 40px
├─ Font Weight: 700
└─ Color: #ffffff

Design → Size:
└─ Margin Bottom: 20px
B) Text:
+ Add → Text
└─ Text: "Kontaktieren Sie uns für eine unverbindliche Beratung!"

Design → Typography:
├─ Font Size: 18px
├─ Line Height: 1.6
└─ Color: #ffffff

Design → Size:
├─ Max Width: 600px
└─ Margin: 0 auto 30px auto
C) Button:
+ Add → Button
├─ Text: Jetzt anfragen
└─ Link: /kontakt

Design → Style:
├─ Background: #ffffff
├─ Text Color: #ff5722
└─ Border: None

Design → Typography:
├─ Font Size: 18px
├─ Font Weight: 600
└─ Letter Spacing: 0.5px

Design → Size:
└─ Padding: 18px 50px

Design → Borders:
└─ Border Radius: 50px (Pill-Shape)

Design → Effects → Box Shadow:
├─ Vertical: 8px
├─ Blur: 20px
└─ Color: rgba(0, 0, 0, 0.25)
Schritt 15: Master-Produktseite speichern
Save (oben rechts)
→ Publish
→ View Page
✅ MASTER-PRODUKTSEITE FERTIG!
→ Diese Seite wirst du später für neue Produkte duplizieren!
PHASE 4: CSS & JAVASCRIPT EINFÜGEN (5 Min)
⚠️ Schritt 16: Backup erstellen
Settings (⚙️) → Global → Custom CSS
→ Alles markieren (Strg+A) → Kopieren
→ In Textdatei speichern: backup-css.txt

Settings (⚙️) → Global → Custom Javascript
→ Alles markieren (Strg+A) → Kopieren
→ In Textdatei speichern: backup-js.txt
✅ Backup gesichert!
Schritt 17: CSS einfügen (Datei 4)
1. Öffne Datei: 4-isolated-css.css
2. Alles markieren (Strg+A) → Kopieren

3. Settings (⚙️) → Global → Custom CSS
4. Scrolle GANZ NACH UNTEN (nach deinem bestehenden CSS)
5. Füge 2-3 Leerzeilen ein
6. Einfügen (Strg+V)
7. Save Global Settings
Schritt 18: JavaScript einfügen (Datei 5)
1. Öffne Datei: 5-isolated-javascript.js
2. Alles markieren (Strg+A) → Kopieren

3. Settings (⚙️) → Global → Custom Javascript
4. Scrolle GANZ NACH UNTEN
5. Füge 2-3 Leerzeilen ein
6. Einfügen (Strg+V)
7. Save Global Settings
Schritt 19: Cache leeren
Settings (⚙️) → Global → Clear All Caches

Falls WP Rocket installiert:
→ WP Rocket → Clear Cache

Browser:
→ Strg + Shift + R (Windows)
→ Cmd + Shift + R (Mac)
✅ INSTALLATION ABGESCHLOSSEN!
PHASE 5: TESTEN & DUPLIKAT-WORKFLOW (5 Min)
Schritt 20: Funktionstest
1. Öffne: /produkte/cupra-formentor
2. Drücke F12 → Tab: Console
3. Prüfe Meldungen:

✅ [Produktseiten-Sidebar] Aktuelle URL: /produkte/cupra-formentor
✅ [Produktseiten-Sidebar] ✅ 5 Menu-Links gefunden
✅ [Produktseiten-Sidebar] ✅ AKTIVE SEITE gefunden
✅ [Produktseiten-Sidebar] ✅ AKTIVER PARENT gefunden
Schritt 21: Visuelle Prüfung
Checkliste:
- Sidebar links sichtbar? ✅
- „Produkte“ aufklappbar? ✅
- „Cupra Formentor“ orange? ✅
- „Produkte“ auch orange? ✅
- Pfeil rotiert beim Öffnen? ✅
- Hover-Effekt (Maus drüber)? ✅
- Sticky beim Scrollen? ✅
- Mobile: Sidebar ausgeblendet? ✅
Schritt 22: Duplikat-Workflow testen
A) Neue Produktseite per Duplikat erstellen:
WordPress → Seiten → Alle Seiten
→ Finde: "Cupra Formentor"
→ Hover → "Duplicate" (via Plugin z.B. "Duplicate Page")

ODER manuell:

WordPress → Seiten → Neu hinzufügen
├─ Titel: VW Golf
├─ Elternseite: Produkte
└─ "Edit in Breakdance"

→ Öffne "Cupra Formentor" in separatem Tab
→ Markiere ALLE Sections in rechter Spalte
→ Strg+C (Kopieren)
→ Wechsle zu "VW Golf"
→ Klicke in rechte Spalte (75%)
→ Strg+V (Einfügen)

→ Texte & Bilder anpassen
→ Save & Publish
B) Link im Menü hinzufügen:
Breakdance → Global Blocks → Produkt-Sidebar → Edit

→ Im Menu Dropdown: + Elements → Menu Link
├─ Text: VW Golf
└─ Link: /produkte/vw-golf

→ Save
→ Cache leeren
C) Testen:
→ Öffne: /produkte/vw-golf
→ Link "VW Golf" sollte orange sein ✅
→ Link "Produkte" auch orange ✅
✅ DUPLIKAT-WORKFLOW FUNKTIONIERT!
FERTIG! WAS DU JETZT HAST:
Dein fertiges System:
✅ Global Block „Produkt-Sidebar“ – zentrale Menü-Verwaltung
✅ Template „Produktseiten Template“ – lädt automatisch bei Unterseiten von „Produkte“
✅ Master-Produktseite „Cupra Formentor“ – perfekte Duplikat-Vorlage
✅ Automatisches Active-State-Highlighting – orange Links ohne CSS-Pflege
✅ Responsive Design – funktioniert auf Desktop, Tablet, Mobile
✅ Isoliertes CSS & JavaScript – beeinflusst nur Produktseiten
WORKFLOW: NEUE PRODUKTSEITE ERSTELLEN (5 MIN)
Standard-Prozess:
1. Seite duplizieren:
WordPress → Seiten → "Cupra Formentor"
→ Duplicate (via Plugin)

ODER manuell:
→ Neue Seite → Copy/Paste Content aus Master-Seite
2. Anpassen:
├─ Titel: z.B. "Audi Q5"
├─ Elternseite: "Produkte" ✓
├─ Slug: audi-q5
├─ Beitragsbild: Neues Auto-Bild
└─ Edit in Breakdance:
    ├─ Texte anpassen
    ├─ Bilder austauschen
    └─ Save & Publish
3. Link im Menü hinzufügen:
Breakdance → Global Blocks → Produkt-Sidebar → Edit
→ Menu Dropdown: + Elements → Menu Link
├─ Text: Audi Q5
└─ Link: /produkte/audi-q5
→ Save
4. Cache leeren & Testen:
Settings → Clear All Caches
→ Öffne: /produkte/audi-q5
→ Link sollte orange sein ✅
⏱️ Zeitaufwand: 5-10 Minuten pro Produkt
FINALE CHECKLISTE
Installation:
- Hauptseite „Produkte“ erstellt
- Global Block „Produkt-Sidebar“ gebaut
- Custom Class:
produktseiten-menugesetzt ✓ - Menu Builder konfiguriert ✓
- Schatten-Effekt eingestellt ✓
- 4 Produkt-Links hinzugefügt ✓
- Custom Class:
- Template „Produktseiten Template“ gebaut
- Condition: Page Parent = Produkte ✓
- 25% / 75% Layout ✓
- Linke Spalte: Custom Class
produktseiten-sidebar-column✓ - Sticky aktiviert (Settings → Animations) ✓
- Master-Produktseite „Cupra Formentor“ erstellt
- Hero-Section ✓
- Beschreibung ✓
- 4 Icon-Boxes ✓
- CTA-Section ✓
- CSS eingefügt (Datei 4) ✓
- JavaScript eingefügt (Datei 5) ✓
- Cache geleert ✓
- Backup erstellt ✓
Test:
- Produktseite öffnet sich ✓
- Sidebar sichtbar ✓
- Accordion funktioniert ✓
- Active State orange ✓
- Parent-Highlighting orange ✓
- Hover-Effekt funktioniert ✓
- Sticky beim Scrollen ✓
- Console-Logs korrekt ✓
- Duplikat-Workflow getestet ✓
- Andere Seiten unverändert ✓
PROFI-TIPPS
1. Duplicate-Plugin installieren:
Plugin: "Duplicate Page" oder "Yoast Duplicate Post"
→ Macht Duplizieren einfacher
→ 1-Klick-Kopie von Produktseiten
2. Snippets für schnellere Bearbeitung:
→ Speichere wiederkehrende Sections als "Global Blocks"
→ Z.B. "CTA-Section" als eigenen Global Block
→ Einfügen per Drag & Drop
3. Bilder vorbereiten:
→ Alle Produktbilder in einheitlicher Größe
→ Empfehlung: 1200x800px, WebP-Format
→ Dateiname: produkt-name-hero.webp
4. SEO-Checkliste pro Produktseite:
- [ ] Meta Title (60 Zeichen)
- [ ] Meta Description (155 Zeichen)
- [ ] Alt-Texte bei Bildern
- [ ] H1 nur einmal
- [ ] Interne Links zu anderen Produkten
HÄUFIGE PROBLEME
Problem: Active State funktioniert nicht
Lösung:
1. Custom Classes prüfen:
   → Global Block: produktseiten-menu ✓
   → Template Spalte: produktseiten-sidebar-column ✓

2. Cache leeren:
   → Breakdance + Plugin + Browser

3. URL-Format prüfen:
   → Link im Menü: /produkte/cupra-formentor
   → Seiten-URL:   /produkte/cupra-formentor
   → Müssen EXAKT übereinstimmen!
4. JavaScript-Fehler?
   → F12 → Console → Rote Fehler?
Problem: Duplikat übernimmt kein Template
Lösung:
1. Prüfe Elternseite:
   → Muss "Produkte" sein!

2. Template-Condition:
   → Breakdance → Templates → Produktseiten Template
   → Edit → Conditions
   → Page Parent = Produkte ✓

3. Cache leeren
Problem: Sticky funktioniert nicht
Lösung:
1. Min Height gesetzt?
   → Linke Spalte → Design → Size
   → Min Height: 400px ✓

2. Sticky aktiviert?
   → Settings (⚙️) → Animations → Sticky
   → Toggle AN, Position Top, Offset 100 ✓

3. Custom Class gesetzt?
   → Linke Spalte → Advanced
   → CSS Classes: produktseiten-sidebar-column ✓
ZUSAMMENFASSUNG
Was du geschafft hast:
✅ Sidebar mit Menu Builder – 15 Min
✅ Template mit Sticky-Layout – 10 Min
✅ Master-Produktseite – 10 Min
✅ CSS + JavaScript – 5 Min
✅ Testen & Duplikat-Workflow – 5 Min
Gesamt: 45 Minuten
Ab jetzt:
- Neue Produktseite in 5-10 Minuten erstellen
- Automatisches Active-State-Highlighting
- Zentrale Menü-Verwaltung
- Pixel-Perfect Design wie im Mockup
Glückwunsch! Dein Produktseiten-System ist einsatzbereit!