speed

PiHole – Sicher und werbefrei surfen mit dem Raspberry Pi

Als Mediacenter oder IoT-Lösung – der Bastelrechner Raspberry Pi ist vielseitig einsetzbar. Mit Pihole macht er sogar euer gesamtes Netzwerk werbefrei und frei von Trackern. So richtet ihr die Software Schritt für Schritt einKling.

Was ist der Unterschied von Pihole zu einem Adblocker?

Warum einen Raspberry Pi mit etwas ausstatten, das ein Adblocker im Browser auf den ersten Blick auch kann? Weil Adblocker-Plugins etwas anders funktionieren und aufgerufene Websites erst blocken, sobald sie euren PC, Mac oder das Smartphone erreicht haben. Pihole hat einen anderen Ansatz, denn es blockt Tracker, Viren-verseuchte Websites und Werbung auf DNS-Ebene.

Das heißt, dass das Pihole quasi alles ausfiltert, bevor es an die Geräte im Netzwerk ausgeliefert wird. Wie ein Sieb, das zwischen eurem Router und allen Geräten im Netzwerk arbeitet. Und es bringt den Vorteil mit, dass diese Geräte auch in den nativen Apps werbefrei sind – und nicht nur mit Plugins oder speziellen Apps. Ich blicke in deine Richtung, iPhone.

Weniger Tracking, mehr Speed

Weniger Tracker bedeuten auch gleichzeitig mehr Privatsphäre, denn die eingebauten Filter sorgen dafür, dass deutlich weniger Informationen über euer Surfverhalten gesammelt werden können. Pihole ist zwar kein Tails oder Tor, das euren Traffic über fünf Millionen Proxies und dann noch mal zur Venus schickt, blockt aber sehr viele Anbieter und gefährliche Seiten.

Weniger Werbung und weniger Gefunke von Trackern und Analytics-Anbietern bedeutet zudem weniger Traffic und schnellere Ladezeiten von Websites und Apps. Na, überzeugt? Das alles braucht ihr für die Einrichtung.

Diese Hardware brauchst du für den Raspberry Pi mit Pihole

  • Einen Raspberry Pi – im Grunde tut es jeder Raspberry, auch der Raspberry Pi 1 oder Zero. Wir empfehlen euch jedoch einen Raspberry Pi 3 und aufwärts, um die Weboberfläche vom Pihole flott nutzen zu können.
  • Ein Netzteil – oder einen USB-Anschluss mit 2A-Output oder mehr.
  • Eine Micro-SD-Karte und einen SD-Adapter, der Karten meistens beiliegt.
  • Optional: Ein Gehäuse für den Raspberry Pi.
  • Optional: Einen Hoodie, da ihr ein paar einfache Shell-Befehle kopieren werdet und dabei aussehen müsst, wie ein Hacker.

Software für Pihole


Vorbereitung der SD-Karte

  1. Ladet euch im ersten Schritt Balenaetcher (oder eine der oben erwähnten Alternativen) herunter und installiert das Tool. Balenaetcher braucht ihr, um das Betriebssystem für den Raspberry Pi auf der SD-Karte zu „installieren“. Das Image öffnen und die Dateien kopieren funktioniert übrigens nicht, da eine Partitionstabelle auf die Micro-SD-Karte geschrieben werden muss.
  2. Raspberry Pi OS findet ihr hier, wobei ihr für das Pihole nur die „Lite“-Version braucht. Bei der Veröffentlichung dieses Artikels ist das Raspberry Pi OS (32-bit) Lite (basierend auf Debian Buster). Ihr könnt aber auch die 64-Bit-Variante installieren oder die Version mit einer Desktopumgebung, falls ihr den Raspberry Pi mit Pihole noch für andere Dinge verwenden wollt.
  3. Startet Balenaetcher, wählt die heruntergeladene und entpackte Datei und dann die Micro-SD-Karte aus, die nun mit oder ohne Adapter in eurem PC stecken sollte. Checkt bitte vorher, dass ihr die richtige Micro-SD-Karte und nicht eine externe Festplatte oder den USB-Stick auswählt (den mit dem geheimen Ordner, den Mutti niemals sehen sollte).
  4. Balenaetcher schreibt das Raspberry Pi OS auf die SD-Karte, und somit wäre das gute Stück dann auch schon bereit für den Einsatz. Steckt die Karte in euren Raspberry und stöpselt ihn mit einem HDMI- und am besten einem Netzwerkkabel verbunden an die Strombuchse. Ihr braucht zudem eine Tastatur mit Bluetooth-Adapter oder ganz oldschool eine mit Kabel.


Voreinstellungen des Raspberry Pi OS

Nachdem der Raspberry Pi gebootet hat (was ein wenig nach „Matrix“ aussieht), loggt ihr euch mit folgenden Logindaten und Passwort ein:

pi
raspberry

(beziehungsweise „raspberrz“, da die Tastatur noch auf Englisch eingestellt ist)

Ich bin zwar kein Hellseher, nehme aber an, dass ihr mit hoher Wahrscheinlichkeit eine deutsche Tastatur nutzt. Damit das auch der Raspberry weiß, gebt ihr im Terminal ein:

sudo raspi-config

In dem Konfigurationstool hüpft ihr zu Punkt 4 (Localisation Options) und stellt im nächsten Schritt die Locale unter I1 auf Deutsch (DE), die Timezone (I2) auf Berlin, das Keyboard Layout (I3) auf Deutsch (DE) und WLAN Country (I4) ebenfalls auf DE. Die Punkte wählt ihr mit der Space-Taste an oder ab und wechselt mit Tab auf „Select“ beziehungsweise „Back“. Nach etwas Gerödel verlasst ihr das Menü über „Finish“ und startet den Raspberry am besten neu, mit:

sudo reboot

Nach dem Neustart ändert ihr zunächst das Passwort, damit Mr. Robot nicht so einfach Zugriff auf euren Raspberry Pi hat. Loggt euch ein (diesmal mit hoffentlich deutschem Tastaturlayout) und gebt ein:

passwd

Gebt euer aktuelles Passwort ein (raspberry) und dann euer neues, das ihr am besten in einem Passwortmanager speichert. Um das Betriebssystem auf den neuesten Stand zu bringen, führen wir ein Update durch, mit:

sudo apt update && sudo apt -y upgrade && sudo apt-get -y dist-upgrade && sudo apt -y autoremove && sudo apt -y autoclean && sync && sudo reboot

Nach dem Neustart installiert ihr nun Pihole und macht euch erstmal zum root, da Pihole bestimmte Rechte für die Installation braucht:

sudo passwd root

Vergebt jetzt ein temporäres Passwort und loggt euch als root ein, mit:

su -


Deutsche Tastatur:

  1. sudo raspi-config
  2. Punkt 4 Localisation Options
  3. l3 Change Keyboard Layout
  4. PC generic de 105 tecles (intl.)
  5. Runtergehen auf „Andere“
  6. Das Wort Duits suchen und bestätigen
  7. Dann nach oben und DUITS auswählen
  8. und dann geht es komischerweise wie gewohnt weiter


Die Installation von Pihole auf dem Raspberry Pi

Pihole bietet eine übersichtliche Oberfläche, mit der ihr weitere Einstellungen vornehmen könnt. 

Falls ihr nicht wisst, welche IP euer Pihole hat, findet ihr es so raus und notiert es am besten:

hostname -I

(das ist ein großes I, wie „Ihhh“, kein L)

Jetzt installiert ihr das Pihole über das Skript:

curl -sSL https://install.pi-hole.net | bash

Sollte das nicht funktionieren, weil curl fehlt, könnt ihr auch Folgendes tun:

wget -O basic-install.sh https://install.pi-hole.net
sudo bash basic-install.sh


Bei Problemen findet ihr weitere Infos zur Installation auf der GitHub-Seite von Pihole. Das Skript installiert und arbeitet ein bisschen vor sich hin und wird euch zwischendurch einige Fragen stellen, die ihr wie folgt, beantworten könnt:


Select Upstream DNS Provider: Cloudflare oder Google oder einer eurer Wahl.

Select Lists: Wählt hier einfach alle Listen aus.

Select Protocols: IPv4 und/oder IPv6, falls ihr IPv6 nutzt.

Do you want to use your current network settings as a static address: Gebt hier die IP-Adresse des Raspberry Pi ein, die euer Router zugewiesen hat (beziehungsweise Enter), und wählt den Router als Gateway aus – meist 192.168.0.1, aber prüft es zur Sicherheit nochmal in den Einstellungen eures Routers.

Do you wish to install the web admin interface: Ja, denn hier nehmt ihr nachher Einstellungen vor und seht, was das Pihole alles filtert.

Do you wish to install the web server (lighttpd): Ja, denn ohne läuft auch die Weboberfläche nicht oder ihr müsst euch den Server anders zusammenfrickeln.

Do you want to log queries: Ja, sofern ihr die Zugriffe in Logdateien speichern wollt.

Select a privacy mode for FTL: Je nachdem, ob ihr ein öffentliches Netzwerk betreibt oder die Anfragen schlicht und einfach komplett anonymisieren wollt (hallo DSGVO), könnt ihr hier einstellen, was genau geloggt wird.


Nach der Installation zeigt euch das Skript die Adresse des Pihole als IPv4 und/oder IPv6 sowie das Passwort für die Weboberfläche an. Loggt euch wieder als root aus und auch ein Neustart kann nicht schaden:

exit
sudo passwd -dl root
sudo reboot


Pihole als DNS-Server des Routers eintragen

Im Grunde könnt ihr den Raspberry nun an seinen Zielort verfrachten. Er braucht nur noch Strom und ein Netzwerkkabel zu eurem Router. Das Pihole funktioniert im Grunde auch per WLAN, sofern es nicht der ganz alte Raspberry Pi 1 ist. Für eine stabile Verbindung, und um etwas Frickelei zu vermeiden, solltet ihr aber ein Netzwerkkabel nutzen. Wer den Raspberry Pi übrigens nicht kennt: Das Teil hat leider keinen An- oder Aus-Schalter. Ihr macht ihn an, wenn ihr das USB-Kabel anstöpselt und fahrt ihn am besten herunter mit:

sudo shutdown now

Dann könnt ihr ihn vom Strom trennen und wieder anklemmen, wenn ihr ihn einschalten wollt. Im Idealfall wird er aber die ganze Zeit durchlaufen und Trackinganfragen, Werbung und anderen Firlefanz auf DNS-Ebene blocken. Damit das funktioniert, müsst ihr das in einem letzten Schritt eurem Router mitteilen.

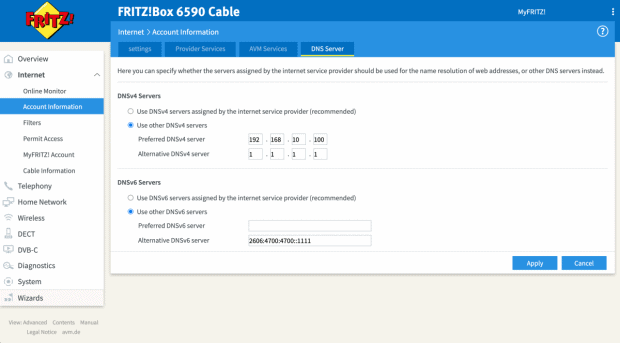
Pihole müsst ihr im Backend der Fritzbox als DNS-Server eintragen. Hier unterscheiden sich die Modelle bei ihrer Weboberfläche natürlich. Bei der Fritzbox findet ihr die Einstellung unter Internet > Zugangsdaten > DNS-Server.

Hier gebt ihr die IPv4- und/oder die IPv6-Adresse eures Pihole ein. Als Alternative empfiehlt sich noch ein zweiter DNS-Server, falls ihr den Raspberry mal wechseln, aber dennoch weiter Internet haben wollt. Hier bieten sich Cloudflare (1.1.1.1) oder Googles DNS-Server (8.8.8.8) an, aber ihr könnt natürlich nehmen, was ihr wollt.


Die Weboberfläche und weitere Einstellungen

Im Grunde sollte alles out-of-the-box funktionieren. Ihr könnt euch die Weboberfläche vom Pihole ansehen, indem ihr die IP-Adresse im Browser angebt und ein „/admin/“ anhängt, zum Beispiel:

http://192.168.0.10/admin/

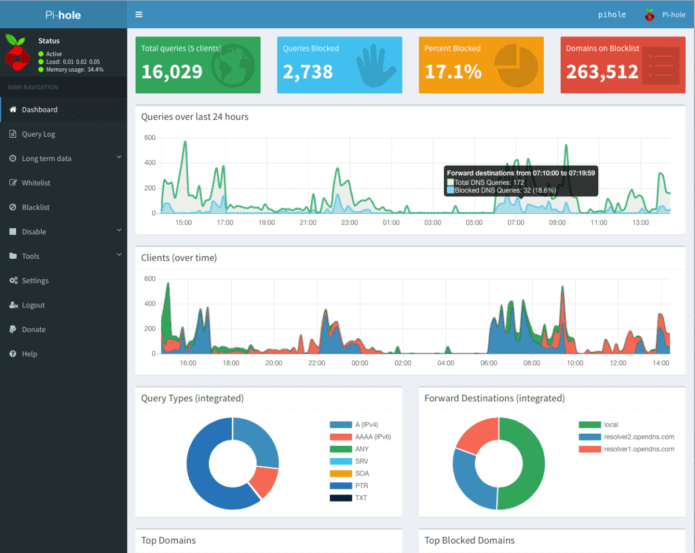
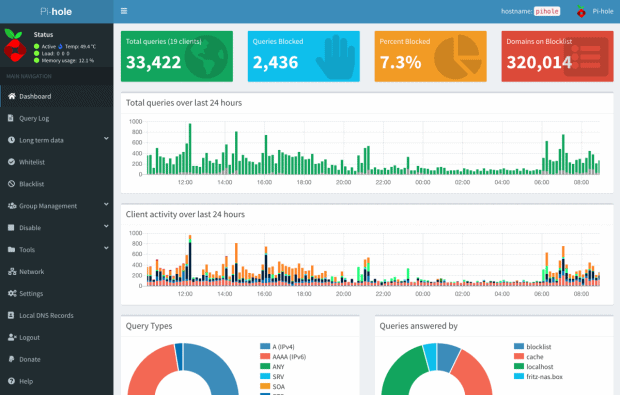
Loggt euch mit dem Passwort aus der Installation ein und ihr könnt euch auf dem Dashboard ansehen, wie viele Anfragen vom Pihole geblockt worden sind, welche Domains und Tracker das waren und so weiter. Wenn ihr die Listen aktuell halten wollt, könnt ihr unter dem Punkt Tools > Update Gravity auf Update klicken.

Eine Allow-Liste findet ihr ebenfalls im Menü links und ihr werdet sie das eine oder andere Mal brauchen, denn manchmal blockt Pihole relativ harmlose Werbetracker oder versaut euch Links in Newslettern, da diese meist über Tracking-Tools laufen. Setzt die entsprechenden Domains dann einfach auf die Liste oder schaltet Pihole kurzzeitig mit einem Klick auf Disable aus und wählt, für wie lange er ausbleiben soll.

Wer möchte, kann das Pihole auch als DHCP-Server nutzen, DNSSEC aktivieren, als rekursiven DNS-Server mit Unbound nutzen, weitere Adblock-Listen hinzufügen oder die Allow-Lists automatisch updaten lassen. Auf die gehört übrigens auch www.t3n.de – ist ja klar. Wie ihr das alles anstellt, erfahrt ihr hier:

Als kleiner Tipp: Wenn das Blocken mal nicht direkt funktioniert, wartet ein paar Minuten, bis euer Netzwerk das Pihole als DNS-Server „vermittelt“ hat. Oder startet euer Gerät ein Mal neu. Das gleiche gilt auch, wenn ihr das Pihole im Menü kurzzeitig ausschaltet, denn ein paar Sekunden lang wird es Tracker immer noch blocken.


Neue Ad-Block Filterlisten in Pi-hole einbinden


Standardmäßig enthält Pihole 5.0 aktuell 7 Filterlisten zum Blocken von Domains bzw. Webseiten. Diese ermöglichen Pihole das Filtern von unerwünschten Inhalten wie z.B. Werbebannern oder unerwünschten Scripten. Durch das Hinzufügen weiterer Filterlisten lässt sich die Zahl der unerwünschten Domains sehr einfach erhöhen. Wir wollen euch heute zeigen, wie ihr euren Pi-hole noch besser im Ad-Blocking machen könnt.

Filterlisten gibt es wie Sand am Meer. Wichtig ist, dass diese Listen gepflegt werden, denn die Listen werden nicht nur einmal in Pihole eingebunden, sondern regelmäßig auf Änderungen geprüft. Wir haben für euch ein paar Listen bzw. Webseiten zusammengetragen:

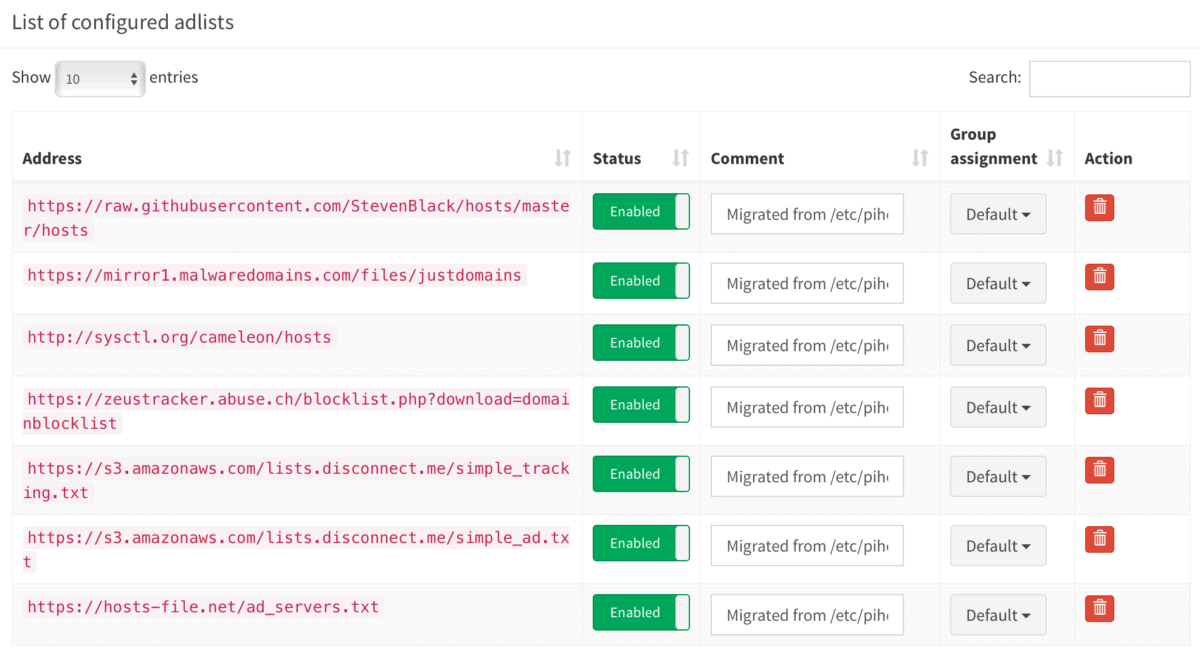
for blocklists i’m using

https://raw.githubusercontent.com/StevenBlack/hosts/master/hosts https://mirror1.malwaredomains.com/files/justdomains http://sysctl.org/cameleon/hosts https://zeustracker.abuse.ch/blocklist.php?download=domainblocklist https://s3.amazonaws.com/lists.disconnect.me/simple_tracking.txt https://s3.amazonaws.com/lists.disconnect.me/simple_ad.txt https://hosts-file.net/ad_servers.txt https://raw.githubusercontent.com/HenningVanRaumle/pihole-ytadblock/master/ytadblock.txt https://github.com/anudeepND/youtubeadsblacklist/blob/master/domainlist.txt https://v.firebog.net/hosts/lists.php?type=tick

for blacklists i’m using

ad.doubleclick.net clients6.google.com googleads.g.doubleclick.net i1.ytimg.com pagead2.googlesyndication.com pubads.g.doubleclick.net r1—sn-vgqsen7z.googlevideo.com r1.sn-vgqsen7z.googlevideo.com r17—sn-vgqsenes.googlevideo.com r2—sn-vgqs7n7k.googlevideo.com r20—sn-vgqs7ne7.googlevideo.com r20.sn-vgqs7ne7.googlevideo.com r4—sn-vgqs7nez.googlevideo.com r4.sn-vgqs7nez.googlevideo.com securepubads.g.doubleclick.net static.doubleclick.net www.youtube-nocookie.com

I’ve had decent success with this regex

^r[0-9]*([-]{1,3}|.)sn-[a-z0-9]{4,}-[a-z0-9]{4,}\.googlevideo

It’s not perfect, but does block about 80% of the ads that play during streaming, but only about 40% of the ads that play before the video begins.


Einbinden neuer Filterlisten in Pi-Hole

Ab der Version 5 von Pi-Hole befindet sich die Verwaltung der Filterlisten im Gruppen-Management der Software. Ihr könnt mehrere Gruppen definieren, die dann auf unterschiedliche Blocklisten zugreifen können.

 
Nach dem Einbinden neuer Blocklisten müssen diese noch über die im Bereich Tools vorhandene Funktion Update Gravity in Pi-Hole aktiviert werden.


pihole5-list-tool

Installing Python packages

sudo apt update
sudo apt install python3-picamera

sudo apt install python3-pip

installation

If you don’t sudo pip3 install, things won’t work – possibly in a very confusing way. Definitely on Raspbian 10, so probably before that.

$ sudo pip3 install pihole5-list-tool --upgrade

usage / running

Simply run:

$ sudo pihole5-list-tool

Finishing up

After adding lists, they must be loaded by running:

$ pihole -g


allowlists

Currently the only source for maintained whitelists is anudeepND’s allowlist. They are presented as:

  • Allowlist Only – Domains that are safe to allow i.e does not contain any tracking or

      advertising sites. This fixes many problems like YouTube watch history,
      videos on news sites and so on.
    
  • Allowlist+Optional – These are needed depending on the service you use. They may contain some

      tracking sites but sometimes it's necessary to add bad domains to make a
      few services to work.
    
  • Allowlist+Referral – People who use services like Slickdeals and Fatwallet need a few sites

      (most of them are either trackers or ads) to be whitelisted to work
      properly. This contains some analytics and ad serving sites like
      doubleclick.net and others. If you don't know what these services are,
      stay away from this list. Domains that are safe to whitelist i.e does
      not contain any tracking or advertising sites. This fixes many problems
      like YouTube watch history, videos on news sites and so on.
    

ad/blocklists

Currently the only source for maintained blocklists is firebog.net

  • Non-crossed lists: For when someone is usually around to whitelist falsely blocked sites
  • Ticked lists: For when installing Pi-hole where no one will be whitelisting falsely blocked sites
  • All lists: For those who will always be around to whitelist falsely blocked sites


Zusätzliche Whitelists

Gibt es, um mal welche zu nennen:

Aber die Ersteller/Verwalter von Blocklists sollten Einträge aus solchen Whitelists eigentlich bereits aus ihren Listen entfernt haben.


IP-Adresse oder sonstige Netzwerkeinstellungen ändern

Reconfigure pi hole via command line: pihole -r

You can also change ip address in

/etc/pihole/setupVars.conf


Updating

Updating is as simple as running the following command:

pihole -up


How do I set or reset the Web interface Password?

The Web interface password needs to be reset via the command line on your Pi-hole. This can be done locally or over SSH. You will use the pihole command to do this:

pihole -a -p

You will be prompted for the new password. If you enter an empty password, the password requirement will be removed from the web interface.

Mozilla Firefox: Vier kleine Änderungen, die den Browser noch schneller machen.

Der Firefox ist mit knapp einem Drittel Marktanteil in Deutschland der beliebteste Webbrowser. Die schier unerschöpflichen Einstellungsmöglichkeiten und (kostenlosen) Erweiterungen sind wohl „schuld“ daran. Jeder Nutzer kann den Browser für seine eigenen Zwecke anpassen und optimieren. Aber alle legen hohen Wert auf die Schnelligkeit. Und die kann man natürlich auch noch verbessern.

Der erste Beschleunigungstipp führt über den Befehl about:config. Gib diesen Befehl in die Adresszeile ein und bestätige mit [Eingabe] und bestätige die nachfolgende Warnmeldung.

Über das Suchfeld rufst du nacheinander die zwei Einstellungen network.http.pipelining und network.http.proxy.pipelining auf und änderst den Wert per Doppelklick von false auf true.

Anschließend rufst du auf die gleiche Weise die Option network.http.pipelining.max-optimistic-requests auf und änderst den Wert von 4 auf 8.

Im letzten Arbeitsschritt suchst du den Eintrag network.http.pipelining.ssl und setzt per Doppelklick den Wert von false auf true.

Ab sofort sollte Firefox spürbar schneller arbeiten.

Noch weitere Tipps

ABOUT:CONFIG

Der erste Trick führt hier auch wieder über about:config. Gib diesen Befehl in die Adresszeile ein, drücke die Taste [Eingabe], und bestätige die Warnmeldung mit der Schaltfläche Ich werde vorsichtig sein, versprochen!

Anschließend rufst du über das Suchfeld zuerst die Funktion network.http.max-connections auf. Mit einem Doppelklick auf den Eintrag öffnest du die Dialogbox und änderst darin den Wert von 256 auf 48. Mit OK bestätigst du die Änderung.

Über das Suchfeld navigierst du nun zum Eintrag network.http.max-persistent-connections-per-proxy und änderst nach obigem Vorbild den Wert auf 12.

FASTERFOX

Im zweiten Tipp nutzt das Add-On Fasterfox auch die Leerlaufzeit des Firefox, um eingebettete URL´s auf Webseiten schon im Voraus zu laden, um sie bei Bedarf schneller anzeigen zu können. Dies erhöht die Surfgeschwindigkeit.

Fasterfox kannst du auf der Add-On-Seite von Mozilla herunterladen und installieren. Nach einem Neustart des Browsers ist die Erweiterung aktiv und einsatzbereit.

Standardmäßig ist Fasterfox auf das Geschwindigkeits-Profil Turbo eingestellt, dass aber eine höhere Serverlast zufolge hat.

Insgesamt kannst du aus fünf Profilen wählen:

  • Standard – nutzt die „normalen“ Standardwerte des Browsers und ist somit eigentlich nutzlos
  • Moderat – Optimiert nur den Aufbau der aufgerufenen Webseite ohne Serverbelastung
  • Optimiert – verbessert die Geschwindigkeit im Rahmen der RFC-Spezifikationen
  • Turbo – Hohe Geschwindigkeit und erhöhte Serverlast
  • Angepasst – erweiterte Optionen zur individuellen Geschwindigkeitseinstellungen

Zu den Profilen von Fasterfox gelangst du über den Menübutton oben rechts und dem Kontextmenü-Eintrag Add-Ons.

Performance des Browsers erheblich beschleunigen

Egal welchen Browser du verwendest, mit der Zeit werden alle etwas langsamer und es dauert länger bis die Startseite geöffnet wird. Der Grund dafür sind die Informationen, die der Browser sammelt, was dazu führt, dass die Profildatei des Webbrowsers mehr und mehr fragmentiert wird. Da hilft es nur bedingt, die Browserdaten manuell zu bereinigen. In diesem Fall hilft das Programm SpeedyFox weiter. Die Performance der von diesem Tool unterstützen Programme kann bis zu dem Faktor 3 verbessert werden.

Das Tool SpeedyFox ist kostenlos auf der Webseite des Anbieters Crystalidea als ZIP-Datei erhältlich. Entpacke das Tool an seinem Bestimmungsort, beende deinen Browser, und starte das Tool mit einem Doppelklick auf speedyfox.exe.

SpeedyFox scannt deinen PC nach unterstützten Programmen. Wähle dann (falls nicht automatisch geschehen) die betreffenden Browser und/oder Programme aus und klicke auf Optimize!

Die Prozessoptimierung der ausgewählten Programme startet und SpeedyFox misst gleichzeitig die Zeit. Wiederhole nach dem ersten Durchlauf den Prozess mehrere Male, bis sich keine wesentliche Verbesserung mehr feststellen lässt. 

SpeedyFox ist kompatibel mit den Betriebssystemen von Windows und MAC OS X. Beim MAC wird allerdings nur der Firefox-Browser optimiert.

Unter Windows können wesentlich mehr Programme beschleunigt werden. Darunter befinden sich neben dem Firefox auch der Opera, Chrome und Thunderbird, sowie Epic, Iron, Palemoon, Skype, Yandex, Cyberfox und Slimjet.

Check Flash: Das Profi-Tool für die Analyse deiner USB-Sticks

Die meisten USB-Sticks sind billige Massenware, deren Verarbeitung zu wünschen übrig lässt. Häufig liegen die Mängel in fehlerhaften Speicherzellen und/oder an mechanischen Fehlern (z. B. brüchige Lötstellen). Wenn USB-Sticks nicht mehr die Leistung bringen die sie eigentlich sollten, dann ist es empfehlenswert, sie vor einem Neukauf erst einmal zu analysieren. Mit diesem Profi-Tool findest du schnell heraus, ob sich der Kauf eines neuen Sticks lohnt.

Das Tool Check Flash ist auf der Webseite mikelab.kiev.ua des Ukrainers Mykhailo Cherkes als kostenloser Download erhältlich. Wird dir die Webseite auf kyrillisch angezeigt, dann stellst du sie über das Symbol EN oben links auf englisch um. Danach wählst du Programs | Check Flash aus, um auf die Downloadseite zu gelangen.

flash-drive-sd-karte-speicher-test-profi-tool-check-mikelab-fehlerhaft-stick-usb

Mit einem Klick auf den Link beginnt der Download im ZIP-Format.

checkflash-tool-download-zip-datei-entpacken-mikelab-usb-stick-testen-560x212

Anschließend entpackst du das Tool Check Flash in einem beliebigen Ordner und startest es über die Startdatei ChkFlsh.exe.

SPEED-TEST

Für eine Messung der Lese- und Schreibgeschwindigkeit wählst du im Programmfenster unter Drive deinen USB-Stick oder ein anderes Flash-Speichermedium aus. Dann wählst du im Bereich Access type die Option Use temporary file aus und stellst bei Test length die Dauer One full pass ein. Mit dem Startbutton führst du dann den Speed-Test durch.

lese-schreib-geschwindigkeit-ermitteln-checkdisk-ukraine-profi-tool-analyse-flash-drive

Das Ergebnis wird im Informationsbereich bei Read speed (Lesegeschwindigkeit) und bei Write speed (Schreibgeschwindigkeit) angezeigt.

SPEICHER-GRÖSSE KONTROLLIEREN

Als erstes solltest du die Daten auf dem Speichermedium auf deiner Festplatte sichern, da sie während des Tests gelöscht werden.

Um zu ermitteln, wie groß der Speicherplatz tatsächlich ist, wählst du im Programmfenster folgende Konfiguration:

  • Drive: Auswahl des USB-Sticks oder SD-Karte
  • Access type: As physical device (NT-based-systems only)
  • Action type: Write and read test sowie Full pattern set
  • Test length: One full pass
  • Start

Bestätige anschließend die Meldung dass alle Daten auf der Karte/Stick gelöscht werden.

speicherplatz-effektiv-ermitteln-herausfinden-usb-drive-check-flash

BESCHÄDIGTE SPEICHERELEMENTE IDENTIFIZIEREN

Dieser Test wird letztendlich zeigen, ob du die Speicherkarte/USB-Stick weiterhin verwenden solltest. Werden nach dem Testende zu viele beschädigte Speicherzellen angezeigt, ist von einer weiteren Verwendung abzuraten. Das Risiko eines Totalausfalls ist dann einfach zu groß.

Vor der Speicheranalyse sollten auch hier die Daten vorab gesichert werden. Im Zuge des Tests wird das Speichermedium komplett gelöscht. Wähle anschließend folgende Optionen im Programmfenster aus:

  • Drive: Auswahl des USB-Laufwerks
  • Access type: As logigal drive (NT-based-systems only)
  • Action type: Write and read test und Small pattern set
  • Start
  • Bestätigung der Warnmeldung mit Ja.

speicherzellen-fehler-defekt-kaputt-test-usb-stick-sd-karte-flash-speicher

Nach der Verwendung des Tools Check Flash ist eine Formatierung des Wechseldatenträgers erforderlich, da verschiedene Informationen während der Tests auf dem Stick/SD-Karte abgelegt werden. Das erledigst du über den Windows Explorer, indem du per Rechtsklick auf das Laufwerk den Kontextmenübefehl Formatieren auswählst.

usb-stick-sd-karte-flash-speicher-formatieren-windows-kontext-menu

TIPP:

Falls ein mechanischer Fehler, wie defekte Lötstellen oder ein beschädigter USB-Stecker der Grund für die Fehlfunktionen ist, kann man versuchen, den eigentlichen Speicher zu retten.

Oft werden in USB-Sticks Mini-SD-Karten verbaut, die mit etwas handwerklichem Geschick aus dem Stick extrahiert werden können. 

Geschwindigkeit deiner Website optimieren

Wir alle kennen die Tools zum Messen der Geschwindigkeit einer Website: Pagespeed, YSlow, Pingdom, Webpagetest oder das Kombitool aus Pagespeed und YSlow GTMetrix. Aber wie wird zum Beispiel Browser Caching aktiviert? Wer sich damit nicht auskennt, der findet viele, viele Artikel dazu, die viel Code in sich haben und nichts erklären. Hier ist noch einer davon. 😉
Über die vergangenen Jahre habe ich dieses Gist immer wieder ergänzt, verbessert und korrigiert. Entstanden ist eine sehr praktische Sammlung von Einstellungen, die fail safe die jeweiligen Möglichkeiten des Hosters ausnutzen. Die entsprechenden Anweisungen sind in If-Abfragen gekapselt, so dass es bei guten Hostern keine Probleme mit nicht unterstützen Modulen geben sollte.

Die Einstellungen teilen sich in drei Bereiche: Komprimierung (Deflate/GZip), Browser Caching (Ablaufdatum für statische Caching-Inhalte definieren) und dem Setzen von sinnvollen Headern (Keep Alive, Accept Encoding, etc.).

#
# Sources:
# http://stackoverflow.com/questions/7704624/how-can-i-use-gzip-compression-for-css-and-js-files-on-my-websites
# http://codex.wordpress.org/Output_Compression
# http://www.perun.net/2009/06/06/wordpress-websites-beschleuinigen-4-ein-zwischenergebnis/#comment-61086
# http://www.smashingmagazine.com/smashing-book-1/performance-optimization-for-websites-part-2-of-2/
# http://gtmetrix.com/configure-entity-tags-etags.html
# http://de.slideshare.net/walterebert/die-htaccessrichtignutzenwchh2014
# http://de.slideshare.net/walterebert/mehr-performance-fr-wordpress
#
<IfModule mod_deflate.c>
# Insert filters / compress text, html, javascript, css, xml:
AddOutputFilterByType DEFLATE text/plain
AddOutputFilterByType DEFLATE text/html
AddOutputFilterByType DEFLATE text/xml
AddOutputFilterByType DEFLATE text/css
AddOutputFilterByType DEFLATE text/vtt 
AddOutputFilterByType DEFLATE text/x-component
AddOutputFilterByType DEFLATE application/xml
AddOutputFilterByType DEFLATE application/xhtml+xml
AddOutputFilterByType DEFLATE application/rss+xml
AddOutputFilterByType DEFLATE application/js
AddOutputFilterByType DEFLATE application/javascript
AddOutputFilterByType DEFLATE application/x-javascript
AddOutputFilterByType DEFLATE application/x-httpd-php
AddOutputFilterByType DEFLATE application/x-httpd-fastphp
AddOutputFilterByType DEFLATE application/atom+xml 
AddOutputFilterByType DEFLATE application/json
AddOutputFilterByType DEFLATE application/ld+json 
AddOutputFilterByType DEFLATE application/vnd.ms-fontobject 
AddOutputFilterByType DEFLATE application/x-font-ttf 
AddOutputFilterByType DEFLATE application/x-web-app-manifest+json 
AddOutputFilterByType DEFLATE font/opentype 
AddOutputFilterByType DEFLATE image/svg+xml
AddOutputFilterByType DEFLATE image/x-icon
# Exception: Images
SetEnvIfNoCase REQUEST_URI \.(?:gif|jpg|jpeg|png|svg)$ no-gzip dont-vary
# Drop problematic browsers
BrowserMatch ^Mozilla/4 gzip-only-text/html
BrowserMatch ^Mozilla/4\.0[678] no-gzip
BrowserMatch \bMSI[E] !no-gzip !gzip-only-text/html
# Make sure proxies don't deliver the wrong content
Header append Vary User-Agent env=!dont-vary
</IfModule>
## EXPIRES CACHING ##
<IfModule mod_expires.c>
ExpiresActive On
ExpiresDefault "access plus 1 week"
ExpiresByType image/jpg "access plus 1 year"
ExpiresByType image/jpeg "access plus 1 year"
ExpiresByType image/gif "access plus 1 year"
ExpiresByType image/png "access plus 1 year"
ExpiresByType image/svg+xml "access plus 1 month" 
ExpiresByType text/css "access plus 1 month"
ExpiresByType text/html "access plus 1 minute"
ExpiresByType text/plain "access plus 1 month"
ExpiresByType text/x-component "access plus 1 month" 
ExpiresByType text/javascript "access plus 1 month"
ExpiresByType text/x-javascript "access plus 1 month"
ExpiresByType application/pdf "access plus 1 month"
ExpiresByType application/javascript "access plus 1 months"
ExpiresByType application/x-javascript "access plus 1 months"
ExpiresByType application/x-shockwave-flash "access plus 1 month"
ExpiresByType image/x-icon "access plus 1 year"
ExpiresByType application/json "access plus 0 seconds"
ExpiresByType application/ld+json "access plus 0 seconds"
ExpiresByType application/xml "access plus 0 seconds"
ExpiresByType text/xml "access plus 0 seconds" 
ExpiresByType application/x-web-app-manifest+json "access plus 0 seconds" 
ExpiresByType text/cache-manifest "access plus 0 seconds" 
ExpiresByType audio/ogg "access plus 1 month" 
ExpiresByType video/mp4 "access plus 1 month" 
ExpiresByType video/ogg "access plus 1 month" 
ExpiresByType video/webm "access plus 1 month" 
ExpiresByType application/atom+xml "access plus 1 hour" 
ExpiresByType application/rss+xml "access plus 1 hour" 
ExpiresByType application/font-woff "access plus 1 month" 
ExpiresByType application/vnd.ms-fontobject "access plus 1 month" 
ExpiresByType application/x-font-ttf "access plus 1 month" 
ExpiresByType font/opentype "access plus 1 month" 
</IfModule>
## EXPIRES CACHING ##
#Alternative caching using Apache's "mod_headers", if it's installed.
#Caching of common files - ENABLED
<IfModule mod_headers.c>
<FilesMatch "\.(ico|pdf|flv|swf|js|css|gif|png|jpg|jpeg|txt|html|htm)$">
Header set Cache-Control "max-age=2592000, public"
</FilesMatch>
</IfModule>
<IfModule mod_headers.c>
 <FilesMatch "\.(js|css|xml|gz)$">
 Header append Vary Accept-Encoding
 </FilesMatch>
</IfModule>

<filesMatch "\\.(js|js.gz)$">
Header set Cache-Control "max-age=604800, private"
</filesMatch>
<IfModule mod_gzip.c>
 mod_gzip_on Yes
 mod_gzip_dechunk Yes
 mod_gzip_item_include file \.(html?|txt|css|js|php|pl)$
 mod_gzip_item_include handler ^cgi-script$
 mod_gzip_item_include mime ^text/.*
 mod_gzip_item_include mime ^application/x-javascript.*
 mod_gzip_item_exclude mime ^image/.*
 mod_gzip_item_exclude rspheader ^Content-Encoding:.*gzip.*
</IfModule>
# Set Keep Alive Header
<IfModule mod_headers.c>
 Header set Connection keep-alive
</IfModule>
# If your server don't support ETags deactivate with "None" (and remove header)
<IfModule mod_expires.c> 
 <IfModule mod_headers.c> 
 Header unset ETag 
 </IfModule> 
 FileETag None 
</IfModule>

FRITZ!Box am Hybrid-Anschluss der Telekom einsetzen

Allgemeines

Bei einem Hybrid-Anschluss kombiniert die Telekom einen DSL-Anschluss mit einer LTE-Funkverbindung. Der Internetzugang wird dabei von einem speziellen Hybrid-Router hergestellt. Dieser stellt bei Auslastung der DSL-Internetverbindung automatisch eine zusätzliche LTE-Internetverbindung her und verteilt den anfallenden Datentransfer auf beide Verbindungen.


Die FRITZ!Box kann auch mit einem zusätzlichen LTE-Mobilfunk-Stick nicht direkt an einem Hybrid-Anschluss der Telekom (z.B. MagentaZuhause Hybrid) eingesetzt werden. Sie können die FRITZ!Box jedoch an einem hybridfähigen Router anschließen und so einrichten, dass sie die Internetverbindung des anderen Routers nutzt. Mit der FRITZ!Box verbundene Telefonie- und Netzwerkgeräte können diese Verbindung dann ebenfalls verwenden.


Der Tag der Umschaltung ist gekommen…

Der NTBA wird abmontiert, der Splitter und ein vorhandener Router ebenso.  Statt dessen wird die Speedport Hybrid direkt in die 1.TAE Dose gesteckt und von dort mit DSL versorgt. Soweit so gut, die Speedport synchronisiert mit DSL, empfängt LTE und ist startbereit. Ohne die Fritz!Box könnte ich nun in der Speedport Hybrid die Rufnummern eintragen, den Endgeräten zuweisen und loslegen


ABER ICH BRAUCHE MEINE FRITZBOX. Und schon beginnt der Ernst des Lebens 🙂

!! NOCH nicht DIE FRITZBOX anschließen !!

Zunächst wird die Speedport Hybrid für den Betrieb der Fritzbox als IP-Client hinter der Speedport eingerichtet. Folgende Einstellungen erwiesen sich bei mir als ideal:


BILD 1

Die Ip Adresse habe ich auf die bei Fritzboxen gängige Adresse geändert. Der Grund war einfach: Ich betreibe einige Geräte mit fester IP Adresse, die zuvor an der „alten“ Fritzbox liefen – ohne diese Änderung hätte ich alle Geräte abändern müssen – so habe ich die IP der Speedport Hybrid geändert. Das geht folgendermaßen

BILD 2

Klick auf Heimnetzwerk, dann auf Heimnetzwerk (LAN ) und dann auf Name und Adresse des Routers.  In meinem Fall
habe ich hier dann die altbekannte Adresse der Fritzboxen genommen.

Wenn wir schon gerade auf der Seite sind, einmal auf „DHCP“ klicken. Das Fenster erweitert sich um den DHCP Bereich:


BILD 3

Auf dieser Seite habe ich den Bereich des DHCP verkleinert. Konkret statt bis zur IP Adresse 192.168.178.199 auf die Adresse 169 am Ende. Der Grund ist einfach: Bei den Geräten mit fester IP handelt es sich um meine Fotovoltaikanlage, um IP Kameras und um mehrere Access Points – die habe ich alle im Bereich ab 170 angesiedelt. Kann man so machen – muss man aber nicht 🙂


Die bisherigen Einstellungen sind nicht für Jedermann notwendig. Wenn man weniger „Spielereien“ betreibt, bleibt zu beachten: DHCP muss in meinem „Fall“  eingeschaltet bleiben. Nun gehts weiter…


In der Speedport habe ich KEINE Rufnummern eingetragen.


BILD 4


So sieht das ganze in meiner Hybrid aus.

Um nun die Fritzbox hinter der Speedport mit Leben zu Erwecken, habe ich folgende Einstellungen vorgenommen. Ich möchte an dieser Stelle betonen, daß ich nicht weiß, ob diese Einstellungen alle erforderlich sind oder ob ein Teil davon reicht.

Unter Internet / Internetverbindung und dann unter LTE deaktivieren oder Ausnahmen hinzufügen  habe ich folgende Ausnahmen hinzugefügt:


BILD 5


Klickt man hier auf „ändern“  ( oder bei Dir auf „hinzufügen“ ) kommt folgendes Fenster, bei dem ich die gezeigten Einstellungen vorgenommen habe:


BILD 6


Weiter unten kann man auf „Telekom Datenschutz“ gehen – dieser steht bei mir derzeit auf „aus“.


BILD 7


Das Alleine brachte leider auch nicht den gewünschten Erfolg, daher habe ich unter „Internet / Portfreischaltung“ weitergemacht.

Unter Port-Umleitungen und Portweiterleitungen habe ich nichts eingetragen


BILD 8

Unter „Dynamische Portfreischaltungen“ habe ich folgende Ports eingetragen:


BILD 9

Unter Anlegen stehen folgende Daten in meiner Hybrid:


BILD 10


weiter gehts…..


BILD 11


… und noch weiter….


BILD 12


langsam sind wir am Ziel…


BILD 13


geschafft 🙂

Bevor wir uns gleich der Fritzbox widmen, sollten wir noch die DSL-Daten notieren, die man auch in der Hybrid findet:

Klick hierzu auf EinstellungenSystem Informationen und dann auf Versionsnummern und DSL Informationen.

Der Downstream und der Upstream Wert sind hier wichtig. Bitte diese Daten notieren. Wie man erkennen kann, habe ich LTE mehr als nötig 🙂  Die anderen Daten habe ich ausgeschnitten..


BILD 14


Gut, soviel zur Speedport.


Bevor es nun zur Fritzbox geht, muss die eMail Adresse bei T-Online eingerichtet werden. Hierzu das Kundencenter unter kundencenter.telekom.de aufrufen


BILD 15

Im Feld eMail Adresse gibst Du nun die T-Online Zugangsnummer ein. Die Zugangsnummer findest Du auf dem weißen Zettel mit den Zugangsdaten, die Du per Post von der Telekom erhalten hast.

Das persönliche Kennwort findest Du auch auf diesem Zettel.


Anschliessend auf Login klicken.


BILD 16


Im Kundencenter dann auf „Dienste und Abos“ klicken ( der Screenshot fehlt ) und dann auf eMail.

Achtung, Stolperfalle:   Es muss ein eMail Kennwort eingerichtet werden !! Dieses kann identisch mit einem anderen Kennwort sein, es muss aber von DIR eingerichtet werden. !!!

Dieses eMail Kennwort brauchst Du gleich bei der Einrichtung der Telefonie in der Fritzbox. Also nochmal: nicht VERGESSEN !!!


Wenn wir gerade im Kundencenter sind, können wir auch gleich die „Offline-Rufannahme“ einrichten. Diese nimmt Gespräche entgegen, wenn die IP Telefonie gestört ist. Andererseits „weiß“ die
Netztechnik nicht wohin mit dem Anrufer und es passieren komische Dinge.

Also Klick auf Anschluss und Tarif, dann auf  Telefonie-Einstellungen


BILD 17


Im folgenden Fenster auf Telefonie Center starten.


BILD 18

Im folgenden Fenster kannst Du nun Deine Rufnummer auswählen, die Du bearbeiten möchtest , dann auf Weiter.


BILD 19

BILD 20


Hier dann auf Offline Rufannahme. In dem Screenshot siehst Du auch den Punkt „Anrufer blockieren“ ausgewählt – das ist hier nicht relevant, ich habe mir da
nur Freiraum von einer Bielefelder Nummer geschafft, die mir immer Millionengewinne versprochen hat ( Rufnummer ist gesperrt und kommt nun nicht mehr an ).


BILD 21


In der Offline Rufannahme kann man entweder die Sprachbox oder eine andere Rufnummer angeben. Bei einer anderen Rufnummer bitte beachten, daß Kosten anfallen können.
Ich habe hier meine Handynummer eingetragen um auch bei einem Ausfall erreichbar zu bleiben.

Wenn man die Rufnummer eingetragen hat, einfach ein paar Sekunden warten, die Nummer speichert sich automatisch.

Anschliessend kann man das Kundencenter verlassen


Jetzt geht es mit der Fritzbox richtig los 🙂

Zur Info vorweg: Ich habe der Fritzbox eine feste IP Adresse gegeben. Das hat den Vorteil, daß die Fritzbox von der Speedport nicht zwischenzeitlich neue IP Adressen bekommt
und man dann erst im Konfigurationsprogramm der Speedport nach der Fritzbox suchen muss, um die aktuelle IP zu finden. Da ich die 7390 auch als Anrufbeantworter, für meine
Dect Steckdosen ( Smarthome ) und die Faxfunktion nutze, habe ich die IP fest eingestellt.

Das geht so..


BILD 22

Zunächst einmal wird die Fritzbox noch NICHT an der Speedport angeschlossen, sondern direkt an den Rechner, mit dem Du das Konfigurationsprogramm aufrufst. Die Fritzbox darf jetzt keine Netzwerkverbindung mit der Speedport Hybrid haben !

Dann die „alte“ IP eingeben – im Regelfall ist das die 192.168.178.1.

Es öffnet sich die PIN Abfrage. PIN eingeben und auf Anmelden gehen.


BILD 23


Hier sieht man die Gesamtübersicht. Bei Internet siehst Du „eine bestehende Internetverbindung im Netzwerk wird mitbenutzt ( IP Client Modus ) und meine IP.

Ferner auch die aktuelle Firmware -hast Du die noch nicht, kein Problem – machen wir am Ende. 🙂 Bitte ganz unten die Ansicht auf „Erweitert“ einstellen, falls noch nicht geschehen.


Nun klickst Du auf Internet / Zugangsdaten und wählst die folgenden Einstellungen:


BILD 24


Wichtig hierbei „Weitere Internetanbieter“ dann „Anderer Internetanbieter“ und dann den „IP-Client Modus“ auswählen. ( sieht bei Dir anders aus, die Abbildung zeigt
das ganze nach der Fertigstellung ).

Anschliessend öffnet sich das folgende Fenster bei denen die angezeigten Punkte angeklickt werden.

Bei den Verbindungseinstellungen trägst Du unter Übertragungsgeschwindigkeit DEINE Geschwindigkeit des DSL Anschlusses ein. Diesen Wert haben wir ganz
am Anfang aus der Speedport Hybrid ausgelesen und notiert. Jetzt noch nicht auf Übernehmen klicken, sondern auf „Verbindungseinstellungen ändern“


BILD 25

BILD 26


In diesem Fenster kannst Du dann der Fritzbox eine feste IP geben. Beachte bitte, daß Du eine IP verwendest, die nicht vom DHCP der Speedport verwendet wird.

Ich habe die 198 gewählt – das geht allerdings nur, wenn man den IP Bereich wie ganz oben in der Speedport beschrieben reduziert.

Standard Gateway, Primärer DNS und Sekundärer DNS ist die IP der Speedport.


JETZT DIE FRITZBOX mit einer Kabelverbindung von LAN 1 ( Fritzbox ) auf einen LAN Steckplatz der Speedport anschließen.


BILD 27

Kommen wir zu der Stelle, an der ich 10 Tage gescheitert bin 🙂

Als erstes wählst Du „Neue Rufnummer“


BILD 28

Dieses Fenster hat es jetzt in sich. Also GENAU gucken was Du tust 🙂  Telefonie-Anbieter ist „anderer Anbieter“. Die Internetrufnummer ist Deine Rufnummer mit Vorwahl – komplett.
Aus Datenschutzgründen steht hier in der Abbildung nur die Vorwahl – hier muss aber die komplette Rufnummer mit Vorwahl eingetragen werden.

Beim Benutzernamen trägst Du Deine eMail Adresse ein ( alles KLEIN )  Die T-Online Zugangsnummer oder anonymous@t-online.de funktionierten bei mir NICHT.

Beim Kennwort trägst Du das selbst erstellte Passwort ( ehemals Webkennwort ) ein.

Registrar und Proxy sind tel.t-online.de

Anschliessend auf Weiter.


BILD 29


Man bekommt nochmal eine Übersicht zur Kontrolle ( hier steht wieder nur die Vorwahl anstatt der vollständigen Nummer wie bei Dir und der Benutzername ist geschwärzt ).

OK – auf weiter.


BILD 30


Die Rufnummer wird geprüft und erfolgreich getestet. Man denkt jetzt „Hurra, fertig“ – und das ist der größte Fehler !!!!!

Die Rufnummer wird nämlich nun mit einem grünen Punkt angezeigt und man denkt, daß alles funktioniert – tut es teilweise auch – aber man ist dennoch häufig nicht erreichbar. Es treten kuriose
Fehler auf – ich war zum Beispiel aus dem Mobilfunknetz erreichbar, aus dem Festnetz nur von IP Anschlüssen, von „alten“ Anschlüssen nicht, oder auch mal gar nicht oder auch mal von allen..

Machen wir es richtig – klicke rechts neben der Rufnummer auf „Bearbeiten“.


BILD 31


Es öffnet sich das entscheidende Fenster – mein Sohn würde hier vom „Endgegner“ sprechen 🙂

Unter STUN-Server unbedingt stun.t-online.de eintragen.

Bei Suffix für Internetrufnummern 0*49 eintragen – sonst bekommt man im Display später 494736123456 anstatt 04736123456 angezeigt. Das was links neben
dem Stern steht, ersetzt das, was rechts neben dem Stern steht.


BILD 32

Jetzt noch das Update einspielen und fertig. WLAN, Steckdosen und AB sind nicht so kompliziert – das schaffst Du alleine 🙂


BILD 33

Ein Hinweis zuletzt: Es kann sein, daß man trotz aller korrekter Einstellungen nach einigen Tagen nicht mehr erreichbar ist – warum das so ist, weiß ich momentan noch nicht – man kann entweder hierzu Speedport und Fritzbox regelmäßig neu starten – oder man installiert einfach eine Zeitschaltuhr in der Steckdose und automatisiert das ganze zum Beispiel nachts.


Alternative


Schritt 1:
Speedport Hybrid einrichten (unbedingt mit der neusten Firmware!), allerdings nicht über den Einrichtungsassistenten, sondern manuell. Telekom-Zugangsdaten eingeben. DSL-Einwahl testen. Danach kommen die Einrichtungsschritte für Telefonie. Diese auf jeden Fall abbrechen! Die Telefonie und DECT müssen auf den Speedport Hybrid komplett deaktiviert bleiben!

Zusätzlich am besten auch den „Telekom-Datenschutz“ auf aus stellen. Durch diese Option wird die 24-Stunden-Zwangstrennung des DSL-Anschlusses deaktiviert.

Schritt 2:
Die FRITZ!Box im IP-Client-Modus per LAN-Kabel mit dem Speedport Hybrid verbinden. Dabei der FRITZ!Box auf jeden Fall eine feste IP außerhalb des DHCP-Bereichs vom Speedport Hybrid vergeben.

Schritt 3:
Anschließend werden die Nebenstellen für Telekom ALL-IP eingerichtet.
Dies kann zunächst ganz normal gemäß Vorgabe passieren. Siehe dazu z.B. die Anleitung auf der AVM-Webseite
Anschließend muss jedoch jede Telekom-Nebenstelle noch bearbeitet werden, da wir beim Speedport Hybrid mit hintergelagerter AVM-Box einige Besonderheiten zu beachten haben.
Dazu die Nebenstellen einzeln bearbeiten und die Server-Einstellungen wie im folgenden Screenshot abändern:

Achtung! Bei FRITZ!OS >= 06.30 müssen die Leistungsmerkmale abweichend vom obigen Screenshot wie folgt eingestellt werden:

Die roten Balken dienen dem Datenschutz :-)

Schritt 4:
Nun ist in der FRITZ!Box unter „Eigene Rufnummern“ Reiter „Anschlusseinstellungen“ noch eine wichtige Einstellung zu tätigen:

Die FRITZ!Box soll also die Port-Weiterleitung des Speedport (die in einem der folgenden Schritte noch eingerichtet wird) alle 30 Sekunden aktiv halten. Ohne diesen Schritt ist keine zuverlässige Erreichbarkeit auf den Telekom ALL-IP-Rufnummern möglich!

Schritt 5:
Achtung! Bei FRITZ!OS >= 06.30 kann Schritt 5 komplett entfallen, da die entsprechende Einstellung bereits in Schritt 3 mit vorgenommen wurde!

Nun wird es leider noch ein bisschen eklig, denn es muss eine Option auf der FRITZ!Box aktiviert werden, die nicht im Web-Frontend zu finden ist.

Zunächst Telnet auf der FRITZ!Box aktivieren per analogem Telefon und Eingabe von #96*7*
Mit Telnet z.B. über putty auf der Box einloggen. putty gibt es hier: http://www.putty.org/
Natürlich tut es auch jeder andere Telnet-Client!

Anschließend wird die Datei voip.cfg bearbeitet, dazu wird der folgende Befehl per telnet ausgeführt:
nvi /var/flash/voip.cfg

Man befindet sich danach im Editor vi. Dort muss für jede Telekom ALL-IP-Rufmummer einzeln die folgende Änderung durchgeführt werden:
no_register_fetch = no;
ändern in
no_register_fetch = yes;

Tastenbefehle für nvi bzw. vi:
Taste i =Editormodus
Escape =Editormodus verlassen
:wq (im Befehlsmodus) speichern und verlassen

Danach unbedingt die FRITZ!Box neustarten.

Quelle für die nvi-Anleitung

Schritt 6:
Die FRITZ!Box wäre vorbereitet. Ursprünglich wurden in Schritt 6 noch Ports von außen direkt auf die FRITZ!Box weitergeleitet.
Es hat sich aber herausgestellt, dass dies mit der aktuellen Firmware des Speedport Hybrid nicht notwendig ist, da dieser den RTP-Traffic als eine Art SIP-Proxy weiterleitet. Aktuell also keine To-Dos mehr im Bereich Port-Weiterleitung. Umso besser!

Schritt 7: 
Nachdem die Port-Weiterleitung eingerichtet ist, muss auf dem Speedport nun noch eine Regel eingerichtet werden, um das Telekom ALL-IP VoIP ausschließlich über die DSL-Leitung zu senden und nicht über LTE.
Hierfür wird auf der Startseite des Speedport Hybrird das Internet-Icon ausgewählt und anschließend der Punkt „LTE deaktivieren oder Ausnahmen hinzufügen“ ausgewählt.

Der Verbindungsmodus bleibt auf DSL + LTE. Nun wird eine Ausnahme wie folgt erstellt:

Dieser Einstellung betrifft übrigens nur die FRITZ!Box als solches, WLAN-/LAN-Clients die mit einer anderen IP an der FRITZ!Box hängen, können so weiterhin DSL-/LTE-Hybrid nutzen!

Schritt 8:
Am besten noch einmal zuerst Speedport Hybrid und dann FRITZ!Box neu starten und dann sollte es das gewesen sein. Viel Spaß mit der FRITZ!Box hinter dem Speedport Hybrid!

How to Speed up WordPress

When you’ve built a WordPress blog, an important aspect of maintaining that blog is to keep it as fast as possible for your readers otherwise they will leave your site very quickly.

If you find that your blog is performing slower than you would like, there are many ways to speed up your WordPress site. It’s important to note that some of these suggestions will only provide a slight boost in speed, while others will deliver noticeable improvements.I hope to provide an in-depth guide that will show you exactly how to speed up your WordPress blog.

Build a Strong Foundation

The first part of running a fast WordPress blog is to make sure that you are working with the right tools. So first make sure that your themes, plugins and WordPress version is all updated to the most recent stable release, not only is this a good idea for performance but also for blog security too.

Next it might be time to look at upgrading your web host from a shared hosting environment. Shared hosting is good for small blogs with only a few thousand visitors per month but it might be time to look at something better. For example Blue Host now offers specialist WordPress hosting environments which are a lot faster or for a little more investment you can sign up with a managed WordPress hosting provider such as WP Engine.

Locate Any Plugins That Are Causing Slowdowns

Plugins can be some of the biggest culprits when it comes to slow loading pages that frustrate users. While each of the plugins you have installed at the moment may be necessary to the blog, it’s still important to identify which ones may be causing some slowdown, if any at all, in order to ascertain what you should do in the future regarding these plugins.

Using diagnostic plugins like P3 will actually provide you with a detailed breakdown of all of the plugins you have running and the amount of slowdown that each are causing for your website. If social-sharing plugins are the reason for some of the slowdown, you might want to consider removing these plugins and instead embed buttons for the respective social websites directly into the source code for your theme. There are also times when you can simply choose to replace one plugin for another, less demanding one.

Compress All Images

Compressing the images you’ve placed onto your nlog is also useful in cutting down page load times ever so slightly. However, simply compressing them down can also bring about a huge loss of quality in the pictures themselves. Using a tool like WP Smush.it will take out all of the bytes within the pictures that are deemed to be dispensable while still retaining the overall quality of the image. This will ensure that your images are never large enough to hamper the speeds of your site.

Remove Trash From the Database

While the autosave feature that is included with WordPress is certainly a nice feature to have, it also fills up your database with tons of data you simply don’t need, which can create slowdown for your site. This data includes all of the pingbacks, trackbacks and revisions made throughout the day. Thankfully, there are two methods of dumping this trash and freeing up a good amount of space that will make page load times quicker. For one, you could implement the WP-Optimize plugin into your WordPress, which will clean up the trash within your database on a regular and consistent basis. This ensures that only the essential website data is kept stored in the database. When you are getting ready to do this, make sure to create a back up of your most important data should anything go wrong during the procedure.

It’s also possible to directly set your WordPress to empty the trash itself on a daily basis by adding the line define(‘EMPTY_TRASH_DAYS’, 10 ); to the wp-config.php file. This allows you to manually set the number of days between each trash removal.

Utilize Browser Caching

Browser caching is an exceedingly useful trick to speeding up your WordPress, though it can be more difficult to implement than most of the tips mentioned here. Browser caching makes visiting your website speedier for customers that have already visited in the past. Expires headers are designed to tell a browser if it should take a web page from the browser’s cache. The pages stored within the cache allows the user to more quickly load the pages they’ve been to in the past, as there is already a cached version of that page within the browser. While this, of course, doesn’t work for people that have never visited before, it’s a nice tool that will keep return customers happy.

There are a number of useful and highly rated tools that you can use for browser caching, which include WP Super Cache and Hyper Cache. Each of these are easy to use for your caching needs. However, it’s essential that you install them correctly, as not doing so can make for a frustrating experience.

Place JavaScript on Bottom and CSS to Top

css-top-javacsript-bottom

Placing JavaScript and CSS at the correct areas on the pages of your website can work wonders in actually speeding it up. When it comes to CSS files, make sure to put them as close as you can to the top of the page. Though this might seem like an odd thing to do, it’s important to note that browsers won’t fully load a page until the CSS file has been fully rendered. Putting it at the top of the page helps to expedite this process as much as possible. As for JavaScript, placing it at the very bottom of the footer is the best course of action, as this typically doesn’t allow portions of a page to be parsed until after the JavaScript has been completely loaded. By doing this, there won’t be anything left to parse after the JavaScript has loaded. Both of these suggestions help to create the correct order for loading a page that will automatically improve the loading speed of that page.

Use Static HTML in the Place of PHP at Times

Static HTML and PHP should be used hand in hand throughout your WordPress site. PHP, in particular, helps to make a website more efficient and greatly minimizes the necessity of entering information a multitude of times. Despite this advantage, PHP also uses up a larger amount of server resources than static HTML. As such, you’ll want to replace the PHP with HTML code in the spots around your website where you don’t necessarily need PHP as much. While this won’t drastically reduce load times, it can help to create a reduction in speeds when combined with a few of these other tips and tools.

Remove Any Inactive Plugins

In relation to a previous tip about detecting the plugins that slow down your site the most, a great and simple means of speeding up your WordPress is by removing any plugins that are currently inactive. While WordPress plugins can be extremely appealing, particularly new ones that pop up all the time, keeping a website as quick as possible requires trimming some of the excess that has a penchant to slow pages down. Make sure to identify all of the plugins that aren’t really necessary for your website and remove them entirely. This requires more than just pressing the deactivation button, as this will still take up much needed space, which can be bothersome if you don’t have much space to spare. Once you have identified all of the plugins that you don’t need, delete them completely from your website. Depending on the amount of plugins that you end up cutting, this could improve speeds dramatically.

Try Hosting Video Externally

Unless you fall under the rare situation of actually having a ton of space and an extremely quick server, it’s highly disadvantageous to host videos directly on your own WordPress, as this can cause a huge slow down on the pages associated with the videos. Hosting the videos you make and use on your WordPress with sites like Youtube and Vimeo can help to keep your site speeds fast for all customers. This is particularly important for anyone that posts a stray video here or there. Unless your website is basically dedicated towards posting lots of videos on a regular basis, hosting externally is the preferred method of video hosting.

Compress CSS Code

You should also attempt to compress your CSS code as much as possible, similar to what you would do when compressing an image. Making the code smaller will allow your browser to basically render the code faster, thus reducing the amount of time it takes for the code and subsequent page to load. The great thing about compressing your CSS code is that there are multiple options available for doing so. For instance, it’s possible to use a service known as a CSS Drive in order to compress the code manually. However, if you make changes to the CSS code on a consistent basis, then it’s much more preferable to use the WP CSS plugin, which is designed to automatically reduce the size of your CSS files by eliminating any of the unnecessary white space contained within. With this tool, you are also provided with the ability to set an expiry time for these CSS files.

Get Rid of Pingbacks and Trackbacks

disabletrackbacks

If you’re not currently fully aware, pingbacks and trackbacks are two tools within WordPress that are designed to notify you when another blog or website has linked to your own. This helps to calculate any potential increases you could have in traffic to your site. While interesting and potentially useful at times, these features of WordPress can also be exceedingly taxing on the overall speed of your pages. As such, it’s best to go ahead and turn these notifications off. In order to properly do this, go to the “settings” section of your WordPress and further select the “Discussion” tab. Once you have arrived at that location, turn these two features to off.

Use the Keep Alive Feature

Keep Alive is a feature that sends a message from a visitor’s machine to the Web server as a means of asking permission to download a specific file. By allowing the Keep Alive feature to run in your WordPress, the visitor will be able to download a multitude of files without having to go through the permission process each and every time. This can save you a lot of bandwidth. To manually do this yourself, place the text Header set Connection keep alive into the file titled .htaccess.

By following each of these tips and recommendations, you will find that your page speed has been improved by a lot in next to no time. All of the aforementioned tips are relatively easy to implement and you will be surprised at what they can do for the amount of website traffic you receive now and in the future.

Netzwerk Geschwindigkeit Network Speed in OSX ermitteln

Ever since I’ve been using my new MacBook Air, I’ve been befuddled by how to do some of the simplest tasks in Mac OS X that I would normally do from my Windows laptop—like show the connection speed for the current Wi-Fi network. So am I using 802.11ac or not?

Normally, on my Windows 7 laptop, all I’d have to do is hover over the icon, or pop up the list—you can even go into the network details and see just about every piece of data about the network, all from the system tray. Here’s how to see your current connection information on your Mac.

Using Option-Click (Alt-Taste + Klick)

altclick

As pointed out by anon in the comments, you can simply hold down the Option key while clicking on the menu bar icon for your Airport, and it will show you the extended information in the popup display.

Very useful. Thanks!

Using the Network Utility (Netzwerkdienstprogramm)

netzwerkdie

You can use the Network Utility by using Cmd+Space to pull up the Spotlight search box and typing it in, or you can navigate through your Applications -> Utilities folder to find it.

Once you’re there, you can see the current connection speed by looking at the Link Speed, which will show the actual data rate that you’re using. This rate will change as you move around your house, so if you’re far away from the router, the rate will change, and if you’re closer, it will get higher.

Using the System Information Utility (Systembericht)

systemosx

You can open up the System Information application from Spotlight search, or through Applications -> Utilities. Once you’re there, navigate down to Network -> Wi-Fi or Network -> Airport depending on how old your MacBook and version of OS X might be, and you’ll see the current connection over on the right. In my case, I’m using Wireless-N. Perhaps it’s time to upgrade!

This can be really useful to make sure that your router is functioning the way that you think it should be. Sometimes that 802.11N router is actually defaulting to G instead, and you’re missing out on a lot of speed.

Appstore

Internet Speed Meter von Kalavathi Ekambaram

Mac OSX Speed up beschleunigen

Speed Tips

Note: the directions are based from OSX Leopard 10.5, most things should work with Snow Leopard as well

Note: the easy tips are at the top and the more complicated and better ones are at the bottom

If you are ever uncertain about doing anything listed here just skip it and move along

If you have any to add feel free to use this pages discussion board…

Install Updates

Firmware, driver, and OSX updates will help things the most. Not to mention security updates are great as well for protecting your data and privacy.

For the best update experience install a few updates at a time, restart the computer, then install some more and repeat. When doing every update simultaneously sometimes things can go wrong.

System Prefs > Software Update > „check now“

Remove Un-Necessary Apps

This fits with the whole idea that less is more. The less clutter and less stuff running the better.

If you often install and delete applications consider using AppCleaner. Even when software is removed from the Applications folder all it’s associated caches, preferences, support files, and more can still remain. These take up extra disk space and adds clutter. AppCleaner is great for this, as it removes the applications clutter instead of leaving it behind.

Keep Disk Space Free

Keep at about 10GB free for smooth running. When OSX needs to use swap space it doesn’t like to run out. OSX writes it’s swap to a file on the main system disk, so when the main disk is filled swap space becomes limited. Note, if you have more RAM or use FileVault encryption you’ll need more free space.

Disk Inventory X is a good app for finding folders and apps that are space hogs.

Reduce Number of Login Items

The less stuff running the better. When some applications are installed they also install services that are started through a users login items. Some login items are useful and others are not. Remove the low value ones and it’ll help reduce ram consumption. Although, consider leaving iTunesHelper alone as it auto launches iTunes when an iPod is plugged in.

System Prefs > Accounts > User XYZ > Login Items

Remove Un-Used System Preferences

Custom installed system preferences can be added when an application is installed or added by the user by opening „.prefPane“ extensions. Some third party system preferences don’t add any overhead while other do add and control extra processes. Simply remove the ones that go unused. The only System Preferences that you can remove are under „Other“.

To remove them either „right click“ or hit „control + left click“ to get the remove option.

Or they can also be removed from the folders „/Library/SytemPreferences“ and „/Users/user_xyz/Library/SystemPreferences“.

Turn Off Dock Animations

Any animations or effects like transparency give the system more work to do. The Dock’s effects are some of the easiest to disable. Turn off magnification and use the scale effect and/or uncheck animate opening applications.

System Preferences > Dock

Disable Un-Necessary Services

Uncheck the ones you don’t use. This will also make your computer more secure. Most normal users will need only file sharing and maybe printer sharing.

System Preferences > Sharing

Disable Fast User Switching

If only have one user on your computer disable it. Fast user switching is made to save an entire users session in memory while someone else is logged into another account. This allows very fast logins between users but uses much more ram.

System Prefs > Accounts > Login Options

Uncheck „Enable Fast User Switching“

Turn Off Bluetooth

Bluetooth is a wireless connection used by many computers, mobile devices, input devices, and headsets. If Bluetooth is left unused it is best to disable it to increase battery life on laptops and improve security.

To disable go to System Preferences > Bluetooth and turn Bluetooth off

Limit Spotlights Reach

Reducing Spotlights reach can reduce the amount of time it’s using the system and its attached disks like hard drives, usb sticks, and network drives. Certain folders are used very actively by OSX especially folders like the „Cache“ and „Log“ folder in „/Users/user_xyz/Library“ and „/Library“. Also, if large external or networked disks are attached only occasionally Spotlight can spend a lot of time indexing them. When extra disks are connected Spotlight has to track all the changes made to each disk since they’re absence. This is usually not a problem if drives are left connected or are not frequently changed.

An additional bonus of limiting Spotlights reach is it’ll make search results more relevant. The results will be cleaner than usual by reducing random results and duplicates like hundreds of „com.apple.*.plist“ files. Unless of course you use Spotlight to find obscure things frequently.


How to add items to Sportlights privacy list…

System Prefs > Spotlight > Privacy

Adding the „/Library“ and „/Users/XYZ/Library“ and „/System“ folders to the privacy list will help reduce Spotlight activity and clean up search results.

Optionally, entire disks can be added to Spotlight as well… If you want to disable Spotlight entirely just add all disks to the privacy list or see the following MacOSXHints.com hint http://www.macosxhints.com/article.php?story=20071102215912892

Disable or Remove Unused Fonts

OSX will automatically load any newly installed font. It will tend to make startup slower and use more ram.

Go to /Applications/Font Book

select the fonts you don’t want to use and choose either „Edit > Disable“ or „File > Remove“

Force Enable Quartz, Disable Beam Sync

Quartz is a hardware acceleration feature of OSX that can provide significant speedups on macs with a decent graphics card. Quartz is not always on for some reason… Beam Sync is for CRT monitors, if you use LCDs then disable it and get a little boost.

Download the „Secrets“ system pref from:

http://secrets.blacktree.com/

Disable Sync and Enable Quartz options in the System section. Its got lots of other goodies as well.

Run Maintenance Scripts Routinely

If your computer is off overnight these scripts will not run. So just leave your computer on some nights or open the Terminal and run the „periodic“ command occasionally.

Applications > Terminal

run „sudo periodic daily weekly monthly“

Let it run, and don’t close Terminal until it’s finished. It is normal for it to ask for a password.

Use Less Widgets or Disable Dashboard

Widgets use a lot of ram, I mean a lot! With a slew of them installed an extra 256MB can be allocated just for widgets even though they’re supposed to be lightweight. No need to have them running if they’re unused. So limit how many are run or disable Dashboard entirely…

Do the following to disable Dashboard:

Applications > Utilities > Terminal

enter „defaults write com.apple.dashboard mcx-disabled -boolean YES“

enter „killall Dock“

To re-enable just repeat the previous steps with „NO“ instead

Remove Extra Printer Drivers

Note: This is no longer required on Snow Leopard as printer drivers are now downloaded on demand.

A OSX default install has a huge amount of printer drivers pre-installed, taking up over 3GB! This is why it’s so easy to setup OSX with printers because it must have every driver on earth! If you don’t use many printers or don’t mind installing a driver from time to time then just remove them. Choose wisely though…

Simple go to /Library/Printers and just trash the ones you don’t want.

Remove Unused Languages and Architectures

OSX and many applications come with many languages that will never be used by most users. Many universal binary apps include copies of themselves for multiple cpu architectures like PowerPC, G5, G4, which doesn’t matter anymore when running an Intel system unless you run a lot of older apps. Removing these extra languages and architectures will save lots of disk space, easily over 1gb. Luckily there is a tool that is made just for this called Monolingual.

Be careful with this one!!! Whatever languages or architectures you delete can’t be restored which can render your system and or certain programs unusable if the wrong choices are made!!!

http://monolingual.sourceforge.net/

Main Culprits to Slowness

Luckily for OSX users viruses/spyware are not a huge problem unlike Windows, for now… The following tend to be the main cultprits.

1) Too many running processes

2) System clutter

3) Routine maintenance not running

Too Many Processes:

Programs the user is running

Menu bar items: little doohickies near the clock (top right)

Widgets = bye bye ram

Login items: background user programs = ram/cpu use

System services, and daemons: invisible happenings

With OSX it’s not uncommon to see the system running near 100 processes under normal use with a few programs open. Of course this varies widely and ideally it’s best to have as few as possible. The good news is that most of these processes are system services and are fairly insignificant in the amount of system resources they use. Luckily, most of the resource hog processes like login items and programs are manageable by users.

System Clutter:

The instantly affecting ones include any fancy graphics, having a lot of fonts or desktop icons, and multiple network connections. The fancy graphics is probably not a surprise. Although, what is surprising is having a lot of fonts actually bogs a system down through its large caches, etc. Also OSX has a history of the beach ball of death when file sharing connections are improperly terminated. For example being connected to remote computer while it’s shutdown OSX will continue to try to maintain the connection until it finally gives up (times out). Spotlight can also index and read remote drives which can cause a considerable effect. So, the more the worse…

Fancy graphics, animations, fonts

Multiple file sharing network connections

Lots of fonts

System Prefs

Desktop Icons

Low disk space

Logs, caches, databases

Broken permissions

Routine Maintenance Not Running:

OSX runs periodic maintenance scripts on a daily, weekly, and monthly basis to keep the system running smoothly. The problem is they don’t run because they’re meant to run in the early morning when most people have their computers off or sleeping. By default the daily and weekly scripts run at 3:15am based on the users clock. The monthly scripts run at 5:30am. The easiest solution is to leave to computer on overnight once in a while or open the Terminal and run the „periodic“ command occasionally.


To run the maintenance scripts manually do the following:

Open: Applications > Terminal

Type in the following and press enter: „sudo periodic daily weekly monthly“ Let it run, and don’t close Terminal until it’s finished. It is normal for it to ask for a password.


If you’re wondering what this all does here’s your answer. Each script will clean, maintain, and/or update the following.

  • Daily: System messages, logs, scratch files, temporary files (all important)
  • Weekly: Locate database, whatis man page database (not really a big deal for normal users)
  • Monthly: accounting logs (not a big deal)

Contents

  • Speed Tips
  • Install Updates
  • Remove Un-Necessary Apps
  • Keep Disk Space Free
  • Reduce Number of Login Items
  • Remove Un-Used System Preferences
  • Turn Off Dock Animations
  • Disable Un-Necessary Services
  • Disable Fast User Switching
  • Turn Off Bluetooth
  • Limit Spotlights Reach
  • Disable or Remove Unused Fonts
  • Force Enable Quartz, Disable Beam Sync
  • Run Maintenance Scripts Routinely
  • Use Less Widgets or Disable Dashboard
  • Remove Extra Printer Drivers
  • Remove Unused Languages and Architectures
  • Main Culprits to Slowness
  • Too Many Processes
  • System Clutter
  • Routine Maintenance Not Running


Mac OS X Swap File Location

If you’re curious where the swap files are stored on your Mac, they’re located at:

/private/var/vm/

This directly also contains your sleepimage file, which is essentially what your Mac has been storing in memory prior to system sleep. This file is read again when you wake your Mac up to return to it’s previous state. Anyway, back to swap files in the same directory: they are named successively swapfile0, swapfile1, swapfile2, swapfile3, swapfile4, swapfile5. You can see them for yourself with the following command:

ls -lh /private/var/vm/swapfile*

The swapfiles are generally staggered in size, ranging from 64MB to 512MB.

Disable Mac OS X Paging / Swap

Caution: I would highly recommend against modifying how Mac OS X handles memory management and swap files. Unless you know exactly what you’re doing and why, this is not a recommended adjustment. Again, if you don’t know what you’re doing, do not mess around with Mac OS X’s swapfiles or paging ability!

In the Terminal, enter the following command. This will unload the dynamic pager from the Mac OS X kernel:

sudo launchctl unload -w /System/Library/LaunchDaemons/com.apple.dynamic_pager.plist

Again, this completely disables the Mac OS X paging ability, do not mess around with this for fun.

Your next step would be to remove the swapfiles that are currently stored, they are generally pretty large (it is your virtual memory after all) and take up a fair amount of disk space.

sudo rm /private/var/vm/swapfile*

That’s all there is to it.


Onyx >>> Info >> Speicher >>> SWAP    enable / disable